Hello,
My name is Katya Somerville.
I'm a tattoo artist in Vancouver,
BC.
One thing I absolutely love is to inspire people to draw.
I also love geometry,
So get out your sketchbook,
A compass.
And ruler as well as a pen,
Pencil,
And eraser and we can get started.
So the dodecahedron today,
This shape here in the middle,
Is one of five platonic solids.
Now,
A platonic solid is a regular polyhedron where all of the edges.
.
.
Faces and angles are congruent which means they're the same shape and size and each face meets at a vertex so there's the same number of faces meet at each vertex so the dodecahedron which we'll be drawing and learning about today has 12 pentagonal faces.
Joined together and three pentagons at each vertex.
So it creates a shape,
Something similar to this.
The other four platonic solids,
Showing you my iPad here,
Is the tetrahedron,
Which has four faces.
If you think of them in 3D,
It's sort of hard to see the octahedron there,
But there's octahedron.
There is the cube here,
Or hexahedron,
The icosahedron,
And the dodecahedron.
Now,
The dodecahedron today,
That represents the elements of.
.
.
Ether,
Which Plato,
People have been studying these platonic solids for thousands of years,
And Plato coined the term platonic solid,
So that's where it comes from.
The acosahedron represents the water element,
The cube is the earth,
The octahedron is air,
And the tetrahedron is fire.
We'll let just a little bit more about the dodecaedron.
It's a beautiful symbol.
I absolutely love it.
And we'll be talking about it a little bit more as we draw.
So getting out a blank page in your sketchbook,
Let's go.
So the first thing to do is to draw a line.
Horizontally across.
Roughly the middle of the page.
If you want to line it up exactly the middle,
You can always take your ruler and mark the middle of the page like that and then let's draw a line across the page.
What I do is I line up the edge of my ruler with the edge of the page to make sure that it's fairly straight and make sure to use pencil because we will be erasing this later.
Second step is to take the compass.
You can measure to the middle of the line as well if you'd like to.
Mine's about here.
End.
Place the tip of the compass on that line in the middle.
Maybe make it about little bit smaller let's say mine is six centimeters and draw your circle now this is where the dodecahedron is going to be placed inside the circle so everything around the circle will be the edges of your design something similar to this whatever you would like to add around the edges.
So this part's a little bit complicated.
I'm going to go through it fairly slowly.
What we're going to do is make the vertical line down the middle of the page.
So in order to do that,
You can take your compass and make it bigger,
Bigger,
Bigger,
Bigger.
Maybe.
.
.
About.
.
.
How big is this now?
It doesn't have to be exactly this big as long as it's bigger than the circle.
This one's ten and a half centimeters.
As long as the line can go above the circle here.
Measure up the compass to the horizontal line where it intersects with the circle and draw a little.
.
.
Curve right at the top of the page.
And then rotate it and draw a curve at the bottom of your circle as well.
This is going to show us where the vertical line matches up.
It's a little trick to do that to make sure it's a 90 degree angle.
Now take the compass to this point and do the same thing.
So seeing where it lines up with the X.
So my X is there and the bottom.
My X is there.
Okay,
Now that you have your X's,
Draw a straight line that touches through the center of each X.
So that we can find our right angle.
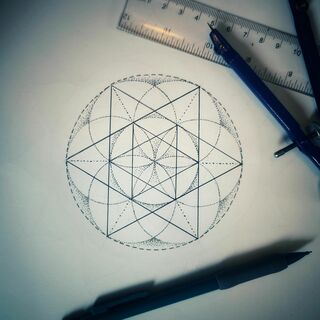
Okay i didn't extend the line too far just kept it inside the circle so now we have our right angle Okay,
So from here,
This is the part where we're going to find the pentagon.
So we're going to be creating this dodecahedron from a pentagon,
Which has five sides,
Five edges,
And five angles.
So this is a pentagon shape here.
For most of you would probably know that.
And find how much distance to put because the pentagon has five equal distance sides.
This is the trick.
Take your ruler and you can keep it the same size.
Just extend that curve that you did there at the top.
So just extending it.
And at the bottom,
Extending it.
Okay,
The same curve that you did at the top.
Now to find the measurements of the pentagon,
Let's take your compass and put it in the center this time and find out where that x goes.
At the top and the bottom.
When we found the middle line,
We used this one,
But this time we're going to use the center line.
The same measurements with the compass.
Now you see that we have another X that is drawn at the top and the bottom of the page.
So let's.
.
.
Will line up like we did the first x.
Line up the ruler.
Trying to make it as even as possible.
And make that second line in the triangle.
This will help us with our measurements of the Pentagon.
Little trick I learned.
Okay,
So now you have two lines.
If you need a minute you can pause the video.
And from here reduce the compass Two.
Match.
From this point,
The horizontal line and that vertical line we just drew,
And to match.
Pencil tip of your compass up with this point.
So this is A.
And B.
So put your compass at B,
Match it up to A.
Alright,
Now when you do that,
Make sure it goes through that point where A touches the circle,
And we're going to draw a little arc that goes all the way down and crosses the horizontal line.
One more step to find our pentagon.
This time.
Put the compass tip at A right here and make it a little bit bigger.
The compass so that you have measurement of the compass that measures from A to this new point,
Which we can call C.
So the measurement between A and C will be how long our pentagon.
Edges are.
Okay,
So it's just a few little steps if you need to rewind that and go through it,
Feel free.
Now keep going with that one and this will be the first edge of our pentagon.
Also on the other side,
Like so.
Okay,
Now from here we have.
.
.
One line of the pentagon.
And two lines of the pentagon.
You can also draw this at the end to make sure it's exact.
I'm fairly sure mine is.
I think I got my measurements right.
Now,
From one of these ends,
We'll draw a little mark.
On that side.
This will be.
.
.
Side edge of the pentagon so we kept it that same measurement between a and c Put the compass on this point and find the measurement how long this edge is.
I'll do the same thing on the other side.
Put the compass here and measure that point.
So we have the sides of our pentagon.
We're almost there.
I know how satisfying it feels to get this pentagon on your page.
Making sure that this.
.
.
Still matches up with that point.
Mine is fairly close.
Draw.
A line for the bottom of the pentagon.
There you go.
Alright,
If you need to rewind that and if I went too fast,
Please do so.
The rest of us.
Good job,
We got your pentagon.
So take your eraser now and let's erase all those marks at the top.
Keep it less confusing.
And the X is at the bottom.
Let's also erase.
Horizontal line that we the very first thing we drew we don't need that anymore trying not to erase the actual pentagon,
Turn off my heater here,
And erase that side line.
I'm pretty much just erasing everything except for the circle around it,
The pentagon and the horizontal line.
I can erase it better later.
Okay,
So from here,
Let's still call this A,
And for B,
We're going to find the measurement between half of this line.
So what's about half of the line?
If you'd like to,
There's two ways to do this.
Take your ruler.
Mine says the line is 7 centimeters,
So half of that will be 3.
5.
And draw a little mark.
That will be your B.
This one C.
Now,
Half of this line Let me show you the other way to measure half.
You can take this point over here,
Make sure the ruler goes through the center.
And this point.
There.
There and then this will be half like that.
Okay,
This is D.
Half of this line i will be doing the measure method oh f this one's already measured because of that horizontal line we drew.
Three and a half This is G,
This is H.
Bye.
And the last.
The line that we need to find the half of.
Okay,
So here we go.
We've got 10 points,
Or 10 little marks here.
1,
2,
3,
4,
5,
6,
7,
8,
9,
10.
J,
My J's upside down.
Well,
We'll be erasing these later too.
Okay,
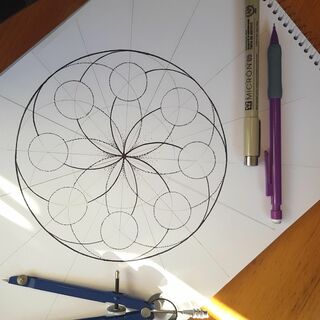
So from here,
This will be A fun little exercise with pencil.
Take your ruler,
Think about string art.
So each letter will be matched up a line to all of the other letters.
Now A already has a line that matches it to B and C.
Sorry about that.
So the next step is to take the A and match it up to D with a straight line.
Like so.
Wait.
It all the way there we go now a matching up to e This is really fun,
This part.
A is already matched up to ether.
A matching up to G.
Matching up to H.
So this A will have five new lines coming from it,
Plus the two edges on the sides.
So A has a line to H,
G,
F,
E,
And D.
Okay?
Now from there,
Keep going around and start with B.
Now B's already got a line matching it to C and A,
So let's match B and D up with a line.
Now these middle of the line segments will have seven.
So that's one.
Seven extra lines,
Two.
Three.
Six and The last one,
B and J is seven.
Okay just like that it's already starting to look really cool Now to C.
Go in order.
I find it's easier.
You won't get to sew lost.
Now this one has five.
It's fairly repetitive this step.
Use it like a meditation.
Take deep breaths.
Have fun with it.
Don't get frustrated.
Remember,
Perfection is just accepting.
It's just part of the process.
Perfection is just what it is.
It's about your heart and your soul.
I moved on to D and now I'm doing my seven lines from D.
We're not computers.
We don't have to be perfect.
In a way we are perfect.
Already.
Now my D already matched up with B,
So I just did that one again,
But I didn't have to.
Alright,
Now on to E.
My E already matches up with the first two,
So going on to E and J.
F already has matched up with those ones.
Becomes easier the more you do it.
Make sure this is in pencil because we'll be erasing some of these right after we're finished.
G just has one.
And then H is already done.
Oh,
I have to do H to J still.
There we go.
Now just make sure each one has either five or seven extra lines coming from it.
So I,
One,
Two,
Three,
Four,
Five,
Eight.
Seven five seven Alright,
Double checking.
It looks great.
So there's my string art pencil bond.
I mean,
You can stop here and just design it the way it is,
Or you can keep going with me and get the dodecahedron on your page.
So the dodecahedron is a shape that was found discovered many like thousands of years ago and a cast iron replica of this shape and nobody knows what it is used for that they found all throughout europe from england to hungary in bathhouses and temples all kinds of places i have a little picture of it here i can show you it's called a roman dodecahedron Right there.
A lot of places have been found where Celts meet the Romans in different areas of the world.
So there's been a lot of speculation about what the Roman dodecahedron was used for in the past,
But there's no written record of it anywhere.
So I find that fascinating.
I like mysteries.
Each side of the dodecahedron has a different sized hole.
And each vertice has a little knob on it.
Some people have thought that maybe it was used for knitting.
Other people thought surveying or reading the sun telling time there are many different theories about it some thought it was a children's toy why wasn't it ever documented and What is it?
But I love it that it's a dodecahedron shape.
The dodecahedron is the dual of the icosahedron.
So this is also a picture here I wanted to show you.
This is the icosahedron inside the dodecahedron.
Each point,
Each vertice of the icosahedron touches the middle.
Face of the dodecahedron.
And in this one,
Each dodecahedron point touches the face of the icosahedron if you put it inside.
So it's a dual,
Which is really interesting because the dodecahedron has 12 faces and 20 vertices,
And the icosahedron has 20 faces and 12 vertices.
Fascinating to me.
How they're those two are so interconnected the water and the ether element Oh,
This on the page as well is a photo of a whole bunch of different types of dodecahedrons that don't have regular faces,
And they're not.
.
.
Platonic solids because a dodecahedron is just classified as a convex polygon,
Polyhedron,
I mean,
That has 12 faces.
But the 12 faces don't have to all be the same.
That's just the platonic solid,
The dodecahedron,
The regular one.
But other dodecahedrons can have all different kinds of numbers of faces and sizes of faces.
Some are square,
Some are triangle.
So it's just interesting to me how many of these are there.
And different kinds and different types.
But focusing on our derby decahedron,
Thanks for that.
Hopefully you've all caught up by now.
Let's take our eraser and erase.
That pentagon in the center,
Which we can see there,
Right in the center creates a nice little pentagon.
Now it's time to take your pen.
Get your courage up.
And use the pen.
Tracing that pentagon that we see in the center.
Tracing the lines.
That you've already drawn there to make them.
Permanent on the page.
However,
If you do make a mistake,
There's always white out or jelly roll pens,
Gel pens that can help.
Correct mistakes.
But as Bob Ross used to say,
Mistakes are just happy accidents.
Now from here,
Each.
.
.
Um each point each vertice of this you can kind of see a line that goes out from it so let's trace that line hopefully yours matches up mine's not maybe this one's not 100 perfect but I just went over a little bit more from it.
So make sure that your pentagon has a line extending.
From each point Alright,
So you can sort of see where that lines up.
I know my pencil was dark,
So my pen.
.
.
I'm gonna try to make it darker so you can distinguish between them.
Just drawing a line out from each edge of our pentagram in the center.
Pentagon.
All right,
Now from here,
The line in the middle that extends out,
The second crossing of it,
So right about that spot,
You can see that each of these lines will match up to it.
So let's match up the line to that one and the line to that one.
See what I mean?
So you can tell.
That there's a line.
Here.
Here.
So each of the extender lines from the points of our pentagon will connect with.
.
.
A line that goes out.
Fairly easy to see.
If you've done your string art pentagon Well.
.
.
If not,
You might want to redo that.
Stop and try it again.
Don't give up.
You've got this.
Next one.
Each one lines up right in the center.
And the last one is right here Might be easier for you to use a ruler,
But.
.
.
I was just freehanding those lines.
All right,
So now just to erase.
Inside.
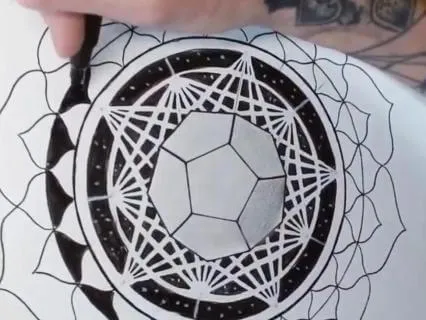
Next step to make it look more 3d is to shade now if you look at different dodecahedrons,
You see that they're.
.
.
Generally darker on the bottom and each face can be shaded a slightly different color.
I'll show you a couple of different ones so you get an idea of how different people have shaded them.
IPad here.
This one.
This one,
They shaded it with different colors,
And they kept the background in.
We just kind of did a foreground solid one.
This one here has a shadow,
Comes out the side,
And the light's obviously coming from this side here.
So thinking about how the light's coming from it,
There's the Roman dodecahedron,
And a few other things that I was going to show you,
How DNA can spiral around a dodecahedron.
And another way to create a dodecahedron is through the Flower of Life design.
Look at how this one's shaded really dark on the bottom and then this one's a little bit lighter this one's about the same this one the light's coming from here so it creates a nice dark piece at the bottom so just thinking about being creative with this thinking about where your light source is And you might want to find a darker pencil.
I just have my mechanical pencil here.
And holding the pencil back a little bit.
Nice long strokes.
To make the shading fairly even.
If you go over the edge a little bit,
That's okay too.
Starting with the dark one at the bottom This one will still be dark,
But I will make it a little bit lighter than the first one.
You can also shade these with different colors or Zentangle-y doodles inside each section.
Use your own creativity.
And just have fun with it.
It doesn't have to look just like mine.
Use your creativity.
Make it your own.
But once it's shaded,
Then the 3D-ness really comes out,
So I do suggest the shading.
Later.
The front will be really light for mine.
See if you can play around with the different shades,
Making them not all the same.
And you can use your finger to smudge it a little bit,
Blending it in.
Page.
You might want to go a little bit darker.
Now with some of them make them a little bit different.
When you're slightly satisfied with that,
Now is the time.
To check out the compass again.
And Make it a little bit smaller so that in the point in the center can match up to one of these mid line points that we did.
So maybe the B point here.
And I'm going to draw a circle.
The center that will match.
All of the midpoint areas.
Sort of going in the middle-ish of the.
.
.
Pentagon.
Of the outer pentagon.
Now I'm going to erase my outer pentagon,
Or maybe do that at the end.
It's up to you,
Because I don't want to erase all the other lines,
So it's probably easier to do it at the end.
And the next step is just to start with the negative space.
Now,
Since the dodecahedron represents the ether element,
Which isn't a recognized element in modern-day science,
Which is interesting,
Not like water,
Fire,
Earth,
And air.
Because it's not tangible.
People haven't recognized it.
It hasn't been officially recognized as an element either.
But we can use our imaginations,
Can't we?
Said that this element makes up space,
Makes up the universe.
And try.
Negative space between the lines in the negative space.
That's why I wanted to erase my pentagon is because I didn't want to get confused when I did this part.
You you Right,
Sir.
First step.
All right,
Congratulations.
I hope you made it this far.
Maybe you pause the video and.
.
.
Now we're ready for the next step.
So I love this Jelly Roll pen.
I'd suggest to get one.
Or.
.
.
Some white out and sometimes it takes a bit to get it going.
Or even a couple of tries and extend these edges.
Extend these points along to the edge.
Also with this pen.
You can make like little dots actually better it works better with dots you can even do these lines with dots and make it look more spacey And because I just finished this part,
The ink might still be wet,
So these dots might have to be gone over.
I'm going to put a few in the big areas here as well.
Okay,
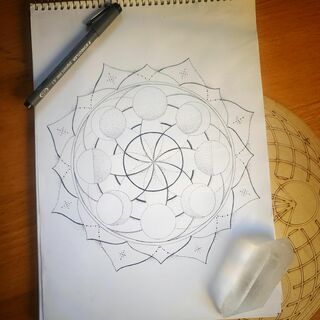
So now to instruct the instructions about the.
.
.
Mandala around the edge,
You can pretty much do what you would like.
This is one that I did during the insight timer class.
And the other one is blue.
That was the one I did.
I have another one somewhere.
Oh,
Here.
This is the Insight Timer class one.
The other one was the one I did on my own.
So now that we've erased around the edges,
I didn't quite finish doing the negative space on this one around here,
But I did on this one.
So now it's time to get this grid on.
How to do that is to take the ruler and a pencil.
And match up.
The center point of the dodecahedron with these points again.
The ones that go halfway through that.
So you can see where these points all kind of come,
This one,
This one,
This one,
To the edge of the circle.
And then from there,
That's where we can draw.
A line on down the page.
So that one,
Going to match the middle of the dodehedron up to the point to make sure it's straight.
That one This is the vertical line if you erased it,
Which I did.
So I'm going to draw another one.
So in the middle of these points,
You can see where this negative space line comes down and then immediately goes back up again.
That's a middle point.
So I'm going to match that up to there and the middle.
And you see it kind of matches up with the middle point on the bottom as well.
And draw a mid between lines like so and then keep going.
So where this negative space line stops the first intersection after the circle and then curves and goes back up,
That's the middle point.
Make sure it's lined up with the center and the one at the bottom.
And there's the grid there this one here as well.
Matches the middle here.
The middle down here and get it roughly in the center.
Got a couple of more,
Couple more.
And the last one is different.
Horizontal line if you erase that one.
Perfect.
So now these are all the right size.
Let's take our compass and.
.
.
Make the circles around the edges.
So the first one I do will just be a small one.
A little bit bigger.
And I'm going to go out a little bit bigger so it kind of looks like it's.
.
.
Coming out at us.
And the last one will even be a little bit bigger than that one.
So from here.
.
.
First thing to do is that smaller circle,
I think I'm just going to keep it white,
So using a pen,
Going over that circle carefully.
My pen's a 08.
I find it easier with a little bit thicker pens like this one than the 05.
But do what you'd like.
You can even have thicker than this.
Remember,
It doesn't have to be perfect.
Just do your best.
Okay,
So if you'd like to draw some designs in between those two circles you're free to.
This one I'm going to do some.
.
.
Uh the lotus petals points like that so how to do that is what i do is i take my pencil and i just do a little mark about in the center of each one start with that about roughly in the center because we're not computers we don't have to be perfect but it's really easy to see the center of these ones Bye-bye.
And then.
.
.
Go out and then in.
I find it's easier if I do three or four at a time than if it can be the same and you get the same hand movement like so.
And then the other side you go in and then out.
Trying to make it mirrored as much as you can.
Might want to start with pencil with this one.
Out and then in.
And in and then out.
Okay,
This one.
Very easy to see.
I'm gonna do this one a double,
Nice big thick ones.
I feel like separating these.
This is the part where you can be creative and do whatever you would like.
The eraser.
And then whatever little detail you would like to do.
My white's working better now that the black is.
.
.
Not wet.
Just calm down.
Okay.
Now whatever else you would like to do in these pedals.
Completely up to you.
Have fun.
Make it your own.
I'm gonna make this one a little bit thicker.
Love is in the details.
I'm recording the class right now so I can hear the coughing in the background but it's okay.
I'll try to edit out that part.
Maybe not.
I have a pretty good microphone.
You you you so you Thank you.
You you you so you you you you All right,
Well,
Thanks for joining me today.
It's really nice to have you here.
I hope you finished yours and did something amazing.
And,
Yeah,
Let me know and send me a copy of your finished picture if you feel called to.
Thanks again,
And I hope to see you back for another class.