Welcome to this drawing meditation,
Part one of the moon mandala.
Now as you're drawing,
I encourage you to feel the page,
Really dive into your work.
Take deep breaths,
Focus,
And clear your mind.
Just follow my instructions.
At the end of this,
You should have the beginning to a moon mandala in 20 minutes.
So in front of you is a blank page.
Make sure you have a nice sharp compass available,
A pen,
Pencil,
And ruler.
Pause this now if you need to get that.
The blank page in front of you,
Think about all the possibilities.
Look at the white,
Think of your mind being clear like the page.
Breathe into it.
Now with a clear mind,
We're going to start by finding the very center point of the page,
Lengthwise and vertically.
So take your ruler and measure about halfway horizontally on the page,
And draw a little mark.
Then line the ruler up vertically,
Aligning to that dot,
And find the midpoint of the page.
Draw a little mark where the center is.
Now we're going to start by drawing quadrants.
So where this dot is,
Keep the ruler lined up,
And measure the top of the ruler or the bottom of the ruler so that it lines up perfectly the edge of the ruler with the edge of the page.
That way we can make sure the line is straight.
If you want to measure this,
You can pause and make sure it's perfect.
But I usually just use the ruler method where I measure the very edge of one of the sides of the rulers to the edge of the page and trust that it's straight.
Draw a line down the center and across the center,
Dividing your page into four perfect quadrants.
And if it's not perfect,
That's okay too.
So thinking of perfection,
Let's try to erase that from our minds because that's where frustration and stress can happen,
And we want this to be a stress-free process as possible.
So align down vertically and align down horizontally.
Where those lines meet is the center of the page.
Now take your compass,
And we're going to put the compass right in the center point and measure so the compass extends out approximately,
Say,
8 centimeters.
And draw a big circle right in the middle of the page,
Almost extending to the end,
But we want to leave make sure there's room on each side.
Now thinking about the four quadrants,
I'd like to tell you a little fact about the moon.
The moon can represent mystery,
Cyclical change,
The sacral chakra,
And strengthening intuition.
So here we have a circle,
Which could be the moon,
And four quadrants.
Now reduce your compass to half the size so it will be four centimeters,
And draw another circle in the lining up the middle,
The point of the compass with the middle of the page.
Now you're going to have two circles on your page.
As you do that,
I'll tell you another moon fact.
This will help us to stay connected with the moon,
And our intentions for this mandala,
Which will be needing to be done in two parts.
So the moon comes from the old English expression mona,
Meaning month.
In astrology,
The moon represents a person's inner nature.
Moon signs reveal a person's emotional and subconscious state.
Now where that smaller circle intersects the top vertical line,
Draw another circle the same size.
It should just fit inside the half of the big circle.
Now not where these circles intersect,
But where the small first center circle intersects the horizontal line across the page.
That's where our next circle will be.
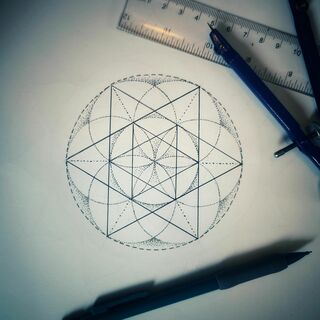
This will be an eighth point mandala,
Not the sixth like the last one,
If you did that one with us.
Where the vertical line down the middle of the page matches the bottom of the small circle in the center,
Draw another,
Mirroring the top.
And the horizontal line where that intersects the center small circle,
Draw your last inner of the four circles.
Well I guess there's five,
Including the center one.
Wonderful.
Now we can divide this mandala into eight.
So let's take the ruler and you can see where the petals match on the diagonals.
That's where we'll draw our lines.
So two lines dividing this mandala into eight pieces.
So we'll draw a line vertically one way and then vertically the other way,
Making sure the line goes through the center.
I'll give you a minute to do that.
Now this line needs to extend all the way to the end of the page.
Don't just keep it inside the mandala.
And if it's not quite lined up,
Then you can erase it and try it again.
And keeping the compass at the same size,
The four centimeters,
We're going to match up the compass with that same smaller center circle.
And all of the diagonal lines that we drew and draw four more circles that stay inside the big circle.
So the first one for me is on the right top,
Kind of in the middle.
And this will help us to divide the page one more time and make a nice little flower in the center of the page.
So we're lining up,
We're putting the compass point on where the diagonal lines that you just drew match with the small center circle.
And we're drawing four more circles where all of these diagonal lines intersect with the small center circle that we drew second,
The second circle we drew.
So four more circles.
This will create a nice little flower in the middle.
And the diagonal.
It's already looking nice.
Now the last thing to do today,
Before we start using our pen,
Is we're going to do the moons.
So we'll be drawing eight moons in this.
So I think we need to divide this into 16 now.
And with the circles we just drew,
Where they intersected the very outer edge,
That is where we're going to intersect this into 16.
So take the ruler now,
And we're going to intersect it again.
It goes through the very middle and both small petals of that little flower that you just drew and the intersection at the very end of the page near the big circle where those two circles intersect.
Draw a line all the way to the edge of the page.
Now we'll do another one.
Make sure it goes through the center.
Two.
And we have two more.
So this will be four lines in total intersecting the page into a grid,
A circular grid with 16 parts.
As you finish these lines,
I'll read you another fact about the moon.
Maria is the name for the dark lunar planes said to once be filled with water on the moon.
We can actually see them from Earth.
Maria means seas in Latin.
The moon's forces of attraction are responsible for the tides on Earth.
The moon was formed 4.
5 billion years ago.
Most people believe it's from a rock the same size as Mars when that rock rammed into the earth,
Collided with the earth.
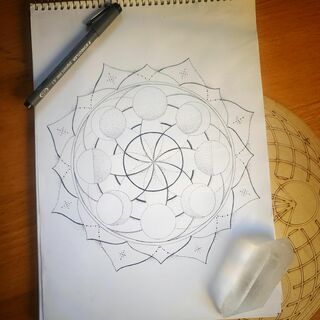
Now the last bit to do today to set up for our moon mandala part one is to draw all of the little moons.
So if you look at the top point of the page,
The very first vertical line that separates the whole page in half,
And you look down about where the circle the circles intersect.
So go down that line and then where two circles intersect,
That's where we'll draw the first little moon circle.
So reduce your compass,
Mine is about a centimeter and a half,
So that it stays in between,
So it stays in between the other two lines that you've just drawn,
And draw a little tiny circle center and a half radius,
About three centimeters in diameter.
Using the intersection of,
If you go,
If you take your finger and you move it down the diagonal line,
The vertical line that moves down the page,
That goes directly down the page,
And keep moving your finger down that line until,
Oh,
You reach a point where two circles on either side will intersect.
Not the original big circle,
The first circle we drew,
But the second two in the middle.
And now you see where the intersection is.
If you jump to the right,
That is another place to draw the same size circle.
It does really help to have a sharpened compass here.
If you need to pause and get used to using your compass in this part,
It does get harder using a compass when it's on a small setting.
Don't get frustrated,
Take a deep breath,
Use your eraser,
And use this as a lesson in moving through the frustrations,
If that's what you feel.
Keep drawing,
Going all the way around,
Until we have eight small little circles around the page.
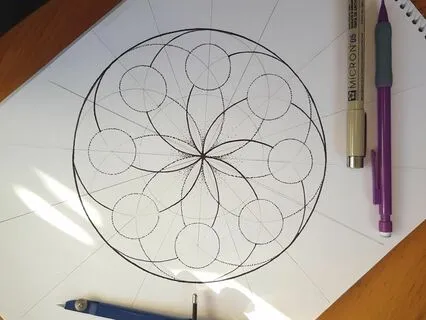
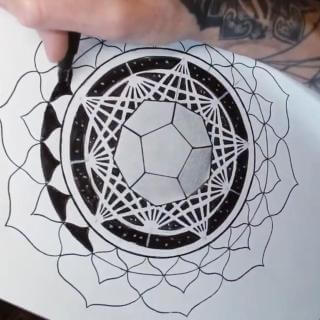
If you want to look at the picture for an example,
Feel free to do that.
Okay,
Beautiful.
So this is the last we'll be using our compass today.
In the next lesson we'll be doing all the moon phases and learning about them as well.
And now it's time to pick up our pen for the last six minutes of this meditation.
And this is the part that I absolutely love,
Where the mandala starts to come alive.
So what I've done,
And you can do the same thing if you'd like,
This helps us to feel that this mandala is moving in a clockwise direction.
And so I've taken all of,
From the center point,
All of the circles that move in a clockwise direction to the end of the outer circle,
So about half a circle,
I've drawn a line.
Now don't draw a line through those moons that you just drew,
So you might need to separate it.
And with a pen,
Anchor your hand on the page and really focus in,
Use this as a meditation,
And really noticing the point of the pen and where it's going on the page.
From the center,
In a clockwise direction,
Skip over the moon,
The moon shell,
And then keep drawing all the way to the outer edge,
The original big circle.
This will give it a feeling of being in motion.
Keep going all the way around,
Practicing drawing straight lines.
And if it's not perfectly straight,
It's okay.
Like when you're meditating,
If thoughts come in,
It's okay.
You're just doing your best.
Nobody's perfect.
That's why I love drawing on paper.
The mistakes are part of the love.
So as you're drawing these,
I'll read to you a few more facts about the moon.
The moon is not a perfect sphere.
It's actually egg-shaped.
It's said that 12 people have been on the moon,
The first being Neil Armstrong.
However,
About 20% of Americans,
As of 2019,
Don't believe that we have landed on the moon.
Hmm.
I wonder if you believe it.
If we drove a car to the moon,
It would take 130 days.
The word moon has been called different things in different places,
Such as Luna,
Cynthia,
And Celine.
I like this last fact a lot.
The moon's phases have been linked to madness.
The word lunatic comes from this association,
The Luna.
A couple of years ago,
I remember that Luna was the most popular name to name your cat.
A blue moon is when there are two full moons in one month.
The moon is a quarter of the earth's size.
The moon is also,
Every year,
Moving away from the earth about four centimeters.
So centuries ago,
The moon looked a lot bigger than it does today.
In the next drawing meditation,
We'll be learning more about the phases,
What they mean,
And feeling more connected to them.
So after you have this done,
Making sure that you don't go through one of the small moons,
If you do,
You can always,
Well,
There's a few options.
You can use whiteout,
White gel pens,
Which I have,
They work great.
You can also cut a little circle of paper from another sheet in your book and glue it over top.
So there's three options for you.
But an option is not to start all over because this is all about the perfection and imperfection.
And maybe you just want to leave it.
That's a possibility too.
So after these clockwise spirals have been penned in,
Then it's time to pen in the circle around the outside.
Now,
This can be tricky,
But just do your best.
Anchor the hand,
Use the fingers.
I like to pull my lines.
Some people prefer to push them.
Focus in on the point of the pen.
Be aware of where it's going.
And outline that entire outer circle around the entire.
We'll be adding to this later.
The last step of this,
Besides perhaps adding some dots like I did in the photo inspiration,
I added dots in the center.
Well,
Actually the rest of it is dots now looking at it.
So I outlined every single circle that will be a moon phase in dots.
It's much easier than drawing lines.
If you go dot,
Dot,
Dot,
Dot,
Dot,
Dot,
Dot,
Dot,
Dot,
Dot,
And just draw all the way around each of the circles,
The little tiny ones,
The smallest ones,
And then use dots after that to outline the petals going counterclockwise,
Like we outlined the circles,
The inner circles going clockwise.
And now we'll outline the half circles going counterclockwise,
The other side of those circles with dots.
So the lines will be used to stand out more.
So to give it the feeling of spinning.
And if you'd like to dot shade in the center,
You may do that as well.
Fade it out to let that flower really stand out.
It's okay if it's not perfect,
But I do really like dotting because each dot gets put down with the love.
Each one is a little hand gesture.
You can feel the energy,
You can feel the intention to this mandala.
And it's been 22 minutes,
So I'd like to stop there before you move on to the part two.
I'd like you just to finish off your dots and make sure you've outlined the entire mandala circle with a line.
And I'll see you in the next lesson.
Thank you so much for being here with me today,
And I hope to see you back.