Welcome.
We're going to do yoga,
Yin yoga,
With the wall today,
Utilizing it for shoulder stretching and opening.
We'll feel a lot through our hamstrings and hips.
Low back.
We'll have lots of props available to us so if you've got pillows,
Blankets,
Locks,
Straps,
Anything that you have,
Gather it.
We'll be using it today to help stretch our body and release tension.
Yin yoga works because we hold still in a pose and we utilize the props so that our body is not stressed our body can relax and let go.
And we just can release.
Anything that we're holding on to.
So for now,
You're sitting up against this wall.
You can pull your shoulder blades back against the wall and drop your chin a little bit.
And you don't have to work so hard through your abdominals to sit up straight and tall.
The wall is holding you in place.
So even here.
As we just sit and breathe.
We're allowing the wall to help us out.
To give us a little bit of support.
You can feel the rise and fall of your breath.
Just in and out through the nose but with the wall behind us.
We can feel the rib cage expanding.
And releasing.
With each breath.
We learned that our body doesn't just breathe from the chest,
But it's all around,
All around the whole rib cage,
Deep into the diaphragm.
And this breath will be present with us as we Hold our poses.
As we try to relax,
And to let go and to release.
Now open your eyes if you want and send your gaze toward your right shoulder.
Lay your head against the wall.
And feel how that twist the side of the neck here.
And our head is just resting against the wall.
So we don't have to hold the head in position.
We can just let it Stay on that side.
At the same time,
We're trying to pull the left shoulder blade back.
And toward the wall.
It may not be 100% touching.
But it's headed back toward the wall.
Our neck is a muscle just like anything else.
It gets tight.
Sometimes we hold stress.
In our neck.
In our shoulders and in our chest,
It's all connected.
And today is all about release letting go.
Good.
Now take your head gently over to the other shoulder.
Look at your shoulders roll that shoulder down that length through the neck yes gazing our right shoulder and pulling I'm sorry our left shoulder and pulling that right shoulder back toward the wall.
Just letting your head rest against the wall that you can feel that motion.
Feel that twist.
As much as you want,
You can close your eyes.
Can breathe.
Try to let go.
Come back to neutral.
Nicely done.
Let's extend our legs out.
Sometimes when we have extra tight hamstrings and hips,
It's hard to sit up straight and tall with our legs extended.
That's another one of the benefits of the wall.
So as our shoulders are rolled back,
Feet are flexed,
Just gently flexed.
You might feel a little sensation through the hamstring.
If you're not very tight in your hamstrings,
You might not feel anything at all.
But we've got this support of the wall behind us.
We feel that lengthening through the backs of the legs.
We can intensify this with the use of our blocks and,
Well,
Blocks,
Pillows,
And straps.
So let's see what we can do today.
Maybe a blanket too.
I'm just going to pull all of this closer to me.
Okay you're going to build yourself a little shelf We're keeping our back against the wall,
Keeping our hips against the wall.
And take your pillow on your leg.
You want to be able to fold forward and relax.
So I'm going to elevate mine just a tiny bit by also adding a blanket.
You might have two pillows.
And just pad it up as much as you can,
As much as you need,
I should say.
Then take your strap.
Around your feet You're going to reach forward.
And just let yourself relax.
I'm going to actually make a little pillow with my blanket here so I can turn my head to one side.
Hold on to the strap and then scoot your hips as close as you can to the wall.
Now we'll try to let ourselves relax.
I'm going to set a timer.
Just because.
.
.
I don't want to do too much on one side because,
You know,
Sometimes we might have that happen.
So I want to,
And I don't want to fall asleep.
In the position We're going to hold two minutes.
With our head facing one direction.
And then we'll turn and have our head face the other direction.
The whole time,
Try to keep your hips up against the wall.
We can feel this in our hamstrings and in our hips.
And if you lay here,
Just let yourself breathe,
Flow,
And steady.
Relax.
Now lift your head up.
Changing my timer here.
And just turn your head the other direction.
So again,
Relaxing on that.
I'm going to be softball.
Keep those hips up against the wall.
Good,
Gently press yourself back up again.
Can set your things aside for a moment and then bend your knees and bring your feet together.
Now I don't know about you but for me when I sit in baddha konasana or butterfly pose against just in the floor I can't bring my knees down very far But when I'm up against the wall,
I can use the wall then press open through the inner thigh Also feels really great on the sacrum,
On that low back.
So just allow yourself to gently press down.
Pull the heels as close as you can.
If this is excruciating,
Feel free to utilize blocks that might look something like this.
And this is great.
It feels really great on the sacrum in the low back.
And I just have my head up against the wall,
My back against the wall.
You might be this way or you might.
Be without the block.
Either way is good.
We're getting that release through the inner thigh.
Just hold here for a few moments.
You can press with your inner thigh as much or as little as you want.
With yin yoga though,
We're really trying to just let go.
So don't press a whole lot.
Just let the wall do the job,
Yeah?
It'll gently open up through here.
As we just sit here,
Gravity's weighing down on us.
Opening up the hips.
And our back just resting comfortably against that wall.
Yeah.
It does feel good.
I'm actually gonna put the timer back on again We'll stay here for two more minutes.
So like I said,
If you need to make adjustments with a block underneath,
You're welcome to do that.
And just let the wall open you up.
Just relax.
All through here Close your eyes if you'd like.
The wall is holding you.
The floor is holding you.
We're just letting gravity do its job.
That presses down.
But let's gently come out of it.
By pulling our knees together.
Hopefully they don't feel too stuck.
Readjusting just let yourself fold over round over now our back curves against the wall and you should focus on having the mid back pressing into the wall.
We won't stay here for two minutes or anything.
We'll just kind of curve for a moment.
Just fold in.
Sometimes we can create space between our vertebrae as we round the spine.
Love that position.
Good nice.
Now let's take our legs open wide to a V.
So again,
Adjusting our stuff,
We're going to bring the bolster and the pillow into the middle.
Take your legs wide now as you open your legs wide you might have to scoot yourself closer to the wall Maybe,
Depending on how you feel.
And then this is here to catch us as we fold forward.
Now,
A lot of times people are tight through here in this position,
In this wide V.
So things you can do.
You can take your blocks on top of your pillow and then put the blanket over that and let yourself hang.
If that's not high enough,
Two pillows perhaps.
So you can,
You know,
Elevate this even higher.
The higher you go,
Um,
The less you're folding forward over the top,
Right?
So it all depends on how flexible you are through here.
I'm going to try for me like this and again we have to turn our heads so I'm gonna make my little pillow as we fold forward try to keep your toes pointed to the sky And then just turn your head.
Rest on that pillow and the arms down by your side so again i'm going to take the timer as we fold into this pose.
This one we're going to hold a little bit longer.
Three minutes on each side because sometimes it just takes that much time to open up through the inner side.
So just rest your head.
Let your hands drop down.
Hopefully you've found a position that feels comfortable to you.
And then let's just go.
Now if you notice that your hips have crept away from the wall,
Try to scoot back.
Try to keep your hips anchored on the wall the entire time.
Relax.
Breathe deep.
Just let it go.
You feel your breath coming and going.
You hear your breath coming and going.
But we don't even necessarily focus on it.
We just let it happen.
The longer we hold,
The more our body is going to give in.
It's going to say,
Okay.
All relax,
All let go.
If you want me to,
I will.
We say yes.
Please let go.
Please relax.
Breath by breath.
Nicely done.
Let's turn our head to the other side.
Oh,
That's my timer.
There we go.
Take three minutes on the other side.
Good,
Let's gently lift up You might be able to stay there all day.
I don't know about you guys.
Gently press up.
Let's move this stuff out of the way.
Might feel a little stiff stuck so gently pull your legs back in Very nice.
Let's move ourselves away from the wall just a tiny bit.
Do a little bit of cat and cow,
A little bit of spinal movement.
So drop your belly down,
Shoulders roll back,
Inhale,
Send your gaze up.
Exhale round through the spine pull and lift tucking your chin tucking those hips Inhale,
Arch,
Belly drops down.
Exhale round just really massaging our spine one more inhale arch Exhale round.
Come back to neutral.
Let's get up onto our feet.
We're not going to leave the wall behind.
We're going to utilize the wall for a couple more things.
A little more shoulder movement and some hamstrings.
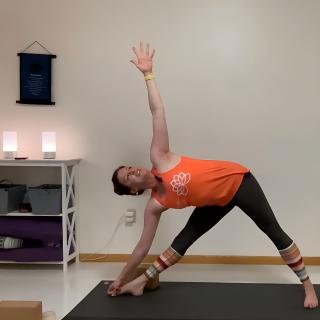
So start by moving into a triangle pose against the wall.
So we'll pull our right heel back so that it touches the wall and then the left leg is straight.
Then place your left hand on the hip.
I think I'm saying it backwards.
So it's my left heel that is against the wall.
Right hand on my leg.
Left hand on my hip.
Pull your shoulder back against the wall.
So I'm laying against the wall.
Now,
If I were to do this in the middle of the floor,
Like a traditional triangle pose,
I might fall over,
But the wall's gonna catch up.
And extend that arm straight up.
Just press against the wall you can deepen if you want to but keep your shoulder and your arm against the wall the whole time Let's just take a breath here.
Inhale.
Exhale.
Come up.
Good job.
Widen out just a little bit by bending i'm going to step forward with my right foot my left heel is still against the wall drop your right forearm to your thigh and then this left arm let's make a rainbow we're going to reach it up overhead and try to keep connection with the wall the entire time If your shoulder is really tight,
Your chest is really tight this might be really hard Do your best.
Move slow.
And just feeling that wall behind you,
Something to reach for.
Something to hold on to maybe one more Good.
Good,
Gently lift up.
Nicely done let's switch our feet So now we're going to press that right heel against the wall here.
Left foot is not on the wall because we've got our hip here and our glute and we're not flat people so you'll fall over Then lean.
Hand to the hip,
Right hand to the hip,
Pull your shoulder back.
Extend that arm trying to keep your arm on the wall and your shoulder and your chest open Shoulder on the wall,
Arm on the wall.
Go down as far as you want.
So not only for this area here,
But maybe you can feel it through here as well.
A little stretch a little opening up of that hip and side body Take one more breath here.
Inhale.
Exhale.
Lift up very nice let's bend widen out just a little bit but keep that right heel Against the wall.
Good.
Drop your forearm.
Right shoulder and arm Making that rainbow.
Connect to the wall the whole time.
Just kind of waving it around.
Feeling the movement through the shoulder socket,
But the connection.
To the wall Nice.
Pulling open right here,
Stretching out through the chest.
Good.
That reach.
Very nice.
Good.
Good.
Lift up.
Nicely done.
Come together.
One more thing standing,
Then we're going to take it back onto our back.
Grab your block.
Place it down on the floor and then walk your heels back against the wall.
So your heels and your hips are against the wall and you're reaching for your block.
Depending on how flexible you are in the backs of your legs and your hamstrings,
You might be able to lower the blocks even lower it one more time.
Or you might be able to go without it completely.
I'm gonna go one level.
I just think I like that better.
Just press the heels against the wall,
Press the hips against the wall.
This is for the hamstrings.
Low back you can relax your neck Just let it hang.
Deep,
Calming breath.
Good.
Take one more breath right here.
Inhale.
Exhale.
Now step away from the wall first.
You'll fall over if you don't let's take our hands off the blocks and just roll up through our spine all the way up.
To the top.
Nicely done.
Good.
Let's take it back down Utilize the wall now on our back So,
Get yourself,
Let's see,
I'm trying to think of what I might need close by me.
Might need the Hello close by.
Probably just the pillow and maybe the blanket.
So have those two things close by.
I don't think you'll use the rest.
So scoot your hip.
Up against the wall Get as close as you can.
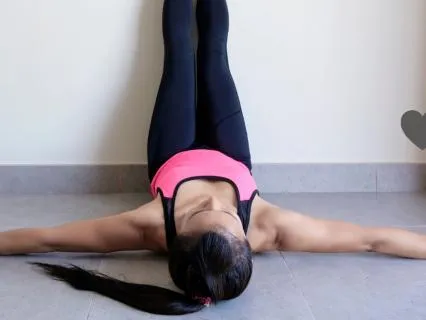
Then extend your legs up as well.
So when I get up to the top,
My hips and my legs are completely flat against the wall.
See that there?
Okay so now we're using the wall for a little different purpose once again it's holding us at that right angle so our hamstrings and our back all going to relax right there.
Let's work on our hips one at a time.
So take your.
.
.
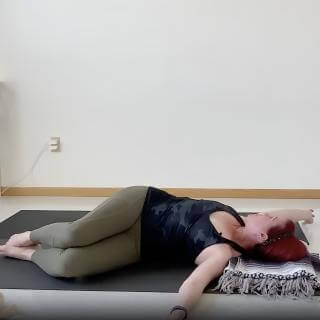
Right leg and let it open up to the side.
So our left leg stays right up tall to the top,
And we're just going to let this right leg open.
I'm going to use a timer,
Two minutes on each side.
You'll feel gravity pressing.
And opening up just this right side.
And it can go as far as it's able to go.
Just make sure that you feel your hips both anchored to the floor.
So we're not trying to roll,
Right?
We've got to keep our legs positioned on that wall.
And this left leg is really what's going to anchor us there.
Feel how that's opening up right through here.
Can you feel it?
I certainly can.
Gravity works.
On us here.
Definitely.
Relax.
So this is inner thigh.
Internal rotators Good,
Now come back up to the center.
You might have to use your hand to help you up there's a lot of gravity there right let's do the other side to move around my little lights here Okay,
Other side,
Opening it up.
Oops,
Get my anchor.
You'll notice probably that one side is a little easier than the other.
I can tell that this left leg is easier for me personally.
But either way,
We're just going to hold for two minutes.
We're gonna let it go.
See what gravity will do as we open up these rotators.
Try to get it to relax all through here try not to hold on Yeah,
Nice.
Just rubbing my leg a little bit because I can feel it pulling.
Kind of helping it to relax maybe.
Oh,
This side is a little more open for me,
But it's a little more intense,
Too.
For whatever reason.
Good,
Take one more breath here.
Inhale.
Exhale,
Nicely done.
Help your leg back up.
And now two minutes with both legs open.
This is going to feel different to you.
One,
You won't be able to go quite as far as when you just had one leg at a time.
And you're going to want to do your best to equal out the two sides so that one side that wants to open more than the other try to balance them out.
So do your best.
Just kind of look at them,
See what you can notice.
How much is opening there?
And let it relax.
Just two minutes on this side,
You know,
On this main.
.
.
Opening so not too long try to let your mind and your body everything relax here can feel my legs relaxing and wanting to open even more that's what we want When they want to let go and go deeper,
Let it happen.
Let him go.
That's how we build flexibility over time.
And hopefully release.
Things over time as our body gradually lets go I've got these little,
My light plugs are in my way.
Thank you.
Good,
Feel that release.
Just keep breathing slow and steady.
Nicely done.
Bring your legs back to the middle again.
Help them with your hands.
Oh,
It feels like a lot.
Good job.
We're going to do one more thing for the outer edges of our hips.
So a pigeon on the wall.
Bend your right knee and put it by your left at your right ankle by your left knee Then let your left leg bend.
Here's the trick if your hips lift you've bent too far you need to straighten up or you can take your pillow or blanket underneath your hips.
Just give yourself a little bit of elevation.
It'll take some of that pressure off.
So try those two things.
You want to keep your hips grounded so you can only bend your left knee as much as your right hip is ready for this.
Good now we're gonna hold here this one feels wonderful on the outer hip It feels great on the low back because as we pull our knee toward our chest and press against the wall we push the low back into the floor.
So we're going to hold this on each side for three minutes.
And just let it happen.
If you notice that your right hip starts to relax,
You can bend more.
You get to be the lever.
You get to decide how far you slide on that wall.
Think I'm where I need to be for now.
Just breathe and open up that outer right hip it's good for the it band the sciatic nerve that runs down the back of the right leg And we hold stress in our hips.
According to the chakras,
The hips are where the second chakra is in our hips.
And we hold emotional baggage.
In our hips.
As much as the holidays are a fun time,
Sometimes they're emotional.
Sometimes they're stressful.
Maybe you're holding on to baggage here and just breathing through this right hip.
Can help you to release that and be able to let it go finally.
Good,
Reset.
Put your right foot.
Back on the wall Extend that leg out.
Bend the left knee.
And start over don't move too fast find that happy balance for your hip each hip is going to feel a little different Feel free to utilize a blanket or a pillow underneath your hips.
And let's put a timer on again for three minutes.
To me,
That actually went a little fast.
It's all good.
It's what we're going to do.
We're going to feel that left hip now Opening up and that gentle release into the low back.
Breathe deep.
We're laying on the floor,
But we're working hard.
We're releasing stress.
And tension.
We need to feel that release.
We need to let it go.
And that takes the help of our breath.
Your body is not in this alone.
Your breath is your partner.
Gently bring yourself off of the wall.
By just laying to one side.
Let the blood flow re move back to a normal position in your body.
And then get yourself comfortable for Shavasana.
I like to use a pillow underneath my knees.
To take a little strain off of the back.
And a blanket over me to keep me nice and warm and cozy.
If you'd like to,
Set yourself a timer for 5,
10,
15 minutes,
However long that you have.
And then let yourself drift off.
Shavasana helps us to reset.
Take in all of the good work that we've done.
Well deserved.
Enjoy your rest.