Hi,
Welcome,
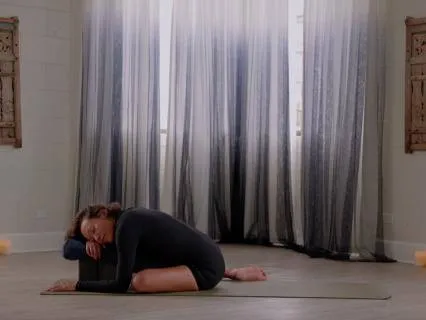
I'm Keala and this practice is yin yoga.
It's a practice that's designed to calm your nervous system.
So let's get started.
Meet me in a comfortable seated position.
You can crisscross your legs or you can sit on your heels.
And close your eyes.
Start to tune in to the rhythm of your breath and how you feel.
Feel your shoulders soften.
Feel your forehead soften.
For your legs and your hips soften.
Feel yourself slow down here.
Bring your attention to your normal breath.
Just that normal breath in.
Normal breath out.
Start to bring your inner awareness to the quality and the cadence of your breath.
Feel the sensation of breathing in.
Feel the sensation of breathing out.
On your next breath in,
Start to amplify the breath so you take more air in.
And as you breathe out,
Soften through your shoulders again,
Rest through the hands.
Soften your head.
Same thing here,
Take a deeper more magnificent breath in.
A luxurious breath out.
One more time,
Just like that to center.
Big breath in.
Smooth breath out.
Can keep your eyes closed or find a soft gaze at the floor in front of you.
And bring your hands into your lats.
Just take a few movements of a seated cat and cow.
So just a gentle flex and extend through the spine.
As you feel a little more into the inner landscape.
Notice what feels tight and what feels loose.
And then pause right at the center with a tall spine.
Take a big breath in.
Big breath out through a wide open mouth.
Make a simple seated twist,
Turning towards your right.
So bring your right hand behind you and your left hand to your right thigh and take a simple seated twist.
Bringing that sense of luxury to your breath.
And height with your spine.
Take a full breath in.
Hold it,
Breathe out.
Come back to center,
Unwind.
And turn toward your other side.
So your right hand is on your left thigh and your left hand is arcing behind you.
Breathe into the space.
And twist a little bit deeper.
Stay for your breath in.
Long breath out.
Unwind and pause in the center and uncross your legs.
The first pose will be recline butterfly pose.
So if you have a bolster or a pillow at home,
Turn the bolster so it's the length of your mat.
Turn your feet.
To face toward the front edge of your mat and slide your blocks if you have them or pillows with you to support your knees.
You'll gently lower down onto your back.
So use your hands,
Use your elbows.
Slip the support just below the low spine and come on down.
Once you're down on your back,
Make sure you're in a really comfortable position.
I'm gonna be here for a few minutes for each pose.
I prefer the blocks on the medium setting.
I feel like that gives me the most support.
You'll place the feet together and open up through your knees.
You want to find that sense of support.
Where you feel like you've built a nest to rest into.
So now try with your own arms,
Either out to the side or you can bend your elbows like a big W.
Or you can close your palms over your heart and your belly.
And here for the first few moments,
Just make sure you're comfortable.
It might be more comfortable for you to slide your heels further or closer.
To your pelvis.
So notice what feels the most nourishing for you.
Position your head so that you have lots of length for the back of your neck.
And now the next few moments,
Tune back inward.
So we just changed the shape.
But allowing the body just to rest here.
In this reclined butterfly position.
You can re-soften through your shoulders,
Your face.
Your hips,
All the way down to your toes.
And now with a softening belly,
Relax a little more.
Really let go here.
Notice how you're feeling now just with that downshift of energy.
The last few moments of this pose.
See if you can let go any more or if any other tiny adjustment will help you.
Feel the most relaxed.
Aren't already on your belly and your heart.
Go ahead and slowly place them there now.
Let's take three really big breaths together.
Just signifying that slow transition to come ahead.
Big breath in.
Big breath out.
Two more like that.
Big breath in.
And a widening breath out.
And then last one.
Breathe in.
And breathe out.
Extend your arms to grab the blocks or supports that you've placed.
Find your footing,
Bring yourself to flat feet,
Bend your knees.
And shift the props just outside of your mat.
Roll over onto your side for fetal position.
So you'll come all the way off of.
The prop to your side and just rest here.
Your eyes can close.
We'll transition into the next shape,
Which is called deer pose.
So use your free arm to transition into seated.
Take your time to transition.
Turn and face the front edge of your mat.
Slide your hands behind your hips,
Adjust your feet mat width distance,
And take a little easy sway side to side.
Just loosening up for the next pose.
Which is called deer pose.
So we will use our props for this one too.
So slide the prop that's behind you or the pillow in front of you.
And we'll start with the right leg.
So take your right foot.
Swing it in front of you and slide your left leg back behind you so you have a staggered leg shape.
So you can use the pillow.
Right in front of you and the blocks in front of you too.
I'm gonna show you two options for you so that you're most comfortable.
So one option is to lay the pillow straight down and bring your forearms down to the block.
And feel the bolster or pillow just snug against your belly.
A second option is to build just a small.
Support configuration so that you can rest into it.
You can even bring your hands under your chin or rest your head straight down.
So take your time to get comfortable into the shape.
Just those little adjustments make a big difference in this kind of practice.
And let yourself just.
.
.
Rest down into the sheet.
And here with.
Your body relaxing into this new position.
Start to sense.
All the contact points of your body and the floor.
So feel for what point in your heel,
Your leg.
Your elbow,
Your hand.
Feel all those points of connection to the floor.
And soften down and around those edges of those points.
Allowing for the body to relax in this shape.
Let your belly be softer.
I'll give you some time and space for silence on this side.
Just allow yourself to feel here.
Take a big breath in.
Ease full breath out.
We'll do two more.
Just a signal to the body that we're about to transition.
To the other side.
And then one more.
Big breath in and out.
The key is to go slow in the transition.
Slide your hands back under your shoulders.
Start to press up to straight arms and look down toward the floor.
Slide the pillow off to the side.
And move the blocks off to the side too.
We're going to transition and just face the other way.
So spin and face the long edge of your mat.
Just turn and face the other side.
So then slide your pillow,
Your prop in front.
Now we'll do the left side for deer pose.
So again,
Same options.
You can bring the pillow right in front of you,
Or you can set up the little tall kind of tower shape.
Where you can access.
A little more comfort and support.
Lift your chest,
Breathe in.
And when you breathe out,
Hinge from your hips and come on down and see what needs arranging on this side.
It's gonna be a little different.
If you turned your head to the right on the first side,
Maybe turn your head to the left on this side.
To balance out the stretch through your neck.
Take any last little wiggles before.
You hold the pose.
Close your eyes.
Just relax into the shape.
Relax.
Any other residual tension for the last few moments?
Even if that means repositioning just a little bit.
And taking three deep breaths together.
A big breath in.
Big breath out.
Really feel the expansion in the back of your body as you breathe.
And one more time.
Slide your hands right under your shoulders.
Press your arms to a straight position.
Uncurl your spine and just look straight down.
Take the props and bring them off to the side.
And then we'll swing back to where we were facing originally,
All the way back.
Straighten through your leg.
Point through your toes.
You can use your hands for support.
Then coming into a forward fold shape.
The last pose before we'll be on our back for the rest of the practice.
So you take the bolster.
And fold it right in front of you and just ease down.
This is one option right here.
If you need to bend your knees,
You can always do that.
Or another option is to slightly open the feet and slide the blocks right underneath so you make that extra cushion support.
I'm going to hold this kind of position here.
I can go further.
And allow the legs to stretch long.
You might have to walk your hips back.
And for this one,
If you're upright like me,
You can catch your head with your hands and just allow your head to nestle into your palms.
Softening through your legs.
Releasing through your feet.
Just allowing the back line of the body to unwind.
If you wanna drop your neck heavy,
You can do that.
As the body starts to come into that nourishing element of each of the poses you might have to adjust when you're in the shape.
The body loosens,
Becomes more receptive to the position.
Take a few more breaths here.
Gently lift your head if it's down,
Tuck your chin in though,
Slide your hands back.
On the floor near your hip.
Keep your chin tucked in for just a moment.
Point through your toes and flex through your feet.
And then sit up and just neutralize.
Okay,
The last pose will be on the back before Shavasana.
So you'll slide the blocks just out to the side.
Bend your knees,
Slide your hips down.
Make sure when you come down that your pillow is reachable off to the side.
For this pose,
I'd recommend a block,
Or you can use the soft bolster,
Of course,
For a pose that's called restorative bridge.
So for this,
Anchor your feet down.
Your feet are hip-width distance apart.
Lift your hips up and slide the block either on the flattest setting or the medium height.
I'll choose flat today.
So you want the block to be underneath that wide,
Flat bone at the base of your spine called the sacrum.
You want your feet to be just underneath of your knees,
So your heels come under the points of the knees.
And spread and fan your toes out.
With your arms you can turn the palms down.
Just make sure you slide anything away.
Can turn the palms up.
And with your legs,
You could straighten your legs out or keep them bent.
So once you arrive into the position,
See if you can allow yourself just to relax.
That much more.
Making any other last adjustments.
Start to bring the breath in again.
Big cycles of breath,
Like big waves.
Breathing in.
Breathing out.
Can always stay here longer if you'd like to.
I'll offer Shavasana next.
You're moving on with me grab the block that's against your sacrum lift your hips up and slide it off to the side Allow your hips to come down.
And swing your knees just gently to the left.
And then gently to the right.
One more time to the left.
And then to the right.
Preparing now for a Shavasana.
So you wanna make this your most comfortable pose.
I'd recommend putting a pillow behind the knees.
You can just rock up and put it behind your bent knees.
I prefer not to use blocks in this one,
But you can.
Take the bolster,
The pillow,
Slide it under,
And you can extend your legs out.
Press into your back so that your chest lifts and slide your shoulder blades closer together.
Allow your hands to soften up toward the ceiling.
Make a little space between your arms and your body.
Allow yourself to fully embrace.
The surrendering pose,
Shavasana.
You allowing yourself to relax a little longer.
Allow yourself to enter that transcendental space past the physicality of the poses themselves.
Feel that inward sense of relaxation.
Start to build a bigger breath.
Notice how you're feeling.
Can take small or bigger movements.
Transitioning here bend your knees Feel your feet grip down and then roll over onto one side.
Fetal position.
Signifying the end of that cycle of practice.
Your time to come up to a seated position just how we started.
That comfortable position.
Taking the last few moments just to tune in to.
Your feeling state.
And bring your hands to your heart.
Thank you for practicing.
Namaste.