Hello and welcome to this foundational practice of Hatha Yoga.
If you're new to yoga or if you've taken some classes before,
Maybe feeling a little bit lost in some of the postures.
This would be a really great class for you.
We're going to keep things really simple here.
We're going to move through about six or seven foundational postures.
And I'm going to guide you through the whole process.
The only real requirement is that you have enough space to practice and just keep an open mind to this experience.
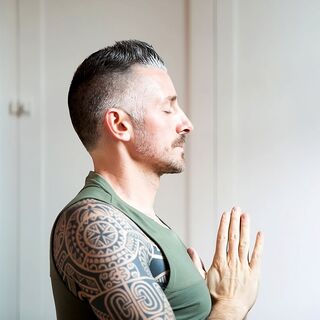
Before we start to move,
Let's just be still.
We're going to find some seated stillness.
So come into a comfortable seated position.
Now,
Anytime we're seated,
Especially on the floor,
It's really helpful to get the hips elevated.
Getting the hips at least the height of the knees,
If not slightly above the height of the knees.
If that's not available or accessible,
Sitting in a chair toward the front edge of the chair with your feet on the floor is a good option.
For the floor,
It's helpful if you have some bolster or pillow or meditation cushion.
Getting that elevation in the hips.
So just settle into your seat wherever that is.
Anytime we're seated,
We always want to have a nice tall spine.
Spine is tall,
Shoulders relaxed.
And then our eyes close.
And the hand position is anything that's comfortable for you.
You want your seated posture to feel really natural.
Just take a few moments.
Let's connect to the breath.
Start to breathe through your nose.
At the foundation of every hatha practice is a smooth breath in and out of the nose.
Slowly start to open the eyes.
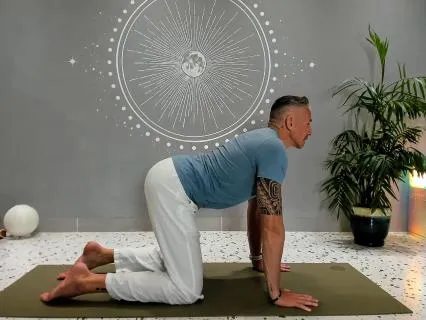
Let's make our way to a table position,
So coming onto all fours.
Now anytime our hands are down on the floor,
We want to have the fingers spread nice and wide.
So fingers are spread wide,
We bring the hands down.
Our wrists are pretty much under our shoulders,
Knees pretty much under the hips.
But just know as well that each of us is slightly different.
Our anatomy of our body is slightly different.
So rather than trying to look a very specific way,
You always want to really just feel into your posture.
So just feel into this pose a little bit.
And we're going to work with the spine through cat-cow movement.
So on the inhale,
We lift the heart,
Lift the chin,
And the whole front of the body lengthens.
And then on the exhale,
We reverse.
So we press through the hands,
We start to round the spine,
Chin comes in toward the chest.
And then we repeat.
We move with the breath.
Inhale,
Lengthen the front of the body.
Lift your heart.
Lift your tailbone.
Look forward.
Exhale,
Press through your hands,
Round the spine.
Chin comes in toward your chest.
And try that with your breath.
As you inhale,
You lengthen the front of your body.
And as you exhale,
You start to gently round the spine.
Chin comes in.
Something you can explore in your Cat-Cow is to initiate your movement from the tailbone.
So on the exhalation,
Your tailbone starts to tuck.
Your spine follows,
Your chin comes in as you round.
As you inhale,
You start to lift the tailbone,
Moving up.
As you lengthen the front of the body.
And then you repeat.
Moving from the tailbone,
Tailbone tucks,
Spine rounds.
Moving from the tailbone,
Tailbone lifts,
Spine lengthens.
Cat-cow is a great posture for working with the spine because you've got the support of your arms and legs,
Your spine is free to move.
Next we're going to work through Child's Pose,
Balasana.
So from here,
We'll be in this sort of neutral spine.
We're going to bring our knees wide and maybe your big toes to touch.
And then we're going to start to sit our hips back toward our heels.
We keep sitting our hips back.
And then we start to extend our arms forward.
Reach your hands forward.
Pause here.
And feel that you create length.
Through your back,
You keep pressing your hips toward your heels.
And then if it's available,
You soften down and relax your head onto the floor.
If that's not available,
Another really good option is to stack your fists.
So create two fists.
And then rest your forehead down onto your fists.
In child's pose,
We close the eyes.
Relax the shoulders.
And keep settling into the hips.
Then the awareness goes inward.
We start to notice the breath.
Continue with a smooth breath through your nose.
Good.
Child's pose is really good.
For centering,
Bringing the awareness inward.
It can be a good resting position too at any point through your practice.
Next we're going to go through downward facing dog.
So let's come back to our neutral spinal position in table.
From this neutral spine,
We start to walk our hands forward.
At least the length of one of your hands,
Maybe a little bit more.
And then checking with the hands,
You spread through the fingers and you're really grounded down.
You're almost trying to grip onto the mat.
Tuck your toes and then start to send your hips back.
Your hands are steady.
Then moving from your hips,
Just start to lift your hips up and back.
This will bring us into Downward Dog.
Really good to keep the knees bent and then press the floor away.
Relax your head.
You can stay like this.
We're ultimately trying to create length in our spine,
So it's totally fine to keep the knees bent.
And then you can start to pedal out the feet a little bit.
Lower one heel on the opposite heel.
Keep pressing through those hands and keep lifting your hips.
Good,
And then come back to center.
If it feels okay,
You can slowly start to unbend the knees a bit.
But a few things here,
The head is relaxed.
The arms are strong as you press through the hints.
And you're creating length in your spine.
So more important that you have length in the spinal column rather than having straight legs.
From here,
We're going to slowly start to walk our feet forward and come into a forward bend.
Uttanasana.
In this pose,
We rest the head and the neck and the shoulders.
And just let the body hang forward.
It can be helpful to keep a little bend in the knees.
Take a few breaths here.
Now from here,
Open your eyes if they're closed.
Check in with your feet here.
Your toes are pointing forward.
I'd like you to make two fists and then connect your fists and place the hands between the feet.
And so your feet are the distance of two of your fists.
Now this is going to be useful when we get into our next posture of mountain pose.
Slowly start to rise up,
Just one vertebrae at a time.
Come up to stand.
And let's come into Mountain Pose,
Tabasana.
A very foundational standing posture.
So,
Feet are hips distance,
Which we've just done,
About two of your fists.
Toes are pointing forward.
Stand up nice and tall.
And then very gently,
Just slightly draw in at the low belly and slightly tuck the tailbone.
Really relaxed.
Shoulders relaxed down the back.
Chin slightly tucked.
And then you start to close your eyes.
This is Mountain Pose Tadasana.
Feeling nice and grounded through the feet.
It can be helpful as well to kind of move the body very slightly,
So shifting the weight forward.
And back and side to side.
So you feel nice and firm and supported.
You can open the eyes.
Good,
From here we're going to move into Warrior 1,
Virabhadrasana 1.
This is going to be the strongest pose that we've done so far.
So we're just going to dig deep a little bit.
We start by coming to the front of the mat.
And then we're going to step our right foot back.
And we're going to step the foot back on opposite sides of the mat.
The back foot is going to be angled slightly,
About 30 or 45 degrees.
The front foot is going to be pointing forward.
And then we start to bend into the front knee.
And you may need to adjust a little bit,
Adjusting the distance of your feet.
The hips are going to be mostly square to the front of the mat.
And both legs are active here,
So we're pressing through the front foot,
We're pressing through the back foot.
You feel strong through the legs.
You can start with your hands on your thigh and this is a perfectly good option.
You could stay with this.
If it felt okay,
You could extend your arms overhead.
And this is warrior one.
So we stay here and breathe.
Now,
Any times arms are overhead,
If your shoulders are tight,
You can bend your elbows.
So this is a perfectly good option for any of your standing postures.
Bent elbows opens your shoulders.
Let's take a few breaths.
Feeling the strength,
Perhaps even feeling some heat in the body.
And then relax your arms.
And then we'll release out of the pose.
So we're going to step the back leg forward,
Come to the front of the mat.
Allow yourself to reset for a moment.
And then doing the other side so the left foot is going to step back.
Again,
Take your time.
Your feet are on opposite sides of your mat.
Your front knee starts to bend.
The back foot angled out slightly.
Start to bend into that front knee.
You can.
Keep your hands on your thigh,
That's a totally good option.
And you just explore a little bit.
Again,
You might need to adjust the distance of the feet.
But you feel strong.
You come to a place where you're grounded through the front foot,
You're grounded through the back foot.
Legs are strong.
This gives you a nice foundation.
And then arms come up for your warrior one You can explore bending the elbows again.
Helping to open the shoulders.
And take a few breaths.
Breathe into this pose.
Good.
Release,
Step your back foot forward.
And that's our Warrior 1.
Let's come back down onto the mat.
And we're going to come into a seated position with the legs extended in front of us.
Preparing yourself for a forward bend.
Now in this forward bend it's totally fine if you bend your knees as well.
So see how that feels.
It can be helpful as well to sit on the edge of a blanket if you have a thinly rolled blanket.
That'll help if your hips are tight.
We're going to inhale.
Arms come overhead.
And then as we exhale,
We're going to lead with our heart.
This helps the key.
And long.
So lead with your heart.
Start to fold forward.
And at some point you'll reach your limit,
You'll reach your capacity,
And then you just soften your head and shoulders down.
Relax your shoulders.
And find any comfortable position for your hands.
It definitely doesn't need to be the feet.
Can rest on your thighs or your shins.
And settle here.
In a forward bend the eyes are closed.
Release tension through your face and your shoulders.
Feel the lengthening in your lower back.
Good.
Slowly release.
So again,
Anytime you're coming into a forward bend,
Totally fine to bend the knees.
Also helpful,
Slightly elevating the hips on a blanket.
And then we'll complete our practice in Shavasana.
So let's make our way on to our back.
So shavastha also translates as corpse pose.
Feet are separated.
The toes and the legs just open out naturally to the side.
Body is relaxed on the floor.
And then the arms are separated from the body.
They're facing upward.
So come into this shavasana.
Let your body rest into the support of the floor.
Relax your face.
Release your lower back.
And simply breathe with awareness as you rest here.
Each exhalation Feel your body softening so you're releasing effort each time you breathe out.
And then start to make small movements.
Your hands and your feet.
Bend your knees,
Place your feet on the floor or onto your side.
Use your arm as a pillow.
And then press it through your hands.
Come to a seated position.
Just like we started.
So helpful if you've got some cushioning.
Sitting up onto a bolster.
Or maybe a block.
And if not,
Perhaps sitting in a chair.
Spend a minute here to seal out our practice.
Where any.
.
.
Comfortable position.
Again,
We always want our seated posture to feel really natural.
We're not trying to force ourselves.
Our spine is nice and tall.
The shoulders relax,
And then the eyes close.
Just take a moment here.
Notice how your body feels.
Notice your breath.
If you'd like,
You can bring your hands together and gently bow the head down.
Honor yourself here.
For practicing today in this way.
And before we open the eyes,
We can rub the palms,
Warm up the hands.
And when the palms are nice and warm,
You cover the eyes.
Let that warmth nourish the eyes.
And then open your eyes and relax your hands down.
Thank you so much for joining.