Any position that feels comfortable to you.
Allow your lower body.
Hips and legs to relax.
To soften and sink towards the earth.
Gently lengthen through your spine.
Reach the crown of your head up to the sky.
Lengthening the back of your neck.
Soften your shoulders and arms.
You might close your eyes or find a soft gaze down in front of you.
And just begin to tune in.
Notice how your body feels.
Is there any vibration or energy flow that you notice?
Or a lack of energy flow.
Are there areas of your body that are feeling tighter or more tense than others?
Is there any discomfort?
What does that discomfort feel like without labeling?
Just experience the sensations.
As they are.
Without resistance,
Without trying to change anything.
Just notice what you're feeling.
And then become aware of your bra.
Breathing in and out through your nose.
Notice the relationship of the inhale and exhale.
Is it fairly even?
Is it shallow?
Smooth or choppy.
And then ever so gently begin to deepen your breath.
Nice and smooth inhales,
Maybe to a count of four or five.
And exhale.
Maybe the same length or slightly longer than your inhale.
Where are you feeling your breath?
Is it in your chest,
Your belly,
Your nostrils?
Your ribs.
You And then take another nice full inhale through your nose.
And exhale through your mouth.
Sigh it out.
Let it go.
Gently open your eyes.
And we're going to find a little bit of movement before we come into our first pose.
Come to neutral table.
Hands and knees,
Lengthen through your spine.
Press gently into your mat.
And then take a few rounds of Cat Cat.
Inhale,
Draw your heart forward into cow.
Exhale,
Navel to spine.
Start the movement from your tailbone.
Come into cat.
Come back to neutral table.
Move your hands a few inches forward on your mat.
Tuck your toes and lift your hips up and back into your downward facing dog.
You can walk the dog,
Dropping one heel and then the other.
You might lift your heels and lower your heels.
Notice how this down dog feels.
First down dog right off the bat doesn't usually feel like a resting pose.
Notice your upper back,
Shoulders.
Notice your hamstrings.
Notice how far your heels are away from your mat.
And then thoughtfully lower your knee.
Take your blanket.
At least one of your blankets.
Open it up to.
.
.
Just about this shape.
And we're going to roll it.
So fringe away from you if it has fringe.
And from the short folded edge,
Start to roll it about halfway.
Smooth out any of the wrinkles.
So that you end up with a rolled blanket just about the diameter of the width of your hand.
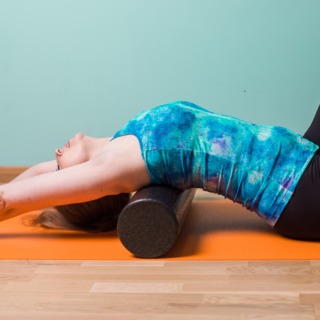
So we're going to lay our neck on the rolled blanket.
Shoulders are not on the blanket.
They'll be below the blanket and head may or may not touch that unrolled part of the blanket.
And we'll be holding it for about five minutes.
So before you straighten your legs,
Keep your knees bent and make sure your neck feels comfortable.
Come down onto your blanket.
Any hair or fabric out of the way.
So that your neck is right on the blanket.
Just pause here with your knees bent in constructive rest.
And make sure that this feels comfortable.
It might feel like pressure,
But it shouldn't feel like anything sharp or anything like that.
The back of your head may or may not be touching the blanket,
That's okay.
Just make sure your shoulders are not on top of the blanket.
Where your neck is.
Your shoulders will sort of drip towards the mat.
They may or may not touch the mat.
So once you get into position here,
Then slowly straighten one leg and then the other.
After you straighten your legs,
You may feel a sense of stretch in your neck.
It should feel pretty good.
A little bit of decompression.
So when we're doing myofascial release,
There's two aspects that are important,
Compression and stretch.
In some positions,
We may get one or the other.
And some we might get both.
So in this one,
We're getting both.
There's a slight compression and there's a gentle stretch.
So soften your shoulders.
Breathing in and out through your nose.
Each exhale is an invitation.
To soften and release.
Imagine you're surrendering into gravity a little bit more.
With each exhale.
Allow your head to be heavy.
Often we don't even realize we have this holding.
Within us.
Within our bodies.
That prevents us from really relaxed.
Just invite your body to soften a little bit more.
With each exhale.
You're sinking into the support.
Of the blanket and your mat.
Notice any sensations.
You can always just stay in this position.
Or explore a little variation.
So right now your nose is pointing straight up to the ceiling.
On your next exhale,
Ever so slightly turn your head to the right.
So your nose is going towards like one o'clock.
And parts.
Notice the pressure goes towards the right of your cervical spine.
Let your head still be heavy.
On your next inhale slowly bring your head back to neutral.
And on your next exhale,
Slowly turn your head to your left.
Like your nose is pointing in the direction of 11 o'clock,
It may not go that far.
Pressure now slightly to the left of your cervical spine.
Head is heavy,
Shoulders soft and heavy.
Neck is soft and relaxed.
Notice if you're able to slightly turn your head a little bit more with each exhale.
Just like if the head wants to turn,
Don't force it.
And on your next inhale,
Slowly bring your head back to neutral.
Take three more breaths here.
And then bend one knee and then the other.
Might bend your arms.
Shift your hips to one side.
Keep your head on the rolled blanket and just roll over to one side and pause.
And then use your hands and arms to slowly press your way back up to a seat.
And pause.
Notice how you feel.
Notice sensation.
Do you feel like your neck is a little longer?
So let's just find a little movement into the head and neck now.
Just sitting up nice and tall,
Any position with your hands and arms.
Take an inhale and exhale,
Slowly turn your head to the left or right.
Look slightly down.
And then slowly look sort of straight towards that direction.
Chin more neutral.
Inhale back to center exhale turn your head the other direction look slightly down Slightly lift your chin to look straight in that direction.
And then inhale back to center.
Maybe roll your shoulders a little bit,
Any movement that feels good to you.
And then we're going to get into the upper back a little bit.
So set the rolled blanket aside.
And any type of roller that you have.
So we're going to get into several things in this next one.
Turn your roller length If you don't have a long roller,
If your roller is shorter,
Say half of this length,
You may need to position block.
To sit on.
You want your head to be on the roller.
So if your roller is only half of this length,
You would put one block up against the roller to prevent it from moving.
And then the other block a little bit away so that you can sit on it.
And then slowly bring yourself down onto the roller.
Making sure it stays where you want it.
You can always move the block closer so that your head is on the roller.
So this is an option if you have a shorter roller.
It's also an option to sit on a block if you don't feel comfortable.
With the roller moving around.
But if your roller's long,
Sit way on the very end.
So that your tailbone is on the end of the roller,
But if you look down,
You can't see any roller.
Use your hands to support you.
Feet are wide,
Knees are bent.
And then slowly come down onto your forearms.
Elbows.
Make sure your head is on the roller.
Your spine is on the roller.
And if you need to,
You can scoot further down on the roller if your head is off.
Or sit on a block so your head is on the roller.
So from here,
Lift your arms up.
Reaching your fingertips to the sky.
And notice how your shoulder blades are moving away from the roller.
And then retract your shoulder blades.
Shoulders go down towards the mat.
And allow your arms to go either out to the side or goalpost arms or slightly down.
So you feel that the shoulder blades are sort of wrapping around the roll.
And you can relax your arms.
If there's any props in the way just move them aside.
We're going to keep our knees bent,
Feet wide,
Feet flat on the mat for stability.
So we're letting gravity do the work here.
As you're laying here,
Imagine your shoulders dripping towards the air.
Wrapping around the roller.
Lengthen your neck.
So make sure you're not looking up here.
Just a neutral neck.
We don't want to undo what we just did.
So you're also probably going to feel maybe some pressure.
Around the shoulder blades and the upper back.
Also possibly feeling some pressure.
Around the tailbone.
Sacrum area.
Depending on the density of your roller or if you're seated on a block.
Notice your bra.
I'm going to offer just one variation here if you want a little bit more of a stretch in your upper chest area.
It doesn't feel like you're efforting too much.
You can take your fingertips.
Sort of right.
Below the collarbone.
Press like the fingertips are maybe an inch away from each other.
Press slightly down and pull slightly out.
And then see if you can just relax the arms.
So the weight of your arms is helping to get the stretch.
So you're not sliding your fingers.
They're pressing down and pulling out without sliding over your skin,
Providing that extra stretch across the upper chest.
And again,
This is just an option.
Try to get your skin.
You can reach under your.
.
.
Clothing there.
Like if you have straps.
Just reach under there and then press down and slightly out.
Your fingertips can be further away.
So that you can rest your elbows on the mat.
So there's not any.
Straining and you're arms or shoulders.
If this feels like it's too much and you're not getting the relief.
In the upper back,
Just.
Go back to relaxing the arms.
Just a variation.
A few more breaths here.
If you're someone that works at a computer desk.
For years,
You might have that tendency to have forward.
Rounding shoulders.
And this is really great for that to open up the front of the chest.
And allow those shoulders to open and release.
Take one more breath here.
Exhale,
Sigh it out,
Let it go.
To come off of this roller.
Place one hand behind your neck.
Lift your head slightly.
And then hands on either side,
Roll your hips off if you're just on the roller.
Or you can push yourself up if you're seated on a block.
Bring yourself up to a seat.
And pop.
Notice your upper back,
Your shoulders,
Your upper chest.
Notice how that feels.
Is there any.
.
.
Sense of more energy flowing or a sense of openness,
Expansion.
And let's go to the next one.
So now,
Place your roller.
Across your mat.
Set aside any blankets.
So this one we're going to get into a few different options.
I have my timer handy.
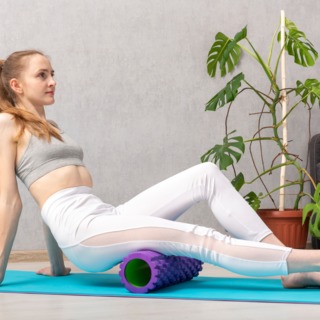
So we're going to have the roller just about at our mid upper back.
And we're going to have our hands behind our head to support our neck.
So knees bent,
Feet flat on your mat.
Elbows on the roller.
And just position the roller just about at your mid upper back.
So that you can sort of have your elbows on the roller like you're leaning back.
So from here,
Take an inhale and look up at the ceiling.
Just going back a little bit,
Notice how that feels.
Exhale,
Come back up to that sort of neutral position.
Inhale,
Go back a little bit.
Exhale back to neutral.
So if that felt okay,
Then we're going to add a little bit more,
Maybe go back a little bit further.
And then when you come up,
Think of using your core to come up.
You're not gonna pull your head or neck.
Your head is supported,
But there should be no strain in your head and neck.
Elbows are out wide.
So you're supporting your head and neck.
I like to have my thumbs.
On either side of my neck,
Just sort of extra support.
Take an inhale,
Look up.
Maybe straight up,
Maybe towards the wall slightly behind you.
Exhale.
Navel to spine,
Use your core to come up so you're looking in the space right between or above your knee.
Inhale slowly.
Elbows wide.
Exhale coming up.
Core is doing the work to come up.
Inhale,
Slowly go back.
Exhale.
Core engages to come up.
We'll do a few more like this.
Notice how that feels in your upper back as you go back.
Maybe you want to go back a little more.
Maybe not.
Exhale.
Contracting through the abdominals,
And a brief pause at the bottom of your exhale as you come up.
Inhale going back.
Exhale to come up.
So now a variation,
You can either continue to do that,
Just going straight up,
Or we're gonna add a little twist.
No pulling on the head and neck.
Elbows out of your peripheral vision.
DOM supporting.
.
.
Just sort of right below the skull on either side of your neck I find is helpful.
Inhale,
Go straight back.
This time as you come up,
Slightly turn to your right.
So the elbows are still wide,
Just a little twist as you come up.
You're right Upper back is on the roller and your left.
Side of your upper back is lifting up slightly.
Inhale,
Come back to center,
Looking slightly up or back.
Exhale coming up.
Little twist at the last half.
Inhale,
Untwist and go back.
You might not go back as far during doing the twist.
Exhale,
Little twist to the right.
So you're getting a little more into the obliques.
Continue with the twist,
Or if you want to just come back.
So without the twists,
That's fine.
Let's do a couple more.
Probably feeling this.
Make sure you feel even on both sides.
And then do one more to the center.
Release your hands.
Elbows on the roller.
Push yourself up.
And pause.
Notice sensation.
Notice your upper bow.
Notice your core.
Is there sensation anywhere else?
Now we're gonna get a stretch into those two areas we just worked.
Set your roller aside.
Come into table pose.
So from here,
Move your left hand slightly forward.
Knees are under your hips.
Lift your right arm up,
Maybe a little twist to your right,
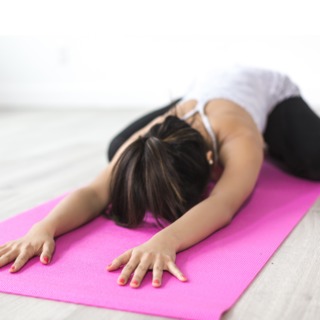
And then thread the needle,
Right arm underneath the left,
Come onto your right shoulder,
Right side of your head.
Any variation with that left hand or arm.
Lengthen through your spine.
And if the mat seems too far away,
You can always put a blanket or a block under your head.
Inhale,
Press into your left hand,
Come back up.
Notice any difference between left and right.
And then we'll do the other side.
From table,
Right hand moves slightly forward.
Extend your left arm out,
Twist to your left.
And then thread the needle.
Left arm underneath the right,
Come onto your left shoulder,
Left side of your head.
Inhale,
Push into your right hand.
Come back.
Place your roller across your mat.
And we're going to explore a little bit before we hold the pose on the quads.
We're going to find a little bit of movement and get a nice stretch into the.
.
.
Abdominal area.
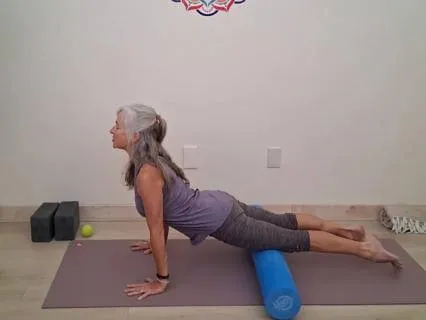
We're going to come onto the roller with our quads.
Do not go past your knee.
So we're rolling from the hip flexors maybe or the top of the thigh to above the knee.
And if you can be on your hands on the mat,
You might come into like an up dog or you might do sort of like a cobra.
And that will really stretch the abdominals that we just were.
Have your toes off of your mat at one end.
Come onto your forearms to start and bring your upper thighs onto the roll.
So you're on your toes.
And you can Initially maybe just stay on your forearms to see how this is going to feel.
Move your elbows forward.
And just start to move yourself over the roller forward and back.
Might need to move your hands forward.
You can keep.
Your hands touching or forearms parallel.
And make sure that this is doable for you.
So if this is super intense,
You might just stay on your forearms.
And as you come forward,
Just sort of a little bit of an arch,
Sort of like a baby cobra,
But with your forearms down.
If you want a little more,
Bring your forearms back a little bit and then come up onto your hands like an up dog.
So it would look like this.
And your toes can touch for just a pause here.
Lengthen through your spine.
And notice that stretch.
It should feel really good.
And then when you're ready,
Slowly roll back.
And lower down onto your forearms.
You might try that,
The starting position,
Your elbows.
Are just about in line with your shoulders.
And then as you pull forward,
Come up onto your hands.
If that works for you,
Stopping above the knees,
You can have the toes down.
Where you can point the feet.
Lengthen,
Stretching the whole.
Front torso area.
And then slowly going back.
So find your variation if that's working for you,
The up dog variation.
Maybe you keep doing that or maybe you stay on your forearms,
Maybe moving the hands a little more forward.
So you just sort of focus on.
The quads.
Find what works for you.
We'll do a little bit more here,
And then you're going to find a spot to hold.
And sometimes I like to start.
Sort of near the top of the quads.
So that if the five minutes holding in one spot is just not doable for you,
You'll very slowly inch yourself forward during the five minutes.
Find your spot.
You can support yourself with your forearms.
You can either have the toes on the floor,
Or not,
It's up to you.
So you're just letting your body weight do the work.
You can either stay exactly in this spot or micro movements during the hold.
To gradually,
Like slow motion,
Like if someone was watching you,
They couldn't tell you were moving.
That's how slow.
And if you are going to move slightly,
You might have your elbow slightly forward so that you can easily pull yourself slightly forward over the roller.
Or if you're in a really.
.
.
Good spot on your quads that you're like,
Oh,
This is just what I need.
Just stay there.
So I'm ever so slightly moving,
Just slightly down.
Make sure you're relaxing your legs.
You can relax the feet completely or you can just stay on the toes,
Whatever feels better.
And if you have your feet like toes pointing down.
If that's natural for you,
Notice how that feels.
If you want a slight variation,
Maybe you externally rotate your legs turning the toes out.
Or slightly internal rotation,
Turning the toes slightly in.
And again,
Maybe slightly pull yourself forward so you're still in the general area.
See what feels best to you.
Maybe slightly moving forward.
And even if you move ever so slightly,
Notice how that changes sensation.
This is a great way to release those tight quads.
A little bit more.
And the other thing,
Groaning.
Totally fine.
Sometimes during this myofascial release practice,
It's like,
Oh my goodness.
So just a few more breaths here.
I find the quads quite sensational.
And if you have a soft roller,
You might want to do just one side at a time.
You might not get enough of a release doing both legs at the time on a soft roller.
Find what works best to you.
And then slowly Use your arms to move your arms back slightly.
Lower your knees,
Lift your hips.
Notice those quads.
Set your roller aside.
So bring your tennis ball.
And just sit with your legs out in front of you for a moment.
Sort of a relaxed Dandasana.
Sit up nice and tall.
You can have your hands either beside you.
Palms flat on the mat or you can have fingertips.
So flex your feet,
Toes towards your shins.
Lengthening the backs of your legs Pressing your heels away from your sits bones.
Option for your hands if you have wrist issues just fingertips Focus mainly is going to be on the hamstrings.
But we want to avoid collapsing the upper body.
So staying upright,
So it's usually a little easier to stay upright.
If your hands are hoping to support you.
If your hamstrings are super tight,
You might need to lean back slightly on your hands.
Might not be able to sit perpendicular.
So find what works for you.
Lengthen,
Actively elongating.
So you're actively elongating.
The bottoms of your heels towards the end of your mat.
So you should feel this in your hamstrings.
And again,
The upper body is lengthened,
But not as active as your legs.
Think about someone actively pulling your ankles away from your hips.
Like you're trying to push the soles of your feet towards the wall.
At the end of your mat.
Like you're trying to make your legs grow longer.
Hands just supporting you.
Whatever position works for you.
Getting a stretch and lengthening elongation into those hamstrings.
You can also do this laying down if this is too uncomfortable to do seated.
You can do this laying down.
Legs up the invisible wall.
Or even at a wall.
Lengthening through those backs of the legs.
You can change hand positions at any time if you need to.
I like to turn my fingers away so I get a little stretch into the wrists.
Which feels really good to me.
Sort of a two for one there.
And if you want,
Get a little neck stretch take one ear towards the nearest shoulder Keeping your spine lengthened.
Just a little variation here if you want.
And then slowly return to neutral and then over to the other side.
I might look down.
Whatever feels good.
Keep those heels pushing away.
You might even notice the heels lift up off your mat.
Not everybody's due,
But.
.
.
Pinging on.
How your legs are.
It's not always the most beneficial.
Mine do that,
But that's because I tend to sometimes hyperextend.
About another minute and a half.
Any variation with your hands.
And come onto fingertips if you want.
Keeping your upper back.
And shoulder girdles slightly engaged,
So you're lengthening through your spine and not.
.
.
Slouching No slouch asana allowed.
Option for the last less than a minute if you want.
To hinge slightly forward.
Now some of you may not want to go here.
But if you can lengthen through your spine and hinge from your hip crease.
Maybe you just sort of walk your hands a little forward.
Coming into variation of Paschimottanasana.
Keep pressing through your heels.
This will deepen the stretch.
So if this is too much,
Just back off,
But here you can relax your arms and shoulders a little bit.
Keep your spine lengthened.
Just sometimes is a little bit easier on the hands.
Just a couple more breaths.
And you could do the whole pose like this for your hamstrings in Pashimoto Nas.
And then slowly.
On an inhale,
Bring yourself upright if you would hinge forward and relax the legs.
Notice sensation.
Now we'll get into the hips.
You can either do this seated or laying down.
Place the tennis ball right under the middle part of your glute.
Straighten the right leg.
And take your left knee across the right thigh so that you're lifting your left.
Hip up a little bit.
And we're going to explore where we want to have the ball.
I suggest slightly outside.
And above the sits bone.
And because we're holding it.
For a length of time,
Two and a half minutes,
You might want to lay down.
I'm going to lay down too.
And it takes the ball out.
Positioning the ball Just a little bit.
Above and maybe outside of the sits bone so you're not right on the sits bone You can keep the left hip up,
Or if that's too much work,
You can relax your left hip down.
You might want to keep your arms so you can support yourself with your elbows,
Or you might just want to relax.
So find what works for you.
I find if I'm straightening my leg,
I'm not feeling,
If my left leg is straight,
I don't feel it enough on my right hip.
So I like to keep my left foot flat on the mat.
And use.
That pressure on the foot to lift my left hip up and take my left knee across so I can get a little more compression into that right glute.
Find your spot.
And as best you can,
Just relax over the wall.
Right leg is relaxed.
If this is too much,
Maybe you don't need to have that left hip up higher.
Any variation of your arms.
You can also do this at a wall.
But to hold it,
I like to move,
Like sort of doing the twist against the wall.
But to really get the myofascial release,
I like to lay down on the ball.
Find your variation bone.
Just a little more on this side and then we'll switch.
Thoughtfully rock off the ball.
Remove it,
Put it onto the other side.
So left leg is straight.
You might move a little bit over the ball to make sure make sure that it's in the right spots.
Once you've found that spot,
Again,
The right knee is probably bent,
Right foot on the mat,
Right hip is lifted a little bit,
So you have that pressure.
On your glute above the sits bone,
Maybe slightly to the outside of the sits bone.
And relax over the.
.
.
Arms where they're comfortable to you.
You can almost make this pose a little bit of a twist if you're taking that.
Right leg across your left.
Could open the arms up and sort of look to the right,
Just noticing this can be a nice twist as well.
Few more breaths here.
And then.
.
.
Slowly rock off the ball.
Set the ball aside.
Notice sensation.
Couple options here.
Maybe you come into constructive rest and just pause.
Maybe you lift your knees up and draw your knees towards each shoulder.
Or maybe you come into a bridge pose.
Pressing into your feet,
Lengthening your low back towards the space between your knees.
This is also a great pose for the pelvic floor as well as the spine and the low back.
The low back also,
If you want to stretch,
Just drawing the knees into your chest or to each shoulder can feel real.
Coming out of whatever pose you were just in.
Slowly rolling over to one side and press your way back up to a seat.
So now we're going to get into the feet a little bit.
You can either do this seated or standing up.
Since we just did that release into the hips,
Sometimes standing up after that.
Is not a good idea.
You might feel lightheaded.
Might not be the best move.
So I'm gonna suggest staying seated.
If you do stand up,
Please stand up.
Slowly and make sure you feel okay.
Place the tennis ball under your right foot.
If you're seated,
You're just gonna have the ball under the foot.
Just about in the middle part of the foot.
And just slowly,
With some pressure on the ball,
Start to move your foot over the ball.
And find where you want to focus on.
Maybe it's the arch.
Maybe it's the ball of the foot.
Maybe it's just in front of the heel.
Just keeping the pressure on the ball,
Slow movements here.
We're not going to hold it for five minutes for this one we're just going to do a little bit of a little bit of movement getting into a little bit of the fashion here.
Find a good spot.
Maybe hold it in one spot.
You can put your heel down so that you have a little more pressure on the ball if you want.
And then release other side.
Whatever position with the other leg,
Either it can be bent or straight,
That works for you.
Floor your other foot,
Moving the ball.
Moving your foot over the ball.
Notice how this one feels.
It might feel different.
If you're standing versus sit seated,
It's gonna feel a little different.
Those little spiky balls are really great for the feet too if you have one of those.
Or those hand sort of rolling pin rollers,
Those are also great for the feet.
They come in a variety of sizes.
You can find them just about anywhere.
Maybe pressing right into the arch or in front of the heel,
Whatever feels good.
And then release.
Set the ball aside.
Straighten your legs out for a moment.
And we'll come back into that downward facing dog.
From table,
Move your hands a few inches forward on your mat.
Tuck your toes and lift your hips up and back.
Downward dog.
Heels drop towards your mat.
Press into your hands.
You can bend your knees a little or a lot.
The tailbone reaches up to the sky.
Press into your hands and take your heart towards your toes so your spine is lengthened rather than rounded.
Like you're lifting your tailbone up to the sky.
Notice how this down dog feels compared to your earlier one.
Notice your breath.
Slowly and thoughtfully come out of your down dog.
Bring yourself to a seat.
Just going to do a seated twist.
It's not qualified myofascial twist because we're not going to hold it for five minutes.
But twists are always great.
So straighten your legs out in front of you.
Bend your right knee.
Cross your right foot over your left leg.
And take your right hand behind you,
Left hand to the outer leg.
Keep that left leg straight and press through that heel,
Flexing the foot.
Keep your left hand.
Sort of on the outside of your right leg,
Instead of bringing the elbow across.
And that left shoulder is usually coming forward and we want that open.
We wanna keep that openness that we've found in our practice.
So lengthen through your spine and imagine your two front parts of your shoulders moving away from each other rather than bringing that left one forward.
Inhale to lengthen and then exhale twist to your right.
You can look slightly down.
We'll be here for about just five breaths or so.
As you inhale,
Lengthen through your spine.
As you exhale,
Navel to the spine and left ribs.
Go towards your inner right thumb.
Take one more breath.
On your next inhale slowly unwind.
Pause.
Notice sensation.
Other side.
Bend your left knee.
Cross your left foot over the right leg.
Right leg is active.
Press through that right heel.
Toes towards your chin.
Left hand behind you for support.
Right hand to the outer left knee or leg.
Inhale,
Lengthen.
Shoulder points moving away from each other.
Opening that upper chest and heart area.
Lengthen as you inhale,
Exhale,
Twist.
Navel to spine,
Right ribs towards your inner left thigh.
Breathe here.
One more breath.
And then on your next exhale,
Release.
Straighten that bent leg.
Pause.
Notice sensation.
And then make your way down onto your back.
You might draw your knees in towards your chest,
Giving yourself a little hug.
Listen to your body.
What do you need right now?
Maybe a happy baby.
Maybe you want to come into bridge pose.
Some sort of neutral.
Pose instead of a one-sided pose that sort of maybe lengthens your back.
That feels good in your body.
And then when you feel ready,
Make your way into your final resting pose,
Shavasana.
Extending your legs out long.
Maybe even a blanket under your head or over your hips might feel really nice.
And just relax completely.
Take a nice inhale through your nose.
And exhale,
Sigh it out,
Let it go.
Allow your body.
To surrender into gravity.
Relax your feet and legs.
Notice your hip.
Maybe any sensation or energy flowing or moving through your hips.
And allow your hips to be heavy.
Visualize space between all your vertebrae.
Relax your whole back.
Soften your belly.
And soften the area around your heart.
Relax your shoulders and arms.
And let your head be heavy.
Soften your jaw.
And soften all the muscles in your face.
Especially around your eye.
And let go.
You you Gently bring your awareness.
Back to being on your mat.
Notice your body.
Notice your bra.
And observe your mind.
When you feel ready,
Begin to make small movements,
Maybe wiggling your fingers or toes.
Gradually and eventually bending one knee and then the other.
Maybe drawing your knees in towards your chest to give yourself a little hug.
And when you're ready,
Roll over to your right side or whichever side you prefer.
Support your head with your bottom arm or a prop.
And pause there.
And then use your hands and arms and slowly press your way back up to a seat,
Maybe keeping your eyes closed.
And with appreciation for your awareness and your focus.
Bring your hands together at your heart in Anjali Mudra.
The light in me.
Sees and honors the light in each of you.
Namaste.
Thank you,
Everyone.