Welcome,
My name is Elli.
I am a transformation guide,
Somatic practitioner,
Yoga teacher and energy healer based in Bali.
After 15 years in the corporate tech world and two burnouts,
I turned towards the healing arts.
I now help high achieving professionals and conscious leaders reconnect with their body's wisdom,
Release stored tension and restore balance through embodied healing practices like myofascial release yoga,
Breathwork and energy work.
My work bridges the practical with the spiritual and I'm really glad you are here.
Please listen to my track Beginner's Guide to Myofascial Release for more information about this practice and how to best approach it in your home practice.
The most important things for you to know for now is that you should never experience pain in this practice and that you define how much pressure is applied.
Please keep that within the comfortable discomfort range.
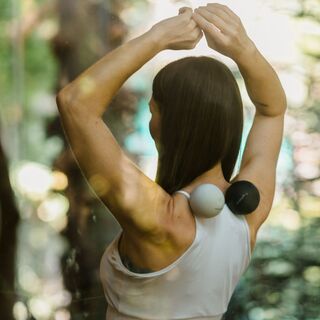
You will need one or two release balls.
A tennis ball is good enough.
If you have a rather hard ball,
You can also cover that with a towel to take the edge off it and make it more comfortable.
Let's arrive at today's practice.
Take a moment to get comfortable.
Sit upright or lean back against the wall.
Anything that allows your shoulders to soften and your breath to deepen.
When you're ready,
Slowly close your eyes.
Inhale through the nose.
Exhale through a relaxed mouth.
One more in through the nose.
Out through the mouth.
One more in and out.
Let your attention settle into your body.
Bring your attention to the base of your skull.
Without changing anything yet,
Simply notice what is present here.
Does the area feel tight?
Tender?
Warm?
Pulsing?
Tense?
There's no right sensation.
Just meeting yourself exactly as you are.
Take a long inhale.
The soft,
Slow exhale.
Keep this breathing pattern as we go into the practice to release your base of the skull.
As always,
You have two options.
Ideally,
You have a release ball like a tennis ball that you can use,
But if that's not accessible for you right now,
You can also use your middle and pointer fingers together to work through the areas at the base of the skull,
Just like we would using the base ball.
However,
I recommend using the ball whenever you can.
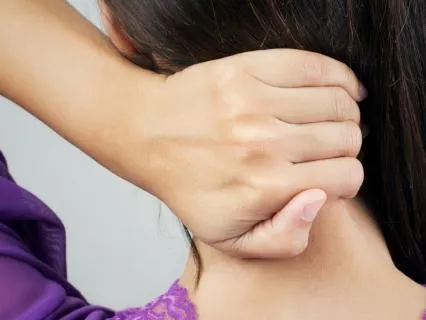
The first option you have here is to place the ball or your fingers in the middle of your base of your skull in that very soft spot where your spine enters the skull.
That's where we want to start.
You can stay seated to initially test how much pressure you can apply and if you're just using your fingers,
Then you want to stay seated anyways and make your way along the base of the skull towards your ears left and right,
Yet also maybe just a little bit,
Just a few centimeters up at the bottom of the skull,
Just around the left and the right to the soft spot in the middle.
Yet,
If you work with the ball,
You can press the ball in the very center against that soft spot at the base of your skull and then start slowly circling that ball just at the rim of that space where the bones of your skull start,
Your muscles that tend to have quite some tension and you just go very slowly,
Spot by spot.
Wherever you feel there's some tenderness,
Some response to the pressure,
I invite you to stay there.
Apply the right level of pressure so that you feel the pressure but it's not painful and then always come back to your breath in through the nose and out through the mouth,
In through the nose and out through the mouth.
You stay in each spot for as long as you like,
Sometimes that is five cycles of breath,
Sometimes that is 20.
It's not important how long you stay,
It's more you choose how long is useful.
Yet,
You make your way around the soft spot just at the bottom of your skull and give each spot enough time and attention and care,
Support with your breath.
Take your time.
You can always pause this recording if you need more time before we move on so you feel into whatever is right for you.
Once you've made and completed that circle,
You're back to the base of the soft spot.
I invite you to move this ball first along the base of the skull towards your ear,
Very slowly.
Also here,
Just feel into where do you want to stop,
Where do you want to stay.
A few extra breaths to support the release.
Move slowly,
Move consciously.
Really feel into how every single slight adjustment of pressure and positioning changes your experience.
When your body tells you to please stay and support the release for a few extra breaths,
There's no rush here.
So you work in your own speed.
You work within the time that you have available.
Yet,
I invite you to be fully present with your body here and listen.
The base of the skull is one of the areas that lead a lot into headaches and it's also an area that is very overused at the moment with how we position our head,
Looking at our mobile phones all the time.
Those muscles do a lot of work at the moment.
So give them some relaxation here,
Give them some care.
And once you've reached your right ear,
Make your way slowly back to the center of the skull to then continue towards your left ear.
So allow the ball to move slowly along the base of your skull and you either turn your head or you're just moving the ball or a combination.
And as always you stay wherever you want to stay.
Whereas many cycles of breath are supportive.
If you feel you want to have more pressure,
You could also opt for a different position of your body.
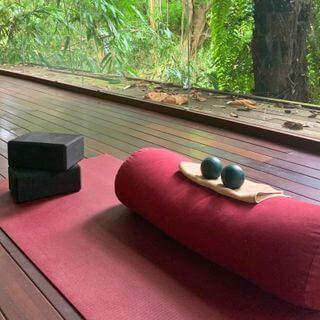
But for that you would need a block.
So if you have another block and you want to increase the intensity here for the release,
You can lay down on your back on the floor,
Position the block right under your head at the base of your skull and then place the ball on top of the block.
Yet,
Position the ball at the same spots as just described,
Starting in the middle of the base of the skull on the soft spot.
Then you turn your head to the left,
To the right or you circle so you can touch all those points.
If your head against the block gives you the opportunity to press your head against the ball more clearly than you can do when you are seated.
So you have a bit more play with how much pressure you apply when you lay down and you have the block available.
For some people it also works without the block if you just want to test it out directly on the floor.
However,
I find it most effective with the block under the head so that you can define how much pressure you apply in each different point.
But in either position,
Whether seated,
Laying down on the block or without the block,
It's still your job to define how much pressure you want to apply and how long you're staying in which spot.
So we have a few more breaths here.
Yet,
If you feel you want to stay longer you can definitely pause.
But I invite you in those last few breaths we have to really feel into how far you feel the release is working,
The muscle grooves that you're pressing against.
How far do you feel the release maybe going to your neck or across your head,
Maybe into your face.
Just notice how all those muscle groups are connected.
You're working very much with the fascia tissue right now that is one big web throughout our body.
It touches everything so the pressure you apply in the base of the skull still reaches the tip of your toes and everything in between.
Okay,
One last final inhale.
And then exhale to release the ball.
Whether you're seated or laying,
Just release the ball.
Allow your head to not have any pressure.
Allow it to just rest.
Coming to rebound here.
Maybe you want to stay still with your head and do nothing.
Just allow the feel into the area of the base of the skull.
Feel the after sensations.
Feel the difference this practice has just made for you hopefully.
Maybe the area feels a bit softer,
A bit more spacious.
Maybe you can notice how the fascia tissue at the moment is reabsorbing fluids and liquids that were pressed out before.
It's rehydrating,
Reorganizing,
Integrating the release.
So take a few breaths here in this rebound.
Allow the base of skull to come back to its neutrality.
While you breathe here just notice what's different.
Notice how far across the skull or into your temples,
Into your jaw,
Do you feel a shift?
Maybe it goes down in your neck,
Your upper shoulders.
Maybe you had some tears coming up as you were working through the base of skull.
Maybe not necessary tears of pain.
I hope not because we don't want pain.
Maybe just tears for an emotional release.
And that is quite common in this practice.
Any tension we hold in our bodies is related to our emotions.
And as we release the physical tension,
We also release the emotional tension.
Which is why it's so important that you hold yourself safely.
You only apply as much pressure as needed,
Not more.
So your body knows it's safe.
The emotions know you're safe.
And that this is a gentle,
Supportive practice.
Allow for everything to settle.
Take a few more breaths.
I hope this short practice helped you soften the base of the skull and ease any tension here that can possibly build into a headache.
To support full integration,
You may want to listen to my other track called Deep Rest Savasana,
Integrate,
Soften,
Restore.
Or simply give yourself a few minutes of quiet time,
Letting your breath and your body unwind.
Please drink water throughout the day to help your body flush out any stagnant energy or toxins released from the tissue.
If you'd like more guided sessions,
You'll find many more of my first release tracks on my profile,
And they're constantly growing.
You're also welcome to try any of my upcoming classes.
If you'd like to connect more,
Please join my group called Awakening Inner Light that you can find on my profile page.
The intention of the group is that you have a place where you can share how this practice has helped you,
What you have experienced.
You can ask me any related questions,
Suggest content for future tracks or live events,
And connect with others.
This is our space to stay in touch and support another.
Please follow my profile to receive updates on new tracks,
Courses,
And live events.
Thank you for being here.
I'll see you in the next practice.
May your heart be your greatest teacher,
Your breath your guide,
And your heart your hope.