In this video I am teaching you how to move beyond the head forward posture and rounded shoulders.
This is not your typical video that I ask you to stretch things around and do a tuck chin exercise to fix the positioning of your neck.
This video is going much deeper than that.
Before I show you the three exercises that is going to change the game for you.
First,
Let me tell you why a lot of typical stretching and tucking won't work for you or hasn't worked for you.
If you're watching this video,
Probably you tried those things or maybe you wondered,
Oh,
I should have done more of them for improvement.
Yes,
Obviously we need consistency to see improvement.
And because we didn't get into these postural habits by accident,
It has been accumulated over time for an extended period of time.
And we need to have new input to be able to change our neural pathways and to be able to embody a more improved posture.
But having said that.
.
.
If you're not addressing the root cause of why we created that rounded shoulders and why our head moved forward in the first place,
Then the rest of our effort is going to waste,
Basically.
We are not experiencing a lot of improvement.
Two things that I'm going to talk to you about before going into the exercises.
Hey,
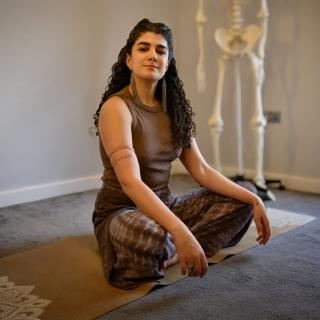
My name is Hedi Shaw.
I am a mindfulness teacher and a body worker,
And I teach those who've tried everything to finally move beyond what keeps them stuck and in pain through posture work,
Somatic work,
And mindfulness.
Number one is your psychosomatic adaptation to life.
What did you need it to be to belong to your family,
Society,
Culture as a whole?
And understanding what adaptation you embodied to make that belonging work,
To create that safety for yourself,
Can give you a lot of insight into why you're embodying certain posture,
And in this case,
That rounded shoulder head moving forward.
Away.
We need to stay quiet or we need to shy away or just shrink a little bit so everything else remains a little bit safer and a little bit more under control.
And our expression is not safe in this world.
I've got plenty of resources on that conversation.
But for today,
I am sticking with more the survival and the biomechanical aspects of this adaptation.
And hear what it is.
We're not just moving our head forward or rounding our shoulder for the sake of it.
It goes deeply into the way that our body needs to adapt for us to purely survive from breathing standpoint.
When my shoulder rounds forward and my chest collapsed in,
Whether that be a psychosomatic adaptation to the life experiences that you lived through,
Or it would be an adaptation to you spending too much time on your phone and not enough time actually looking around and having that expansion in the system to feel safe to open up.
Either way.
We don't have any capacity in the ribcage to expand 360 degrees.
That's when we need to be able to expand our lung.
And not only that,
To also create beautiful connection between our diaphragm and our core,
So we feel stable.
We feel that we get to adapt to life more effortlessly.
But so many of us have lost that and modern life hasn't helped with that either.
But in this case.
.
.
When the chest collapses in,
The head needs to move forward to open up your airways for extra breath.
And there has been studies done that every time our head moves forward,
We open up just a little bit more of our airways and we increase our ability to breathe.
And in this case,
You can do all the tucking in,
Which is literally the exact opposite of what your body is trying to do.
You see where I'm going with this?
So that creates a lot of excess tension in a body that is already trying so hard to adapt to this.
Posture.
So in order for us to do the tucking,
The easier way would be,
And a lot more practical way,
Would be for us to understand where do we need to expand for the body to find better way of breathing.
And typically these people who are stuck in this posture,
They're also stuck in using their neck for everything.
So our primary breathing muscle is our diaphragm.
But so many of us are using our neck and the shoulders as the primary breathing muscle.
So now we will get a lot more for our efforts and the time we spend on improving our posture if we actually address the root cause,
Meaning being able to expand our ribcage capacity,
Opening up our chest first to be able to get more air in,
And oftentimes the rest of the stuff becomes unnecessary.
I first show you how to open up do a soft massage open up the chest and learn to deactivate the neck.
Because even though I teach diaphragm breathing all the time and the intention is for you to learn how to use the diaphragm,
For me personally and for so many of my clients,
We are such heavy neck breathers that no matter how much I'm training this until I can really relax this,
Then this can fully take over and I'm not constantly dropping into the habit of breathing through the neck.
And then we relax the neck in the exercises I'm giving you.
So the first exercise is opening the chest,
The second exercise is relaxing Softening the neck and the last exercise is tying all of these together.
As a whole in your posture to support you to breathe better and also simultaneously relax the neck and open up the chest.
Find a comfortable position that allows you to relax and connect to your body as you're doing this exercise.
So we want to massage.
This area right underneath our collarbone that starts from this bony area.
And are underneath their neck all the way to inside our shoulder.
So we're basically going straight and slightly down into this area.
Straight and slightly down into this area.
So you can use your fingers and create a firm but gentle touch that can support you.
So we start here,
Slowly moving.
And then depending on what you're feeling and how tender this is,
You can definitely adjust the pressure.
And ideally you want to allow yourself to soften and relax.
These are the muscles that sometimes can be overworked to breathing and that creates a lot of tension in our neck,
Even in our head and in our skull.
So taking your time here,
We're here about 10 to 20 rounds of this.
And taking your time as you're doing that,
And then you're going to switch to the other side.
So again,
Taking your time,
We're moving underneath this bony area from this spot,
This bony dot here,
All the way into the inside of our shoulder.
And the shape is like this.
So we're going like this.
And.
Take your time as you're doing that.
So again,
We're doing that for about 10 to 20 reps.
And allowing yourself to receive this as you're doing this,
Because sometimes you can do things mechanically without actually receiving that gentleness that comes with it.
And noticing.
What you need to actually feel that and receive that.
So you can stick with doing it with your fingers.
But if we notice that there are a lot of tension,
That might be the case for you.
You could use a physio ball or even a softer ball that could work as well.
So basically,
Again,
We start from that inside going out along the fiber of this muscle that tend to get really tense due to breathing.
So you can even use your physio ball to do this with your hand that might give you more control and more firmness as you're going through that or we could do that on a wall.
So on the wall again we're starting from the inside out so get into this position lean in against the wall and slowly roll out towards that inner part of your shoulder.
Then by the time you get to the end of it,
You lift it back inside and then go again.
Again leaning in,
Allow the breath to remain nice and soft.
So you can ease into it,
You can relax into it.
This is one of my favorite exercises that literally changed my life and it supported so many of my clients and it finally allowed me to get out of my neck and feel like what it feels like to have a relaxed neck.
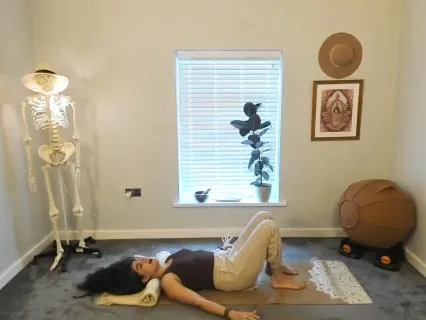
So for this,
You will need a towel or a blanket.
I would love something that has a little bit more texture.
If it's too soft and fluffy,
So you may not feel the support that you actually need for this.
So we basically roll this out and create a nice support.
So the level of support for everybody can be different.
But what is really important is when I put this underneath my neck,
I get to relax my head on the ground.
So ideally make sure that the excess part of your blanket or your towel be on the other side because that will support your head instead of it coming this way and interrupting the positioning of your ribcage.
So lie down on your back,
Make sure you have no ponytail,
Nothing that will disrupt the positioning of your head.
And then have your neck nice and relaxed.
On this cushioning So in here.
And we want to reinforce the natural curve of the neck.
Our neck is not like a stick.
It has a natural curve into it that allows us to have that freedom of movement and freedom for our eyes and our senses to experience the environment.
A neck meant to be free.
So you get into that position.
So you want to make sure that the back of the head is landing on the ground here,
Okay?
And now.
.
.
Make sure that you feel your feet tripod,
Meaning the bottom of the big toe,
Bottom of the pinky and the heel,
Both sides on the ground.
You also sense these two bony area above your pelvis on the ground as well.
I didn't say push it to the ground,
I said sense it.
So that's a very different experience when you sense it.
That allows you to ground through the feet tripod and the senses of the pelvis being on the ground.
All of that covered.
So you start moving the bottom jaw in front of the top jaw.
You want to do all of these with a lot of gentleness and softness.
It's not something that you're jaking off.
It's like really relaxed,
Really smooth as you're doing that.
You can have your hands relaxed on the ground,
Palms facing down or up,
Whatever that allows you to be more relaxed.
So we start driving the jaw forward towards the ceiling.
And gently move your eyes as if you want to look behind you.
Gentleness is key here.
You want to keep it really,
Really soft,
Really,
Really smooth.
That creates a subtle shift in the positioning of the head.
It's not that you're doing it yourself.
You're allowing that to happen as a result of the movement of the jaw.
And the movement of the eyes.
So we do that.
And then gently bring the.
.
.
Eyes back to centre,
Relax the jaw.
And check in with your brother.
I know this,
What's happening.
For so many,
They do feel a subtle softness.
Expansion.
Can we do that one more time?
And make sure that you continue sensing the feet,
Sensing the bony area above your pelvis.
Drive the bottom jaw forward in front of the top teeth.
Gently look behind you.
And then now bring your eyes back to center and let go of the jaw.
Again,
Check in with your breath.
We want to keep the in-breath.
Very soft.
Very relaxed.
We already talked about soft breathing,
Plenty in the space.
So making sure that.
You're really practicing that soft breath here.
And from here on,
The neck is not moving.
So the neck stays in this position.
For the remainder of this exercise.
Which you will need five to 15 minutes to be in this position.
And all you do is practice soft inhales through the nose.
Long exhale.
Through the nose.
Soft inhale,
Two,
Three seconds.
Long exhale.
The goal is to get into 8 seconds.
But work with what you've got access to.
Maybe at the beginning you only have 3 seconds in you on the exhale,
4 seconds on the exhale.
So keep that consistent and then over time improve the length of your exhale.
I'm going to review all the pieces so the head remains exactly in the same position,
Nothing is changing.
You sense the tripod beneath your feet.
You sense the top of the pelvis.
Hands,
Either palms facing up.
Or down or you could even have it on your ribcage so you can feel and sense the expansion of the ribcage because on the inbreast We want to minimize the movement of the neck and the belly,
And we want to feel the expansion of our diaphragm and our ribcage 360 degrees,
Meaning in the front,
To the side,
And to the back.
And then we exhale nice and long through the nose.
When we're exhaling,
We want to sense a nice integration of our side abs here.
And over time,
The more relaxed our body becomes.
Head and neck gets on the cushion and on the ground,
The more you start noticing that we're getting a little bit more air into the back of the ribcage.
But the key part here is when you softly inhale and get that expansion and you exhale,
There is that closure that happens in my ribcage.
Just watch me for a second.
Soft inhale,
Nice long exhale out.
It's very subtle.
Things are coming together.
I sense my side out.
The next ribcage and you start feeling that 360 expansion here.
So now,
You're just going to be here nice and relaxed without the head moving.
I know I am moving my head for demonstration purposes and making sure that I'm speaking to you.
For you,
You're just keeping the head relaxed and stay there and breathe.
For 5 to 15 minutes.
Let's do this!
A couple here and then I leave the rest to you.
For this exercise you will need a soft ball,
You could also use a foam roller or a blanket,
Rolled up blanket for this as well,
And then also a wall space.
Put your feet on the wall.
Put the ball between your legs.
And start.
By really first sensing your feet tripod on the wall here.
And then your arms are going to be nice and relaxed on the side.
If this is too much,
You can always manage what feels good.
So we want to feel some expansion in our chest as we're breathing here while we keep the neck and the head nice and relaxed.
So soft breath is key around this exercise.
But before we get into that,
So you want to make sure that you've got a nice 90 degree angle on your knees and then on your pelvis.
So you start digging the heels down towards the ground.
And as you're starting,
The feet are not moving.
So you're just digging it down.
So I didn't say push the wall away.
I said,
Dig it down towards the ground.
So that's when you're starting to feel the hamstring closer to the knees working.
And that's great.
And then you can think about tucking that pelvis under you.
So when we're talking about tucking the pelvis,
It's not about activating the pelvic floor or squeezing the bum.
Really thinking about the bone of your pelvis the ball of your pelvis move up.
If you think about that our light's shining right now,
Probably in that direction.
So we want to bring it up towards the ceiling.
That's another way to think about it.
So naturally just by being in this position,
Moving the pelvis in this position,
I'm also feeling my hamstring closer to the bum activating.
So I could almost slide a thin piece of paper underneath my bum.
I'm not here.
It's a very gentle,
Subtle shift and the shift is happening not because I'm lifting anything,
Because I'm activating these things.
And when we have all of these pieces together,
Naturally you feel more pressure around the ball or whatever you've got between your legs.
So we want to make sure that the ball or the foam roller or the blanket is not too high up towards the knees.
It's actually a little bit lower down.
And then.
.
.
When we got all these pieces together.
So you stay in this position and all you need to do is do diaphragmic breathing.
So breathe 360 degrees into your diaphragm.
Without getting too much air into the belly or activating the neck and the shoulders.
So soft inhale here.
And then imagine you have a birthday balloon on your lip.
And you can actually literally get a birthday balloon.
And I highly recommend you doing that because that's going to really change your relationship with your breath.
And you have a very clear reference point on what is moving and what is not moving.
So you blow it into the birthday balloon.
And naturally.
You're there's this feeling of your core wrapping around you and you start feeling and sensing your side abs activating.
So while these things are creating,
Being integrated,
Keep them integrated as you go for the next breath.
So we're basically building layer on top of layer.
So we maintain this nice integration as we go into the next breath.
So let's keep that going.
Soft inhale.
Again,
Nice,
Long exhale out.
The goal is two to three seconds in breath.
While lips are sealed.
And then eight seconds exhale.
If you don't have the capacity for eight seconds exhale,
That's okay.
Slowly build up to it.
If you don't have a birthday balloon and you don't feel much of a connection to this blowing out sensation.
When I say like you don't feel much of the connection is you don't feel your core integrating as much.
This is another version of exhale.
You can give it a try.
Imagine there's a mirror in front of you and you want to sigh the mirror out.
Everything stays the same.
The only thing that is changing is the way you're breathing.
Instead of blowing into a birthday balloon,
You're sighing it out and fog that mirror in front of you.
Let's try that for a few more reps as well.
Yourself in hell.
Nice long exhale out.
We do this for about 5 to 10 reps.
Hope this video landed for you.
Let me know your major takeaways.
How are you feeling after doing these exercises?
And thank you so much for joining me on the path of unconditioning.
My name is Hedi and I see you in the next one.