Hi,
I'm Lisa.
Welcome to Workshop Yoga.
Today,
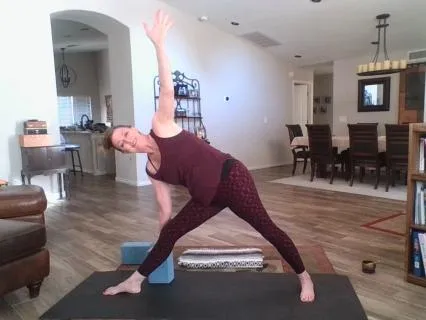
We're going to work on triangle pose.
And we're going to work with the three A's.
This is an anusara principle.
And that is attitude.
Alignment,
And action.
And attitude really is just having an open mind.
It's just being open to possibility.
What can I do with this pose?
So I'm going to go to my mat here.
This will be kind of a quick video and I'm going to start by grabbing a block.
Because I believe in using props.
Especially if you're newer to yoga or you're easing back in.
And by the way,
I do have a video called Ease Back In.
It's about an hour long,
But it's really a nice full rounded yoga practice,
But it's kind of slow and gentle and really nice.
Helps you ease back in so anyway with triangle pose this is called a standing pose And we're going to take the right foot and bring it to the front of the mat.
And we're going to look at the toes.
And you want the middle of your ankle to be aligned with the second toe.
So you're really just looking for a straight foot,
Right?
That's what I want you to think about for your right foot.
And then the left foot you're gonna take back.
And um the You know,
I like to talk about this in several of the poses.
What we're looking for is a combination.
Of stability and freedom.
So if your feet are too far apart,
You lose stability.
If they're too close together,
You lose freedom.
And so in this pose,
You're just going to have to play with this,
But like this is about where I'm at.
So I have both,
Right?
Not too far apart,
Not too close together.
The left foot's going to be either.
.
.
Parallel to the back of the mat or if you want to turn the foot in a little bit You can I find it's easier if it's more parallel to the back of the mat It doesn't strain the ankle and then take your left hand on your hip and your right hand You're going to grab the block and place it behind the right shin And this is your support.
And I'm bending my knee just to ease into the pose,
Right?
I can do this.
And I can also use my block on the lower level,
Either one.
And if you don't need a block,
You don't need a block.
But what we're focusing on here is the foundation of the pose,
Which starts at the feet.
So you want to maybe lift the toes a little bit.
Feel the space between the toes and then gently place them back down without pressing,
Without gripping.
But also,
Maybe.
.
.
Try to create an arch in both your feet.
So this is strong foundation.
When you have some energy moving through the feet,
It's very grounding,
It's very stabilizing.
Then you're going to take that energy from the feet all the way up the legs into the core of the pelvis.
So this is going to create a really strong,
Well,
The feet are the foundation,
But also you're going to build that foundation up through the legs and create lots of stability here.
Then we're going to take the hand on the block.
Bring your opposite hand on your hip.
And we're going to strengthen those legs.
So hug the muscles a little bit to the bone.
Strong legs.
While you're.
.
.
Strengthening those legs,
I want you to take your hips back a little bit.
So the right hip goes back,
The left hip goes back.
It's like you're widening your thighs apart just a little bit.
And then you're going to draw the navel in.
So that will even out that pelvic floor.
The left shoulder,
You want to just raise it a little bit towards your ear and then open it up.
And then bring the right shoulder back as well.
You're kind of squeezing both shoulder blades on the back.
From here,
We'll start by taking the arms straight out front.
Draw the shoulder back in and then lift the arm up.
You can have your gaze up.
You can have your gaze down or you can have your days anywhere you want.
And to come out of the pose.
So what do you,
First of all,
Feel like when you're in the pose?
Where do you feel stability?
Where do you feel freedom?
And then the expression of the pose.
We've opened our hearts,
Right?
We've opened our minds to what's possible in this pose.
And then we've aligned the pose for stability and freedom.
And then the action is the expression.
That's where we really shine in the pose.
I have a.
.
.
I have a frozen shoulder.
Well,
I had a frozen shoulder on the left side,
So my arm does not go all the way back.
But,
Um,
It's okay because I'm not in pain.
So anyway,
That is triangle pose.
Let's do it on the left side.
Why not?
It's funny,
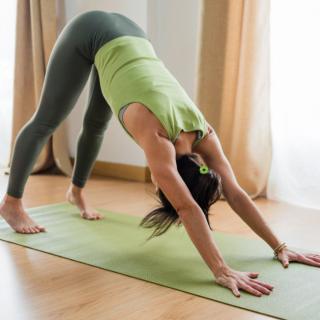
I have another video.
Call it's a workshop video for down dog there's only one side but in this post there are two sides so we're gonna take the left foot Straight.
We're gonna bring the right leg back.
To provide enough stability in the pose and enough freedom.
You'll probably want that foot parallel at least to the back of your mat.
Again,
You can turn your toes in if you want.
And the front ankle or the front heel is going to line up with the arch of the back foot.
It's typically how we line it up.
We take the block,
We bring it to the left of the shin,
Right hand on the hip for now.
Lift the toes a little bit.
Feel the air between the toes.
Gently place the toes back down.
Create a little bit of arch in the foot.
When you do that,
Your legs are going to automatically take some action there.
So then you're going to focus on creating a little muscular energy in your legs.
Once you have that,
You'll move the hips back a little bit.
And then draw the belly in.
Keep pressing down through the feet,
Rolling both of your shoulders back.
And then lifting your arm up If you wanna come here first,
You can pull the shoulder back.
This is upper alignment,
Upper body alignment.
And then you can look up at your hand.
Or again,
Anywhere else.
That you want.
I think I've covered it all.
But what a great pose,
Right?
It's like really great for strength.
It tones your legs,
Creates flexibility in the inner legs.
Again,
These poses,
There's a little,
Almost like a little twist in it,
But it's really good for the spine because it lengthens.
We want to lengthen the spine,
And then we express from there.
Thank you so much for joining me.
For triangle pose.
I hope you enjoy this pose.
And namaste.