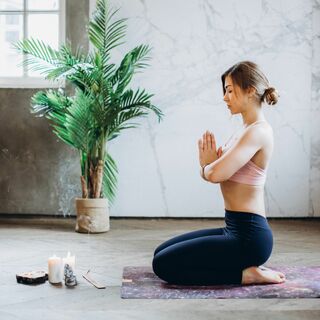
Hey everyone,
It's Nina.
Today's handstand class is going to be a mix of conditioning,
Drills,
And a little vinyasa flow,
And of course,
Handstands.
So if you're new to handstands,
That's totally fine.
This class is perfect because we're going to be going through a lot of strengthening exercises and then also drills to get you familiar to be in the shape of an actual handstand.
So the more that you practice,
The stronger that you'll get and the closer that you'll get to being in a handstand.
If you don't have a block,
You can use a book or something similar.
We just need to have that to hold on to and then also as part of our drills today.
So to get started,
Get on your hands and your knees into tabletop position.
We're going to start off by warming up the wrists a little bit.
So while we don't necessarily need to have strength in the wrists,
That's not really possible.
We want to open up the wrists so that we have a little bit more freedom to move forward and backwards.
So just begin to rock forward and backwards here.
And then turn the fingertips to face the body.
You can walk the hands a little bit closer or farther apart,
Just depending on what the flexibility of your wrists are.
The more that we begin to open this,
The easier this will get for you.
So the goal here,
Like I said,
Isn't to necessarily strengthen the wrist.
We want to open up the wrist to give them some more flexibility and some mobility.
The strength mainly comes from the forearms and the arms and the shoulders to support you while you are upside down.
So just rocking forward and back.
And then turn your fingertips to face opposite of each other.
And then just rock from side to side.
You can kind of shrug the shoulders a little bit here start to wake up the shoulders a little bit always important to warm up the wrist before you do any type of handstand work.
So to bring some more of that synovial fluid,
That lubricant in the actual wrist joint so that we're not injuring ourselves when we're going into this practice.
Bring your hands back to center.
From here,
We're going to go from this tabletop position and then up onto our fingertips.
So we're really working the forearm strength here.
So do your best to lift up.
The slower that you go,
The harder it is.
So we're going to do 10 total.
So lift up and down.
Bye.
Seven.
Nine 10.
Take a breather here.
Maybe rock forward and back.
Maybe you felt that a little bit in the forearms.
And that's exactly what we're looking for.
So coming back.
Into this neutral position.
We're going to do one more round of 10 of these.
Try to go a little bit slower if you can.
So lifting up for one.
Four.
Seven.
And then just tuck your toes under.
Shift your hips back onto your heels and take your hands to clasp together and just roll them out.
And we'll do a little bit of Qigong to wake up the wrists a little bit more,
Send some energy into those wrists and those hands.
So extend your hands out a little bit and just begin to flop the hands up and down.
Seems a little bit silly,
But just keep going,
Keep going.
As we do this,
We're just sending more energy into the hands,
Removing that energy within the body.
And over time,
Your hands might start to feel a little bit tingly,
And that's really good.
That's that energy that you're moving.
Good.
And then shake out the arms and just hang out here.
Feel that energy in the hands and the wrists.
Feel that tingling sensation.
We're gonna come back into tabletop,
Tuck the toes under,
And push the hips up and back into our first downward facing dog.
So really wanna just take a few moments here to pedal the feet out,
Start to wake up the hamstrings a little bit.
Hamstrings are a huge component of.
.
.
Getting into your handstands,
The more open and flexible your hamstrings are,
The easier it will be for you to jump up into your handstands and then as you progress,
Also lowering down and coming up and down into your handstand in different shapes.
We'll just start off with one sun salutation here.
So walk your feet all the way up to the top of your mat.
And inhale,
Halfway lift.
And exhale fold.
Inhale,
Lift your arms all the way towards the sky.
Take a little backbend here.
And exhale,
Hands to heart center.
Inhale lift the arms up little back bend here Exhale,
Fold forward.
Inhale,
Halfway lift.
Exhale,
Hands down,
Step back into your plank.
Lower down,
Chaturanga.
Inhale upward facing dog.
And exhale,
Downward facing dog.
So coming into a little bit of core work,
We're just going to start to wake up those abs.
So from downward facing dog,
Start to slowly roll the spine forward into a plank position.
And while you're here,
We're going to lift that right leg up.
And bring your knee to your nose.
Start to round through the upper back.
Really pulling that lower core up.
And then lower that knee down.
Lift the knee up.
And down for two.
Up,
Down for three.
Down for four,
Last one,
Lift up.
And lower down Extend that right foot back onto the other side.
Lift the left foot up.
Bring the left knee to your nose.
Round through the upper back.
Bring that knee as close to your nose as you can.
Lower down for one.
Three,
And five extend that left leg back push up and back into downward facing dog that anytime this gets too intense for you,
You can always come into child's pose where you bring your knees down,
Heels together.
And push your hips onto your heels.
So coming back up,
We're gonna grab a block.
So this next drill that we're gonna do,
It is going to teach us that hollow body shape,
And the specific muscles that we want to activate while we are in handstand.
So we're going to be in a handstand shape without actually being in a handstand.
So you can start to get more comfortable and really understand and have a better awareness of how your body should feel when you are upside down.
Because sometimes when we kick up to handstand and our bodies are all over the place and our legs are all over the place and we're not really sure how it should feel,
We can start by doing this on the floor and not being upside down so we can get our bearings a little bit.
So we're gonna come into plank and we're gonna place a block or whatever you have that's similar between our legs.
So we're gonna use this block so that we can squeeze the inner thighs and activate the inner thighs,
Which goes all the way up to the lower core,
Which will really help to stabilize us in our handstands.
So coming into a plank position.
Squeezing that block.
Then pulling the shoulders away from the ear.
So you really just want to start to wrap those shoulder blades down the back.
Of the ribs.
And keep your neck in a nice neutral position.
And just slightly tuck the tailbone under.
Really engage that core,
Squeeze the inner thighs.
We'll be here for five.
One lower down onto the forms.
Same.
Position here same deal here.
So we're going to squeeze our inner thighs together squeeze that block so it doesn't fall out And if you notice your butt coming up,
Just lower it down.
Squeeze the glutes.
Squeeze the inner thighs.
Keep those shoulders in line with the elbows.
Be here for five.
One push back up to plank.
Lower down to the knees.
And set your block aside.
We'll use that in a little bit for another exercise.
From here,
Come onto your forearms.
And tuck your toes under.
And just like you're getting up into downward facing dog,
Except we're going to go into dolphin.
So we're really gonna work on the shoulder strength and flexibility here.
So you don't wanna push the shoulders forward,
You wanna push them back as far as you can.
So take a deep bend in your knees for right now.
And then just imagine like you're trying to push your butt up and back.
Really pushing away from the ground.
And then from here,
Holding your upper body in this exact shape,
All you're going to do is start to walk your feet a little bit closer.
A little bit closer.
And then walk your feet back,
Coming into Forearm Plank.
Bringing those shoulders in line with the elbows.
And then back to Dolphin.
Pushing.
Butt up and back,
And then walking the feet forward.
And we're just gonna hold this shape for 10.
One,
And then from here,
You're gonna walk your feet back into your forearm plank.
Back up to plank.
And then lower down,
Chaturanga.
Inhale,
Upward facing dark.
And exhale,
Downward facing dog.
Come down to your knees.
We'll just catch our breath for a moment.
So.
.
.
Coming down onto your knees,
Place your hands up.
On the tops of your knees.
And just close your eyes.
Come back to your breath.
And when you're ready,
Let's come back into downward facing dog.
So from downward facing dog,
We're gonna roll forward.
Into a plank position.
And in this plank position,
We're going to roll onto the outer edge of our right foot and lift our left arm up to the sky into side plank.
Doing your best here.
Modification,
You can always take your right knee down to the ground.
This will make the transition that we're going to do next a little bit more difficult,
But do what you can.
Over time,
As you build your strength,
This will get easier.
So lift the left leg up to the sky and then start to bring the left knee as close to the chest as you can.
We're slowly going to take that left foot and place on the inside of the right hand.
So we're coming into this revolve low lunge.
Drop your right knee down.
Inhale,
Lift your arms up into a low lunge.
So take a moment here.
You can take a couple variations with your arms,
Lifting up and back.
Really just opening up the hip flexors here.
And then take the hands down,
Shift the hips back,
And straighten out your left leg into half split.
So continuing to open up these hamstrings.
Start to bend your left knee.
You're gonna take the right foot up to meet the left.
And inhale,
Lift the arms up into chair pose.
On an exhale,
Fold forward.
Inhale,
Halfway lift.
Exhale step your feet back into plank lower down chaturanga inhale upward facing dog and exhale downward facing dog So to roll the spine forward into your plank.
This time,
Roll onto the outer edge of your left foot.
Make your right arm up to the sky,
Side plank.
Coming down to your knee for a modification.
Lift your right knee up,
Or right leg up towards the sky.
And bend your right knee.
Start to bring it as close to your chest as possible,
And slow and with control,
You're gonna place that right foot on the inside of that left hand.
Revolve the lunge.
Drop the left knee down,
Inhale lift the arms up.
Taking any arm variation that feels good for you.
To really get that stretch in that left hip flexor.
Take your hands down to the ground.
Shift your hips back straighten out your right leg come into your half split Start to bend your right knee.
Take your hands forward and step your left foot forward.
To meet your right,
Inhale up to chair pose.
And exhale,
Release,
Coming into Mountain Pose.
So this is where we're going to do another drill.
Open up the shoulders and strengthen them a little bit.
So grab your blocks or whatever you have as a block replacement.
And we're going to go through two sets of five of these exercises.
The stronger that you get,
The more of these that you can do to challenge yourself as you get stronger and work on opening up the shoulders.
So you're going to extend the arms forward with the block in between your hands.
And while you're in the shape,
You're going to start to press your hands into the block.
And as you do this,
You'll start to feel that activation in the serratus anterior here.
So you really want to work on stabilizing the shoulders here.
So if you find that your shoulders are up by your ears,
Relax them down.
And as you start to press the hands into the block,
You'll start to feel some more stability in the actual shoulder girdle.
This is what you want to feel.
You want to feel the shoulder blades start to go down the back,
Kind of wrap.
Around those back ribs.
Continuing to press into the block,
You're going to lift up towards the sky,
Going up as high as you can.
And then lowering down for one.
Slow and control,
Lift up.
Pushing into that block.
Lowering down for two.
Pressing into the block.
And lowering down.
Slow and controlled here.
My arms are shaking when I do this exercise.
You probably should as well.
Try to push yourself and lift the arms up a little bit higher each time for three.
Lift all the way up.
And down for four.
Last one in this set.
Lift up.
Push yourself here.
And lower down,
All the way down.
Shake the arms out a little bit.
That one's a little bit more difficult because we're really putting a lot of attention in a very specific area that can be very uncomfortable because just in all the years that I've been teaching yoga,
Shoulders tend to be very tight.
So we're gonna really work on opening them up,
Which we really wanna have these nice open shoulders so when we're in a handstand and everything is in one full line.
We don't want to have our shoulders over here because it creates this line break and we're not able to find that center of balance within our entire body.
So the goal here is to really work to get that flexibility and that mobility in the shoulders so that we can be in one straight line in our handstand.
Alright,
So last step for these.
Extend the block forward.
Squeeze that block,
Feel the serratus anterior activate,
And just feel the shoulder blades go down.
And lift that block up,
Still pressing into the block.
Lowering down.
Five total,
Lift up.
And as you lift the arms up over time,
Start to think about squeezing the glutes as well.
And engaging the core.
I know this is a lot,
So just focus on one thing that you can focus on right now.
Maybe that's just squeezing the block and that's perfect.
So we start to gain awareness of the different aspects of our body.
We'll be able to stack on.
And add in more body parts to the awareness and have a little bit more awareness of more than just one thing at once as we progress because it starts to become second nature for us.
The more that we practice.
I think this is the last one I was talking and not paying attention.
All right,
Lower down.
And relax shake the arms out a little bit and release that block over to the side i don't think that we'll do that for the rest of the class So we're gonna come onto our backs now to do a little bit of core work before we do our actual flow.
So come all the way onto your backs.
We're gonna do a progression here.
So this is for.
.
.
Really working on having an awareness of creating a hollow body shape and engaging the core while we're in handstand.
So you're gonna lift the feet up so your shins are parallel to the ground.
And maybe you notice that your lower back automatically lifts up off the mat.
You can maybe put your hands underneath your back like I do.
I have this natural arch in my lower back.
It's completely normal.
So the goal here is to pull the belly button into the spine so that our lower back is on the ground and we can't put our fingers under our back.
So from here,
We're just gonna work on lowering the feet down to the ground one at a time and making sure that we are keeping that lower back on the ground.
So this is gonna be a progression of core exercises.
So bring your hands by your sides.
And make sure that that lower back is pushing into the ground start to extend and tap that right heel to the ground.
And then the left heel.
And as you lower the legs you'll start to feel that your lower back wants to really come up off the ground.
So do your best to engage that core and keep it on the ground.
So keep it going here.
If these are a challenge for you,
This is an exercise that you can start to add into your daily routine to really start to engage the core and begin to strengthen.
That lower core.
Just a few more here.
And come back up here where your shins are about parallel to the ground.
So instead of doing one foot at a time,
We're going to do both at a time.
So if this is a little bit too hard for you and you feel that your back is coming off the ground,
Just go back to the one-legged taps and that's completely fine.
So lowering the heels down.
And lifting up.
So you can see where my back wanted to come up off the ground.
So maybe you don't lower.
Heels all the way down to the ground.
You just do your best.
And when you get to that point where your back wants to come off the ground.
Just bring the legs back.
Just a few more here,
Pushing that lower back into the ground.
We're going slow and controlled here.
We want to be more mindful as we start to develop more awareness of the core and this proprioception of where our body is in space in relation to the rest of our body.
So,
For example,
We want to know what our lower back,
Our core is doing,
What our legs are doing,
What our arms are doing,
All at the same time when we're in handstand.
So we do this by starting off.
And doing simple exercises like this.
And as I said,
Over time,
We'll get a little bit more comfortable,
And it'll start to become ingrained in our muscle memory,
So we don't have to consciously think about these things.
We'll just be able to naturally do them.
Alright,
Place your feet down to the ground.
So next thing we're going to do is a hollow body shape hold.
This might be a little bit more difficult,
Especially if you don't have the core strength and that's fine.
So like I said,
Just do the best that you can.
If this is really difficult,
Think about lifting your feet up a little bit higher.
That should take a little bit more of the stress off the core.
So we're going to go into a hollow body shape.
We're only going to hold for 20 seconds,
But we want to be in the shape to get us in the feeling of what it means to really activate the entire body while we're in handstand.
While not being on our hands.
All right,
So.
Just sit up for a moment.
You're going to extend your legs out and bring the arms over the head and then just lower onto the ground so your lower back is going to be on the ground here.
If you find this arch in your back,
Lift the feet up a little bit higher.
So squeezing your inner thighs together,
Squeezing your feet together,
Trying to bring the shoulders back a little bit more,
Trying to push your thumbs to the ground behind you to open up the shoulders.
We're almost here.
One release All right,
Now come onto your bellies.
We're just going to do one more hollow body drill just to get.
.
.
A little bit more.
It's more of a nuance.
To get your body to understand what it is to feel like to Really tuck the tailbone and engage the core while you're in this hollow body shape while you're upside down.
So come onto your stomach.
Bring your arms out in front.
And keep your toes untucked here.
So what you're going to do is you're going to place your forehead on the mat And then from here you're going to tuck the tailbone and lift the hips up off the mat.
So it's going to feel a little bit weird,
But we're really working on.
.
.
Going to this one specific area of our body to engage that lower core and create more of that hollow body shape in this area of the body.
So we're going to be here for about 10 or 15 seconds.
So place the forehead on the ground.
And lift the hips up.
Just continuing to breathe here.
And lower the hips down to the ground.
We're going to do one other variation.
So the next one,
Instead of focusing just on the lower core where we're lifting your hips off the ground,
We're going to focus on doing more of that hollow body shape and the upper body.
So we're going to come up onto the fingertips and tuck the toes under.
And we're going to start to create that hollow shape around the rib area.
So you're going to lift the belly and the ribs off the ground.
And just hold this shape.
You need to come down and rest you can.
But the whole point of this is really Bring the belly up towards the sky.
Create this hollow shape.
And open up through the shoulders.
And squeeze your legs together We'll be here for five.
One and lower down to the ground And start to push yourself up and back to the back of your mat.
Sit on your heels.
Bring your hands to your knees.
Take a few moments to catch our breath.
Maybe roll the shoulders around.
Shake the arms out.
Before we go into our main flow today.
So our body should be nice and warmed up.
You should feel like you've worked your muscles a little bit,
Especially your core and your shoulders.
In this flow we're going to do some balancing.
And some core work as we go through these transitions.
And then at the end of the flow,
We're gonna go in for some handstands.
So if you're new to doing handstands,
Don't worry about this too much.
You can attempt them the best that you can.
If you feel more comfortable going against a wall,
You can do that as well.
So I'll tell you a little bit more when we get to that,
But just to give you a heads up.
So to get started,
We're gonna come into a downward facing dog.
From down dog,
You're just gonna jump your feet all the way up to the top of the mat.
And inhale,
Lift your arms all the way up towards the sky.
And then from here,
You're going to pick the left leg up and push up and bring it all the way back into your crescent lunge.
So bringing both of the hips forward,
Squeezing that left glute,
And sinking the hips a little bit deeper.
From here,
Start to straighten out your right leg,
Turn your back foot down to a 45 degree angle,
Keeping those hips facing forward,
And fold forward into your pyramid pose.
Again continuing to open up the hamstrings.
It's a little bit easier because when we have the flexibility in the hamstrings If we're not that flexible,
It's going to be harder for our hands to be on the ground versus when our hands are on the ground and our stomach is closer to the tops of our thighs,
It immediately puts us in a position where our hips are closer to being stacked and in line with our shoulders when we're in handstand.
So hamstring flexibility is extremely important or part of getting into a handstand.
From here,
Start to bend your right knee,
Extend your arms forward,
Lift your left leg back into warrior three.
Continue to breathe here.
Take your hands to your hips.
Swing that left leg forward.
You can keep your knee bent or you can extend your leg forward.
So take your variation.
Just really working on this balance here,
Squeeze that right glute.
And then push that left leg back.
Come into standing split.
Take your hands down to the ground.
Flex your left toes.
Relax your head and your neck here.
You can keep your toes flexed and your hips closed.
If you'd like to open up the hips and go a little bit deeper,
You can do that as well.
So to lower that left foot down.
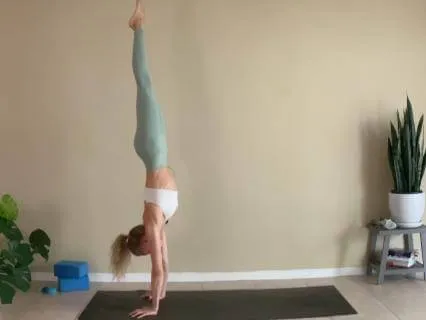
So this is where we go into the handstand.
So we're gonna start from this position of this low lunge.
So you're gonna take your hands down,
Bringing your belly to the tops of your thighs.
So you wanna try to keep.
Your belly and your thigh as close as possible when you kick up.
So when you come from this position,
Going to lift.
Keeping your arms as straight as you can the entire time.
So remembering when we were doing those drills,
Lifting the arms up and down,
Feeling that stability within that shoulder girl.
You want to try to feel that when you kick up.
If this is too overwhelming or too much you can just practice taking small kicks.
And that's perfectly fine too.
Handstands are a progression and wherever you're at is the perfect place to be because you can only continue to build onto that.
Be easy on yourself or go easy on yourself.
We all started in the same place and we're all working towards that same goal.
So try this three times.
Again,
You can use a wall.
You can take small hops.
You can go for the handstand.
So go for three.
And when you're done,
Come back into downward facing duck.
Roll forward into plank.
Lower down,
Chaturanga.
Inhale,
Upward facing dog.
And exhale,
Downward facing dog.
Take a big inhale in.
And exhale out.
Look to the top of your mat.
Jump all the way up towards the top.
Inhale,
Lift your arms all the way up towards the sky.
And step your right foot back this time into crescent lunge.
Relaxing the shoulders from the ear.
And squeezing that right glute,
Sink a little bit deeper here.
Start to straighten your left leg.
Turn that back foot down.
Come into your pyramid pose.
Allowing your head and your neck to relax here.
You can bring your hands down to the ground,
Maybe place your hands on blocks.
Maybe you like to have your hands behind you.
In more of like the traditional sense of doing pyramid pose.
I like to have my hands on the ground,
So take your variation.
Start to bend your left foot.
Her left knee.
And extend your arms in front and lift that right leg back behind you into warrior three.
Bring your hands to your hips.
And swing that right leg forward.
You can keep your knee bent.
You can extend your leg forward.
Take whatever variation you like,
Squeezing that left glute.
Start to bring that right leg back behind you into your standing split So squaring your hips or opening them,
Taking your variation of your standing split,
Just allow your head and your neck to relax here.
The goal here is to get that stretch in the back of the hamstring.
Lower the right foot down to the ground.
Come into this 90-90 shape.
So same thing as the other side,
This may be more difficult or easy for you,
Depending if you're right or left-handed.
And that's normal.
This side's a little bit more difficult for me.
So I have to be a lot more mindful of how I kick up.
I'm not as flexible in my left hamstring.
So it takes a little bit more of a kick for me to get up.
So just do the best that you can.
Let's go for three kick ups.
Keeping your arms straight.
When you kick that right leg up,
That back leg up,
Think about squeezing that leg.
And keeping it straight.
And then coming back into downward facing dog after three attempts.
Roll forward into your play.
Lower down,
Chaturanga.
Upward facing dog.
And downward facing dog.
We're gonna go through that flow two more times,
A little bit faster.
So look to the top of your mat,
Jump all the way up towards the top.
Inhale,
Lift the arms up to this guy.
Step the left foot back into your crescent lunge.
On an exhale,
Come into pyramid pose.
Inhale,
Halfway lift.
Exhale,
Bend your right knee.
Extend your arms forward.
Come into warrior three.
Inhale really lengthen through the body.
Exhale,
Hands to the hips,
Swing that left leg forward.
Inhale really lengthen through the spine.
And exhale,
Kick that left leg back into standing split.
And lower down that left leg.
Come into your 90-90 stance.
Go for your three handstands.
And after three attempts come back into down dog.
Flow through your vinyasa.
Look to the top of your mat.
And jump all the way towards the top.
Inhale lift the arms up to the sky And on an exhale,
Bring that right foot back into Crescent Lunge.
Inhale,
Reach the arms up to the sky.
Exhale Pyramid Pose.
Inhale,
Halfway lift.
Exhale,
Warrior three.
Inhale,
Lengthen through the body.
Exhale hands to the hips,
Swing that right leg forward.
Inhale lengthen through the spine and exhale standing split.
Inhale,
Halfway lift.
Exhale,
Bring that left foot down,
Kick up into your handstand three times.
And when you're done.
Come into your downward facing dog.
And flow through your vinyasa.
From downward facing dog,
Jump to the top of your mat.
Inhale,
Lift your arms up to the sky.
Just one more round on each side.
Exhale,
Step your left foot back,
Crescent lunge.
Inhale lengthen,
Reach the arms up to the sky.
Exhale Pyramid Pose.
Inhale,
Halfway lift.
Exhale,
Warrior three.
Inhale,
Lengthen through the spine.
Exhale,
Swing that left leg forward.
Inhale,
Lengthen through the spine.
Exhale,
Standing split.
Inhale,
Halfway lift.
Exhale left foot down go for your three handstand kicks if you're tired maybe you just go for one or maybe you just hang out here and flow through your vinyasa after your three hands hands.
Flow through your vinyasa and meet me in downward facing dog.
I'll just do this one more time.
On the other side.
From down dog,
Jump to the top of your mat.
Inhale,
Lift your arms up to the sky.
Exhale,
Step the right foot back into crescent lunge.
Inhale,
Reach the arms up.
Exhale Pyramid Pose.
Inhale,
Halfway lift.
Exhale,
Warrior three.
Inhale,
Lengthen.
Exhale swing that right foot right leg forward inhale lengthen Exhale,
Standing split.
Inhale,
Lift halfway.
And exhale,
Step that right foot back.
So coming into your 90-90.
Last couple of handstand hops that we're going to go into from this position.
And meet me in downward facing dog after you've flowed through your vinyasa.
Drop down to your knees.
Come into child's pose.
Come back to your breath.
So.
I had planned for us to do some tuck jumps into a handstand.
But.
.
.
I think this is enough for this cost today.
We're going to start to slow down,
Stretch out the shoulders,
Stretch out the front of the body.
And then we'll end in a final Shavasa.
So we're going to come onto our stomachs.
So coming from your child's pose onto your belly.
Extend your left arm forward.
And thread your right arm underneath with your palm facing up.
Can place your chin on your shoulder.
So take your variation to relax as much as you can here.
So I like start to.
.
.
Come out of this posture,
Extend the right arm forward,
Thread the left arm underneath.
Slowly start to come out.
And press all the way up,
Coming up onto the shins.
I'm going to go into a camel pose.
This doesn't have to be an intense stretch or anything.
I just really want to think about opening up through the front of the belly and the chest.
We did a lot of core work today,
So we want to open this up a little bit.
We always want to work on counteracting all of those forward folds and the core strengthening exercises to open up the front of the body.
Because if you think about it,
We're constantly doing forward folds and things that really contract the front of the body.
So camel pose,
You're going to take your hands to your lower back.
So fingertips facing up towards the sky.
On the lower back.
Start to bring the elbows in close to each other.
Start to feel the front of the chest open.
Think about lifting the chest up towards the sky,
And then slowly pushing the hips forward,
Slightly squeezing the glutes.
And feeling that stretch in the hip flexors.
Come back up.
Slow and controlled.
You can play around.
Your knees should be about in line with your hips,
Maybe a little bit wider.
So find what's comfortable for you.
If this hurts your lower back at all,
Then just stay at a place where in the beginning of the stretch where you may not feel that pinch in your lower back.
You don't want to feel this in your lower back.
You want to feel this opening in the chest,
The front of the body,
And the hip flexors.
So I used to feel a lot of pinching in my lower back when I did this.
This pose when I first started doing yoga because I was really trying to jam everything from my lower back and push my hips forward.
And I wasn't really creating that openness in the chest because the more I'm open here in the shoulders and the upper body,
The more that I can decrease that pressure and that crunch in the lower back.
So really think about lengthening through that entire spine and lifting.
Let's go into this one more time.
And slowly start to come out.
And come onto a seated position with your legs out in front.
I take the hands behind you with the fingertips pointing towards your feet.
And then bend your knees and you're just going to keep your elbows bent behind you.
And you're just going to sink down into the shoulders.
So we'll kind of go back and forth,
Bending the arms and then straightening.
So slow and controlled here.
Only go as far as you feel that stretch in the front of the shoulders.
And slowly come all the way onto your back.
Hug your knees into your chest.
Bring your arms out to the side.
Drop your knees over to the left.
Just a quick little.
.
.
Twist before we make our way into Shavasana.
Bring the legs back to center and then drop the knees over to the right.
Bring the knees back to center.
Hug your knees into your chest.
And then release your legs down in two.
Shavasana palms facing up.
Bring those shoulder blades a little bit closer together,
And then down the back.
Really open up through the chest here.
If this bothers your lower back,
You can bend your knees,
TB them in together.
We'll be here for about a minute or two.
Always are more welcome to pause the video if you'd just like to leave here for as long as you'd like.
Slowly start to come back into your body taking movements,
Small movements.
With your fingers and toes.
Reaching the arms over the head.
And over the next few moments,
Just make your way all the way up to a seated position.
Place your hands on your knees.
Close your eyes.
Let's take a big inhale in.
And exhale let it out.
Thank you guys so much for joining me in this handstand conditioning drill flow.
A little bit different than my other classes,
But handstands are a little bit of a different beast because there are so many components that go into getting into an actual handstand.
It takes a lot of practice,
A lot of body awareness,
And a lot of time to really dedicate yourself to being upside down and getting on your hands.
One of the first steps is just by doing classes like these a better awareness of your body and really building up your strength.
So great job today,
Guys.
Thank you so much for joining me and I will see you on the mat in the next video.
Bye guys.