Hi,
My name is Catherine,
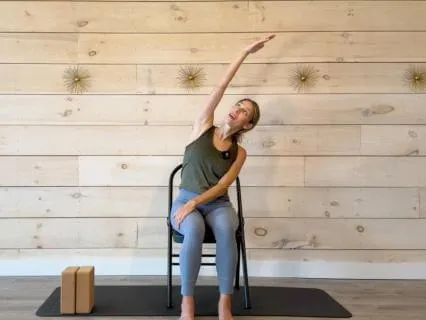
And thank you for joining me today for this brain and bone health chair yoga class.
This class can certainly be adapted to on the mat,
Seated and standing.
You can use any chair that does not have wheels.
So a sturdy chair,
Maybe having a wall nearby would be helpful for the standing postures.
And if you have either yoga blocks or something that would bring the ground just a few inches higher up,
That can also be helpful.
So in place of a yoga block,
You might use a book or a small stool,
Something that's flat that can bring ground up just a little bit higher.
Not necessary,
But it may be helpful.
So there's no experience needed.
This whole class is meant to help.
Work the left and right hemisphere of your brain,
Working proprioception.
Reducing cortisol levels,
And loading for the bones.
So there'll be some work on the femur bones,
Supporting our hips,
Knees,
And whole body.
So we'll begin seated in a chair,
Finding a comfortable place where your feet can meet the mat,
The floor,
Whatever is beneath you.
You might be barefoot or maybe have sneakers on for this practice.
And to begin,
We'll take what's called rupa mudra.
So mudras are hand gestures that have been studied to help support the body,
The mind,
All parts of ourselves in different ways.
So rupa is a very stabilizing mudra that's great for the support of bone density and bone health.
So to take this mudra,
We'll begin by curling in your three fingers.
I'm sorry,
Curling in your ring finger and middle finger.
So you'll have the index finger and thumb and pinky finger extended,
And then curling in the thumb.
So the right hand comes over your left.
And interlace together so you're Pinky fingers are interlaced and your index fingers are pointed outward.
So that is all it takes to create Rupa Mudra.
Try not to hold your fingers too tight.
You could rest the hands on your lap or let the hands float over your lap.
Relaxing the shoulders down away from the ears,
Finding a nice,
Tall,
Strong spine.
Maybe softening your gaze or even closing your eyes for just this moment if you'd like.
Letting go of any lingering thoughts and allowing yourself to be fully present for this moment.
This time of brain and bone building.
Letting the face muscles relax,
The jaw.
Just coming to your breath here.
Observing the inhale.
Deeply exhale.
And the subtle spaces between.
You might even notice how holding your hands in this position feels within your arms,
Your bones.
Your nervous system.
How your breath may be.
Impacted or arriving.
Without having to change anything.
Just noticing and observing.
And allowing for up to two more full breaths here.
He might take an audible sigh out the mouth.
And then with the next breath,
If the eyes are closed or the gaze is soft,
You could start to flutter the eyes open,
Releasing the hands,
Maybe shaking out the hands a little as the arms rest to the sides.
We'll continue to add breath and body movement together by letting the palms turn away from the body.
On the inhale,
We'll reach the arms up.
And on the exhale,
Lower the hands back down.
We'll do that about five more times.
You can start to watch the hands come up overhead.
And exhale to lower back down,
Looking towards your lap.
Inhale,
Let the gaze come upward.
Exhale lower back down And if your shoulders feel better to go forward,
That could be an option too.
Inhale forward.
Exhale lower.
We'll take two more whichever way your arms feel best moving today.
Shoulder rotation might be different day to day.
And after this next exhale,
We'll let the hands come down to the sides,
Resting here.
Going to take a cross lateral stretch.
So laterally stretching the spine and creating a little bit of mind work as well with the left right hemisphere of the brain crossing over.
So to do this,
You're going to take your right arm to lift up towards the sky,
Taking a side lean to the right as your left hand crosses over to the right thigh.
Breathe a full breath in here.
And if accessible for the neck,
You might start to bring the gaze even up towards the hand.
And we'll lower back down with the right arm and take that one more time,
Keeping the hand here.
We'll inhale to rise up and exhale to reach.
Feeling the side body sweep through the body.
Maybe take the hand off the leg and take just one more.
Hand crosses,
Right arm lifts up and over.
And then we come back to neutral.
Pausing here.
Just noticing and feeling how one side of the body is arriving now versus the other.
And then we'll take the other way,
Lifting your left arm up as the right hand crosses over the leg.
Maybe the gaze follows,
And that might not feel good on your neck.
So if it doesn't,
Don't do it.
Listen to your body.
Crossing one hand to the outer leg,
Thigh,
Knee.
As the right arm,
Or left arm now,
Reaches up and over.
And we'll take just one more,
Crossing the hand,
Reaching up and over.
Full breath here.
Let the gaze go where the neck is happy.
And we'll lower both arms to the sides.
We'll come right into another twist from here.
So we'll take the right hand to twist to the right.
Sorry,
I'm going to mirror you.
We'll take the right hand to twist to the right.
So your left hand is going to cross over to the right knee as your torso twists to the right.
Inhale and lengthen,
Keeping the head between the shoulders as you move towards the right.
From this position,
We'll start to lower the chin towards the chest.
And then bring the gaze up towards the sky.
Now extra brain challenge here.
You can lower the chin towards the chest and try to lift the eyes up towards the sky.
And then as the head comes up,
The eyes go down.
So as the chin lowers,
The head looks to the floor,
The eyes look towards the sky.
Just a couple more times.
The eyes and the head going in opposite directions,
Very unnatural.
For the body.
Which makes it super effective.
Good.
After the next one,
Take your time to come back to a neutral head and we'll switch to twist to the left.
So taking your right hand to the left thigh,
The other hand could stay down by your side or hold on to the side of the chair,
Depending on if you have arm rest or not.
And the same thing,
We'll lower the chin towards the chest.
Lift the head,
Lower the gaze.
Lower the head,
Lift the gaze.
Lift the head,
Lower the gaze.
Up to two more on this side.
Maybe one side caught on quicker than the other.
Might be still very challenging.
And that's normal.
Coming back to neutral,
We'll start to unwind back to center.
So our eyes are used to moving with the neck together in the same direction.
So these things are great to throw off our normal muscular skeletal behavior.
So as we come back to center,
Let's come to a march.
So we're going to lift one foot up.
You can tap the leg and then the other.
Lifting one foot,
You could come to take the standing eventually too to work the balance a little bit more.
But for today,
We're going to take it seated and go through three different variations.
So see if you could really move slow through this.
Added.
Bonus,
If you want to tap opposite hand to opposite knee.
Crossing over You could tap the knee,
The thigh.
And we'll stay with this for a few more times,
A few more breaths.
Breathing fully.
And deeply.
Let's take one more on each side.
And then come back to center.
Continuing the same motion,
But this time we're gonna press the hands up towards the ceiling.
You could add weights for this too.
If you're working with strength training,
You could add a light weight,
A dumbbell,
Maybe a soup can or a water bottle in your hand.
So as one hand lifts up,
The other lowers down.
Now adding your heels.
One heel lifts and the opposite arm lifts.
One heel lifts,
The opposite arm lifts.
The core,
The lower abdominal area is really strengthening here.
So see if you could really press the hand up.
Lifting the heel.
You might lift the whole foot.
Just like we were doing before,
That will change how you feel the sensation.
And if you have automatically switched and you have the same side hand and leg lifting,
That's okay too.
You'll be working your obliques.
So be working the side body in a different way.
And it's great for the brain to keep trying to go back to where you were.
So changing it,
Maybe go back to the hand taps if the shoulders have become tired.
Maybe you stay with the heel lifts.
And tap.
So just a few more breaths,
Whichever one you're at.
And then we'll stop here and take one more variation of this,
This time tapping one heel forward and bringing the foot back.
Keep the spine long.
So we tap the heel forward,
Bring the foot back.
You could cross the hands at the chest.
You could continue to tap the opposite leg.
Go from opposite leg.
To the same leg.
So we're continuing to challenge the mind,
Challenge the brain.
Come back to our breath and feel what's happening physically within your core,
Within your hips,
Within your whole body in this movement.
Let's just take one more on each side.
Good.
Making our way back.
To a seat,
Taking a full breath here,
Maybe softening your gaze,
A full breath out.
And we'll come to the option of standing for the next couple positions.
You could stay seated if that works better for you today.
I'll show standing and you'll just do the exact same thing in your chair if that's where you're going to stay today.
So as I come up to stand,
I'm going to move my chair so that I have the back of,
I'm going to have it so I have the back accessible and also the seat accessible.
So I'm going to start in front of the chair.
At the seat level.
If you have blocks,
You can move those out of the way.
We'll come back to them later.
So we're going to come to a chair pose with a chair behind us.
So my feet are in front of me,
Maybe just about hips distance or slightly wider.
And I'm going to come to a chair pose hovering over the chair.
So loading my femur bone,
Loading at the hips,
Working the core strength,
The strength of the back.
And your hands could stay pressed together in front of the heart.
You could keep the arms extended out in front,
Or you could have the arms lifted up to the sky.
So as I ground down through the feet,
I'm going to lift up to a chair squat,
Strong in the core,
Strong in the back,
Arms extending straight out,
In at the heart center,
Up towards the sky.
Hold here a few breaths,
Feel the strength of the quads.
If you'd like,
You could also put the block between your thighs to find the right position for you.
So if you have a block or something that fits there,
You could squeeze the block between your thighs,
Just an option,
Not necessary.
And then either staying with this hold or starting to take little pulses,
Really starting to load So pulsing down,
The chair is there for you.
So if you need to take a break,
It's right there.
Bring your hands back down to it,
But work the challenge.
Little pulses,
Lowering down to lift up.
Find your breath.
Keep your gaze in one place.
Let the hands be where it feels best on the shoulders.
Good,
And at the next one,
We'll stay standing,
Rise back up.
If there's a block between your legs,
You could take that out.
And we'll move to stand behind the chair,
Having the chair accessible to hold onto for a tree posture.
So working our balance,
Our proprioception,
A variation here.
So holding onto the chair with one hand,
We'll take the outer leg to come up to a tree posture.
So the foot could stay at the heel.
Heel to ankle,
You could use the block to place the foot on,
Or you can bring the foot onto the leg.
Just being mindful that we're not totally loading and dumping into the standing hip.
So find a nice strong lift through the side body,
Strength through the core.
Shoulders over the hips.
If it's better on the hip,
You can keep the knee facing forward.
You can keep the toes down and challenge yourself.
Challenge the strength of the muscles.
Maybe find a hand gesture or extend the arms.
Out to the sides.
And then find a gazing point straight ahead,
A place on the floor or the wall that helps you to keep your balance.
So as you gaze here.
We breathe.
I try to hold for a decent amount of time.
Coming in and out as many times as you'd like or need.
Any amount of swaying is a good sign.
The muscles are strengthening.
The trees outside are always swaying and moving,
So there's no reason why you need to be perfectly still.
It's all a practice.
The chair is there for you.
Maybe the wall is next to you,
Too.
Don't be afraid to use your props,
Use your support.
As you work through these shapes.
These postures.
And slowly and mindfully with your next couple breaths,
Start to lower the foot back down.
Maybe circle out that ankle.
Or foot,
Maybe both ankles,
Find a little circle.
You may even circle the foot on the floor.
Working all the way up towards your hips.
And then we'll take the other side.
So if you're using the chair for support,
You might just move your chair or move your body to the other side of the chair so that you have that accessible.
Opposite foot will come forward.
This side might be very different.
So as you switch legs,
Just notice what does this side need?
Do you want to keep the foot down?
Keep the knee forward?
Can you find that nice strong lift through your torso,
Through the trunk?
Decide where the hands want to be.
And we hold.
We hold and breathe.
We're working on balance.
Stability.
Strength.
Building within the bones of this balanced leg.
Working through our proprioception,
Where our body is in space and time.
By keeping our eyes focused.
On one single point straight ahead.
Assisting ourselves with different arm positions.
To find what can change.
Within the balance,
Within the mind.
Within the body.
And just do more breaths here to finish out the side of tree pose.
If you're seated,
You're doing the exact same thing.
Working just as hard.
Starting to lower the standing,
The balanced foot up.
Back to the floor,
Taking maybe a little circle of the ankles or the hips.
And then we'll come to just one more standing posture.
So we'll be doing another heel lift.
So you can use the chair as a place to know it's there for balance,
An option to add the arms in or not,
It's up to you.
So we're going to work this with the breath in an opposite way of what the body naturally wants to do.
So as we come to lift the heels,
Sorry,
We're going to keep the heels down to start.
We're going to inhale and lift the arms.
As you exhale,
Lift the heels.
Hold here for two breaths.
Arms and heels lifted.
Spine long,
Core long.
The hand could be on the chair.
You can start with one arm.
And then the other.
And then inhale,
Lower back down.
Exhale at the bottom.
Inhale,
Arms reach up.
Exhale,
Heels rise up.
Hold here.
Building strength through the glutes,
Through the calves.
Through the legs,
The mind,
Lowering back down.
Good,
Inhale,
Arms rise up.
Exhale,
Heels lift up.
The opposite of what our body naturally wants to do with the breath.
Is working everything in a much different way.
Holding here.
You can have one arm down and one arm up.
Great way to test the balance too.
Both hands can be at the chair or the wall.
Inhale,
Lower back down.
Exhale at the bottom.
Let's just do two more.
Inhale,
Lift the arms.
Exhale,
Lift the heels.
Hold for two breaths.
Same as tree,
Find your single pointed focus,
One place straight ahead that you can gaze to.
And then lower back down.
We'll take one more.
Inhale,
Arms rise up.
Exhale.
Heels rise up.
Two full breaths here.
With the next inhale,
Start to lower back down.
Exhale and pause.
Feel and notice as we stand in mountain pose,
Ears over shoulders,
Shoulders over hips,
Hips over heels.
Feel the balance,
The stability,
The strength of your whole body,
Your bones.
Your brain.
Everything aligned.
Pause here.
And then we'll come back to a seat.
We'll finish off with just about a couple more movements.
Back in the chair,
Back on your floor or mat,
Wherever you are.
We come to a seat and we'll find an eagle pose of the arms.
So let me turn just slightly sideways.
So as we come to eagle arms,
We'll extend both arms out,
Taking the right arm under the left so the elbows stack.
This is a great place to pause.
Arms at this wide V or maybe the hands come to the shoulders and the elbows extend forward.
Elbows are still stacked.
This can be a great place to be.
If your shoulders have taken eagle arms and you're comfortable bringing either the backs of the palms or the backs of the hands or the palms together,
Shoulders can come up,
Elbows can come up to shoulder height,
And you can breathe here a full couple breaths.
Feeling the opening behind the shoulder blades.
Noticing your breath,
If it's become limited in any way,
You might have twisted or reached too far,
Maybe soften the hands or soften the arms.
We'll just take two more breaths here.
Slowly unwinding the arms,
Taking the hands to the shoulders and gently circling out the shoulders,
Circling the elbows,
Change direction to go the other way.
Good,
And then we'll take the arms the opposite way.
So opening the arms wide.
Bring the left under the right.
If you didn't follow the same way that I did in the last one,
You might notice right away if it feels the same or very different.
So maybe you're at this wide V.
Or the hands come to the shoulders and the elbows reach forward.
Or the backs of the hands touch or the palms.
It's very normal for this to feel extremely or maybe even slightly different on one side versus the other.
It's also very typical for it to feel different each day.
Depending on what you've done throughout the week or the morning or the day before,
This can feel quite different.
If it's more into your neck,
You might just lower the chin and lift the elbows and adjust the arms just slightly.
Start to slowly release the arm with the next couple breaths,
Reaching the arms up.
Exhale,
Lower it down.
Let the arms just sway down in front of you.
Hands can shake out,
Face can shake out,
Arms release.
And then we'll make our way back up to a seat,
Coming to a little bit of a wrist stretch.
So we're going to interlace the hands.
And do what feels natural.
So as you bring the hands and let the fingers interlace,
Take a look at your hands and see which thumb is on top.
So what thumb is on top of the opposite thumb right now?
Just make note of that if you can.
Maybe it's your writing hand,
Your dominant hand.
We're going to press the heels of the hands away from the body so the thumbs are pointing down.
And you might be able to see here.
That where that thumb is or the hands are.
You can lift the arms a little higher.
Alright,
Lower.
And then start to scoop the hands back in,
Bend at the elbows,
Circle out the wrist here.
Release the hands and now interlace your hands again but with the opposite thumb on top.
So now you're going to interlace and this is probably going to feel a little awkward.
It does for me.
It's like the hands have changed size or something's missing.
It just feels a little weird.
So then you know you're on the right side,
You're on the opposite angle.
This time we're gonna reach the hands away with the thumbs up.
So now we're looking at our palms versus pressing our palms away from us.
Stretching a different part of our back body.
And you can push away as much as you want.
You could round your chin.
Maybe even let the arms reach up towards the sky.
Big inhale.
Deep,
Even bigger exhale.
Start to hug the hands back in,
Circling the wrist one more time.
Releasing the hands.
And from here,
Let's take the right ear down towards the right shoulder.
Be mindful that the whole body doesn't take that tip.
So the shoulders are staying over the hips and just the right ear goes a little towards the right shoulder.
From here,
You could extend.
The left arm out.
You could cross the arm over,
Similar to how we started.
And you might notice if you change where the eyes are going or the nose or the chin,
The stretch will change.
Maybe your right hand wants to be there as support,
Not to push down further,
But just to hold.
And support the head.
Good,
Now we're slowly going to release both hands and lower the chin towards the chest.
So taking this half roll,
Letting the chin slowly come to the chest.
And then over to the other side,
Left ear towards left shoulder.
You might have the left hand support the head.
You might extend the right arm or take the right hand to the leg.
And maybe observing where the eyes,
Chin,
And nose are.
How that changes the line of stretch.
Really working to activate around our vagus nerve here,
So from the ear.
Down the throat,
Working all the way into our gut eventually.
Lowering our levels of stress.
Balancing the nervous system.
Gently bringing the head back up.
Lowering the chin to the chest.
Little up and down movement.
And then if it's comfortable,
Taking the nose to draw little circles in front of you.
Evening everything out.
We'll end the practice today with an alternate nostril breathing practice.
So Nadi Shodhana is the pranayama name for this.
And the hands can come into a couple different positions.
So we'll take the hand,
I'm going to use the right hand.
You could use your dominant hand or whatever feels more comfortable.
So the thumb is going to close and seal off the right nostril.
We're going to inhale through the left nostril.
Feel the left nostril with the ring finger.
And then open the right nostril to exhale out the right side.
So I'll show this way.
Inhale now through the right nostril.
Feel the right nostril.
Exhale out the left side.
All the way out.
Inhale through the left.
Feel the left.
Exhale out the right.
All the way.
Taking a few more rounds of this,
You could bring your middle finger and index finger to the place between your eyebrows if that's comfortable for your hands.
You could switch hands if you need to.
So we're going to inhale again.
Steal the nostril,
Exhale out the opposite way.
Inhale this side.
Feel at the top,
Exhale out the opposite side.
Inhale here.
Seal the nostril,
Exhale out the opposite side.
Inhale here.
Seal,
Open the opposite side,
Exhale out.
Inhale in.
Feel and hold,
Release both nostrils and exhale fully.
Take a couple deep breaths here.
Eyes can stay soft or closed.
Inhaling naturally,
Feeling the abdomen,
The chest rise.
Exhale fully.
With these next few breaths,
You can let your whole body rest into your chair.
Into your support.
Letting the eyes close or the gaze soften.
Let the hands rest in any position they feel comfortable,
The shoulders down away from the ears.
Just scanning to notice how the brain feels right now.
Feeling this cleansing from the body.
Alternate nostril breathing.
This activation from the left and the right hemisphere of all the different movements and thought patterns.
And sending love to your brain.
For all the work that it does without us even knowing.
Without us even having to think about what's happening.
Scanning down through the body from the brain to the bones,
The bones of the face.
The neck,
The spine.
The shoulder and the arms.
Getting and sensing our ribs.
Bye.
10.
And all the little bones that make up our feet.
Sending love and gratitude to all the bones within our body.
Gratitude to our breath.
And as I bring hands to heart center,
If that's comfortable for you,
You might take one hand over the heart and the other to come on top.
With so much love and gratitude.
Thank you for taking time for this brain and bone health class.