Hi,
My name is Kathy and this is my second video in Simple Mandala Drawing.
Today I'm going to cover some options on how to fill in your mandala that you learned how to draw in my first video,
Simple Mandala Drawing.
All you will need today is your mandala that you've drawn and then some tools to color in the petals.
So perhaps your crayons,
Colored pencils,
Markers.
I'm using acrylic pens.
Any of those will work and I hope you enjoy this session and you end up with a beautiful mandala.
Okay,
So here is our mandala that we have drawn in a previous video.
And now I'm going to cover just a few ways that we could decorate this mandala.
Some options and we'll go from there.
So as I already mentioned,
I'm using some acrylic markers.
You could use crayons.
You could use colored pencils.
You could use gel pens.
You could also just use your black pen and do some of the designs.
Obviously coloring in with a black pen would be pretty complicated and it would take a long time.
But you absolutely could do that as well.
So one option to do is you could just color in each individual petal a certain color.
So I'm going to go with yellow in the middle and just do a solid.
Like if you wanted to solidly color in your petals,
That's a great start.
So we'll do I'm going to do my first row just coloring them in as well.
And then I'll show you some different options of things you can do.
One thing I like to do with the options and remind people is,
You know,
I'll show you these different options.
And then I really encourage you to listen to your intuition.
And what is your how does your intuition want to fill in your mandala and go with it?
Like what color does your mind say you want to use next?
What design does your mind say you want to use next?
And don't,
You know,
Audit it or just just go with it and see what happens at the end.
See what you come up with.
OK,
So one option we can do is we can do lines that follow along the outside of the line that we already drew.
So I'm using,
Again,
A different color here.
And I'm just going to come in and mimic that outside line.
I'm going to do that a couple of times.
Again,
Being mindful about our mind chatter and like that little one that I just drew was not not super great,
But it's OK.
It's all going to be beautiful when it gets done.
So there's one option.
With the lines,
Then another thing we can do with the lines is we can do lines and some dots in between.
So on this next one,
I'm going to do a line.
So I'm going to mimic the outside line and then I'm going to do a row of dots.
So just doing some little circles.
And then I'm going to do another.
Row on the inside.
So,
Again,
We're drawing or mimicking our outside line with a line.
We're creating some dots on the inside of that line.
And then we're drawing another line on the inside.
Like I already mentioned,
I'm just kind of intuitively whatever color comes to my mind next,
I'm just picking it up and just going with it.
OK,
So here's another option that we can do.
It's following along the same lines of what we've been doing,
But a little bit different.
So I'm going to draw an interior line again,
Mimicking that outside line.
Then I'm going to draw another line,
Leaving some space in between these two lines,
Because we're going to do a little design in between those two lines.
So we're going to draw two lines and then you can take whatever implementation,
Crayon,
Marker,
Whatever you're using.
And you can draw lines in between those two lines.
If you wanted to get really fancy here,
You could also maybe add some dots to the outside of this.
So,
Again,
We're drawing a line,
Mimicking the outside line.
Adding another line on the interior,
But leaving some space in between.
And then we are drawing lines in between those two lines.
And then if so desired,
Maybe adding some dots to the outside.
Optional,
Of course.
Oh,
I just had this thought and I'm going to do it.
And maybe adding a dot in the middle.
This is what I mean about following your intuition.
Sometimes when you're moving along and you're filling in your spaces and you might,
You know,
Your mind might say,
Do this.
I highly recommend you follow that.
Do it.
That's how new cool designs are made and thought of and implemented.
I see that I just made a mistake.
I went to the bigger leaf instead of the smaller leaf.
So that's okay.
I'm going to roll with it.
This is a perfect example of what to do when we make an error like that.
We're going to laugh about it.
We're going to carry on.
We're going to just go ahead and complete the row that we actually were working on.
And then I'm going to show you what I'm going to do to cover that mistake that I made.
Because it's okay.
These things happen.
Again,
This is just for fun and enjoyment.
We're not trying to create a museum piece here.
So just really allowing that mind shatter to not get the best of us.
Laugh it off when you make a mistake.
Okay.
So now,
Because I have filled in a pedal that I did not want to fill in with orange,
I'm going to choose a darker color and I'm going to do a solid fill in there.
So my next row is just going to be a solid fill in to cover up my mistake.
So again,
I just chose a color that I knew would overwrite the orange below.
For instance,
I would not want to choose,
Say,
Yellow or probably even red wouldn't do it.
So that's why I chose the nice dark purple.
I'm just going to go over that.
Easy peasy fixed.
Now,
Yes,
I can see a little bit of the orange below it and it's okay.
I usually,
I like to outline my edges.
This is just how I do it.
You please do it however feels best for you.
But then that way I can feel like I can just kind of come in here and quickly fill in my middle and not worry about going out of the lines.
One more to go.
Now,
Let's see,
I'm going to use kind of an aqua color on this next set of pedals.
I'm going to go back to the line design.
And just do all lines inward.
So when we get to these bigger pedals,
We can obviously draw more of our lines and it kind of ends up looking pretty cool,
I think.
So on this one in the middle,
We were only able to draw two lines because it was such a small pedal.
As I mentioned in the basic mandala drawing video,
If it is easier for you to be turning your mandala while you're doing this work,
Please do that.
I'm just not turning my mandala because then my camera will refocus and it makes things kind of hard to watch.
So I'm just drawing in the same spot.
But I do find it easier when I'm drawing my mandalas for myself and not for a video.
I turn my paper as I'm working on my mandala.
Okay,
So for our last spot here,
And we kind of went off the paper.
So again,
As you're filling in your mandala,
You can decide if you want to go off the paper or not.
I just went off the paper to show you that option.
So on this one,
Our design isn't going to stay.
We're going to have to implement a design and then decide,
You know,
It's on these two shorter ones.
It's not fully going to be there,
Which is fine.
So I'm going to do kind of like an oval or a long oval here in the middle.
Coming off the top of that smaller pedal.
I'm going to do some dots on the outside of that.
I did five dots on the side.
And then a top dot.
Which is only kind of partially there because of the cutoff.
And then for my five dots,
I'm going to draw some lines out to the edge.
My middle line,
As you can see,
Is a little bit longer.
And then these ones are shorter.
So here that is again on the side one,
Which we're going to be able to actually get a little bit more of the design on there.
So drawing an oval.
Coloring it in.
Drawing five circles on the side.
One circle on top.
And then drawing lines out from our dots.
So the middle dot of the five,
We're going to draw the longest line.
And then these two will be shorter.
And then the one at the bottom,
The shortest of all.
So middle dot,
The line is the longest.
The two surrounding that,
It's a little bit longer.
It's going to disappear kind of behind that one on that.
And then the top dots are shorter even still.
And then here we have our top,
Top dot.
And I'm just going to draw a line off the top of that as well.
So this one feels like there's not even as much space as there was on the other side.
That's okay.
Make my dots a little bit smaller to get my five dots in there.
And get my lines.
Longest from the middle.
The one surrounding it a little bit shorter.
And then the end one's the shortest of all.
And then again,
Our line's the middle dot.
The middle of the five has the longest lines.
The ones immediately surrounding it are a little bit longer.
And then the top one's,
Not the top,
Top one,
But the top and bottom one of your five dots have the shortest lines.
So essentially your lines are,
You know,
It looks like an arc.
And then our top dot,
We draw a big line up to the top.
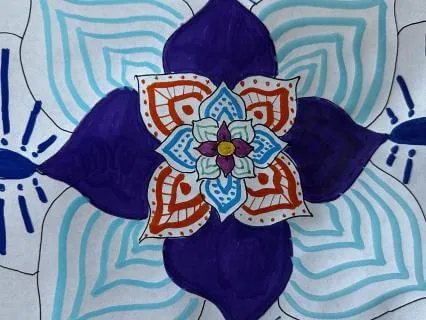
So there are some examples of how you can color in your mandala.
So just to recover those again,
You can do solid like I did here in the middle.
And on the first row of petals and also this row of petals.
Covering that I made a mistake and I used the solid to cover up that mistake.
Our second row of petals,
I used just lines.
I did two lines in each of those.
And I also did that same concept out here in the fourth row.
Where I did five lines inside of the original line.
On these two I did some variations of lines and dots.
I did two lines with dots in the middle on this row.
And on this row I did two lines mimicking the outside line with lines in between.
And then dots surrounding.
And then on this outside row I did an oval shaped diamond or just an oval.
With five dots on the outside and a dot on the top where it fit.
And then lines coming off of it.
Longer line in the middle.
Shorter lines as we come to the outside of the oval.
So I hope you have enjoyed this mandala coloring in video.
And I hope you go off to make many more mandalas.
I find this practice very relaxing.
I often draw a mandala a night just to kind of relax.
I can do it while I'm watching TV or just some music going.
And I really find being creative helps bring me back to a space of peace in my mind.
And I thank you for joining me.
And I hope you have a beautiful day.