So this is a gentle myofascial release practice.
Always remember to listen to your body and your breath and find variations as you need to.
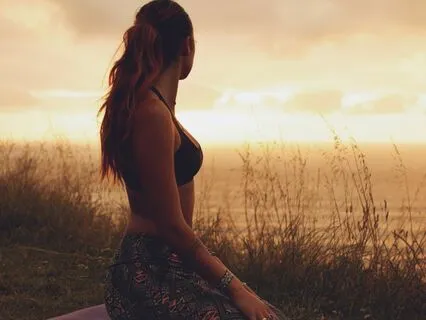
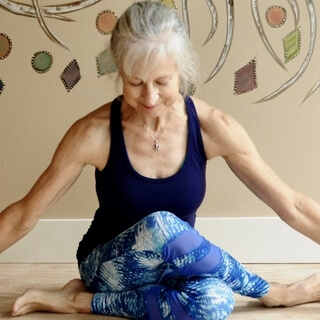
Come to a seat maybe on a blanket so your hips are up a little bit higher so that you can invite that nice tall spine.
You might close your eyes or find a soft point down in front of you for your gaze.
So in your comfortable seat,
Lengthen through your spine,
Soften your shoulders away from your ears,
Hands wherever they're comfortable for you,
And begin to tune in.
Notice your body,
Maybe areas you're feeling tightness or tension,
Even discomfort.
See if you can invite a sense of observing,
A sense of curiosity,
Just watching what you're experiencing like you're listening to the sensations you're feeling without trying to push anything away,
Without trying to change anything,
Just being fully present and noticing what you're feeling.
You might notice your feet and legs and where you're making contact with the mat or other support beneath you.
Notice your hips and invite your legs and hips to soften and be heavy,
Just letting your lower body sink into the support beneath you.
Maintain that nice tall spine and begin to notice your breath.
Maybe notice the quality of your breath.
Is it shallow or deep,
Smooth or choppy?
Where do you feel your breath?
Is it in your chest,
Your belly,
Or somewhere else?
And then gently begin to deepen your breath.
So you might soften your belly,
Maintain that nice tall spine,
Breathe in through your nose,
And then exhale through your nose.
Notice how long your inhale and exhale are,
And then see if you can extend your exhale two counts or even more,
Longer than your inhale.
So if your inhale is about four seconds,
See if your exhale can be about six seconds or perhaps eight.
You might even double the exhale,
As long as there's no strain in your breath.
Continue to breathe in this way,
Smooth breaths in and out through the nose,
With your exhale being longer than your inhale.
Extending your exhale to be longer can help not only calm your mind but also the whole body,
Accessing the parasympathetic nervous system.
A few more breaths like that,
In through the nose,
Out through the nose with a longer exhale.
And then on your next breath,
Take an inhale through your nose,
And exhale through the mouth like a soft sigh.
Let it go,
And then open your eyes if they were closed.
And on your next inhale,
Reach your arms out and up,
And exhale.
Bring your hands down to your heart.
Pause here,
And remember this is your practice.
Find variations as you need to.
Really honor how your body is feeling today.
On your next inhale,
Open your arms out to the side,
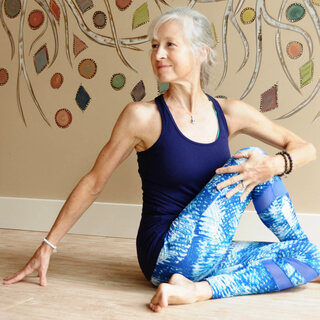
And lower your right hand down beside you.
Reach up through your left arm,
And as you exhale,
Side bend over to your right.
You might look up,
You might look straight ahead,
Or you might release your neck and look down.
Notice how this feels.
Inhale,
Come back up,
Lower your left hand down,
Reach up through your right arm,
And then side over to your left.
Choose your gaze.
You might notice if one side feels any different than the other.
On your next inhale,
Come back up and lower your hands down by your side.
If you need to switch out your leg position,
Feel free to do so.
So from here,
Sit up nice and tall,
Hands on either side of you.
Try to keep your shoulders level and still,
And as you inhale,
Lengthen through your spine,
And then exhale,
Slowly turn your head to your right,
And then bring your hand,
Your right hand,
Slightly in front of your nose.
Move your hand away so your fingers are pointing in the direction of your nose.
Remember that spot,
And notice how your neck feels.
Lower that hand down,
Inhale back to neutral,
And then exhale,
Turn your head to your left,
Bring your left hand slightly in front of your nose,
Move it away.
Remember that spot,
Lower your hand,
And inhale the head back to center.
So with that little assessment,
We're going to start to get into our neck.
So releasing some of that tightness and tension in the neck.
So we're going to begin with our hands as a tool.
So make a loose fist,
And we're going to use the knuckles of our right hand to start,
And bring those knuckles right up behind your right ear,
Right at that mastoid process,
That bony protrusion behind the ear.
If this feels awkward,
You can use your fingertips,
Lowering your elbow down,
So whatever feels best to you.
Relax your other arm,
And take about 15,
20,
25 seconds to slowly move your knuckles down the side of your neck.
So with some pressure,
Like massage pressure that feels okay to you,
Slowly begin to slide those knuckles down the side of your neck.
You might feel tenderness,
Tightness,
Little knots,
You might feel ropiness,
You might tip your head slightly away from the hand that you're using,
So your head's tipping towards the opposite shoulder,
If that feels comfortable.
When you get all the way down to the base of your neck,
Slowly release that hand and arm,
Shake it out,
Release any tension that might have built up in that arm and hand,
And we'll repeat.
So bring that right hand back up behind your right ear,
Keep that other arm and shoulder relaxed,
And again,
Take your time.
If you're going at a faster pace than I am,
See if you can do more repetitions.
Find the pace that works best for you,
15 seconds or more,
Even 30 seconds is great.
And then when you're done,
Slowly release,
Shake it out.
So we'll do one more on this side with a little variation.
I usually go a little faster on this last round because it's a little more awkward for my hand and arm,
But it's up to you.
So start in the same position,
Knuckles or fingertips right up behind your ear,
And as you slowly start to slide those knuckles down the side of your neck,
Begin to slowly turn your head in the opposite direction.
You might be looking slightly down,
So your knuckles should feel like you're going more into the back of your neck a little bit,
Not the front.
A little more into the upper trapezius muscles.
When you get all the way to the base of your neck,
Release,
Shake it out,
Look straight ahead and just notice the feeling between the difference of your left and right side of your neck.
And then we'll do the other side.
So bring your left hand up in a loose fist behind your left ear,
Relax your right arm.
With the pressure that feels best to you,
Slowly start to slide those knuckles down the side of your neck.
Notice how this side might be a little different than the other.
And again,
If your shoulder complains,
You can lower that elbow down and use your fingertips instead of your knuckles.
I find I can get a little bit better into the neck using the knuckles,
But listen to your body.
And again,
When you get all the way to the base of your neck,
Slowly release that arm and hand,
Shake it out and repeat.
Notice if this side feels a little more ropey.
Notice if you have certain tender spots.
So notice what you're feeling.
Going at your own pace all the way down side of the neck.
Try to avoid going to the front of your neck here and slowly release.
Shake it out and we'll do one more on this side with that variation.
So when you're ready,
Bring your knuckles or fingertips right up behind your left ear.
Starting to slide those knuckles down the side of your neck and then slowly turn your head in the opposite direction.
Going a little bit more towards the back of the neck here,
Getting into the upper trapezius.
So when you're done,
Shake it out.
Release tension and tightness.
So hands on either side of you,
Sit up nice and tall and slowly exhale,
Turn your head to your right.
Bring that right hand slightly in front of your nose,
Move it away so you know right where your nose is pointing.
And notice if you've gone further,
If your range of motion has improved.
Notice how your neck feels.
Inhale your head back to center and exhale,
Turn your head to your left.
Again bring your hand in front of your nose,
Moving your hand away so you know right where your nose is pointing.
And again on this side,
Notice if you've gone further.
Notice how your range of motion might have improved.
And then inhale back to center.
I always feel more like an owl after that.
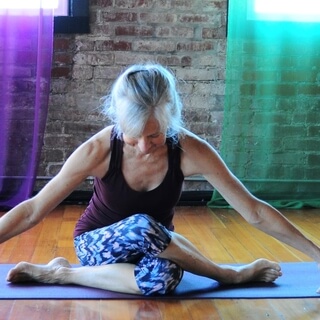
So let's come off of our seat.
We've been there long enough.
So just in a neutral table,
Knees are about hip distance apart,
Wrists about shoulder distance,
Maybe a little wider.
Lengthen through your spine and then arch into a cow.
Belly towards the mat,
Draw your heart forward and exhale.
Belly towards the spine,
Look to your knees for cat.
Moving with your breath,
Inhale cow,
Draw your heart forward,
Arching into your spine.
Exhale,
Draw your belly in,
Look to your knees for cat.
Breathe in and out through your nose.
And then come back to neutral.
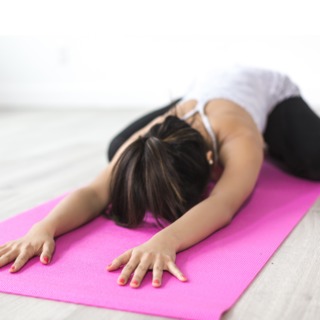
Come into puppy pose.
You may or may not need a block for your head.
If you don't have a block,
You can just do without.
Keep your hips over your knees and reach your hands forward,
Trying to keep your arms straight if shoulders will allow.
Taking your hips back slightly and your forehead to the mat or a block if you have it.
Engage your core as you take the hips back so that you're protecting the low back.
And notice how this feels in your upper back and shoulders.
Pressing actively into your hands.
So if you don't have a block,
Keep your neck neutral.
Don't let your head drop to the mat if it feels like the mat's too far away.
And then come back up.
So there's two options.
Downward dog is the first option.
Moving your fingers just slightly forward,
Maybe an inch forward.
Tuck your toes and reach your hips up and back.
So if down dog is not accessible to you,
Maybe you have wrist issues,
The other option is to come into a forward fold,
Maybe using blocks or a low stool or chair if you don't have blocks,
So that you can reach forward with your hands on blocks or another support and get into the upper back as well as the hamstrings.
If this is not feeling good in shoulders,
Just come into a regular forward fold,
Lengthening through your spine,
Keeping the weight into the balls of your feet.
So whatever you would like.
Forward fold with that option or a downward dog.
If you're in down dog,
Notice how close your heels are from your mat.
Lengthen through your spine,
Reaching your hips up and back.
Notice your hamstrings.
Notice your upper back and shoulders.
And then thoughtfully lower your knees down.
If you're in down dog,
Come back to your mat.
If you were in that forward fold.
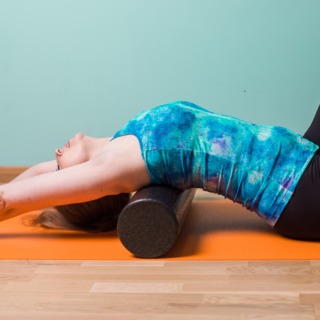
So we're going to get into the upper back and shoulders a little bit more and then we'll work our way down.
Let's start with the blanket.
You might need two blankets.
You can place one blanket near the top of your mat in case you need it for your head.
Take your other blanket and open it up.
You might just fold it in half long ways and then roll it so that it has some thickness to it.
So start to roll it from the folded edge so that you end up with a rolled blanket or towel something like this.
Maybe about the width of your hand as far as the diameter.
And then place that blanket about a foot and a half,
Like about a half a meter.
So the upper back is going to be on this blanket.
Shoulders and head will be on the mat.
If it feels like it's too much,
You'll move that blanket that you have positioned with it.
End of your mat under your head.
You'll sit in front of your blanket.
You might bring your forearms,
Elbows onto the blanket.
Should feel sort of like it's at your middle back.
Support your head with the hand and start to lower your head to the mat.
So once you get here,
If it feels like your head is going back a lot,
You'll reach for that blanket,
Lift your head,
And place the blanket under your head.
One other thing,
If you are prone to anxiety,
It'll probably be best to have that blanket or other towel under your head so that your head isn't going back too much.
Sometimes that can aggravate anxiety.
So supporting your head,
Making sure you feel comfortable.
Arms and shoulders are above the blankets and it should feel like you're getting a lift of your heart.
Shoulders may or may not touch the mat.
So find your variation and then straighten one leg and then the other.
Arms out where they're comfortable to you.
You can have them in goalpost arms or straight out.
And just begin to relax over this prop.
Initially it might feel like the upper back and shoulders are really tight.
And as you breathe here,
Just breathing in and out through your nose.
And occasionally if you would like to release or just feel the inclination to do those open mouth sighs of an exhale,
That can be really great to just aid in releasing tightness and tension.
Just relaxing the lower jaw and sighing it out.
And if you have tension in your jaw,
This is a really great way to start to release that as well.
So using those open mouth sighs of an exhale and think of your lower jaw just being heavy.
So as you sigh it out,
The lower jaw just relaxes and releases towards the earth.
And then inhale through your nose or your lips close again for your inhale and sigh it out.
If you prefer to just inhale and exhale through your nose,
That's totally fine.
Whatever you find to be the most relaxing.
Each exhale invite your shoulders to drip a little closer towards the earth.
Invite your back to relax and release a little more with each exhale,
Letting go into the support beneath you.
We'll be here for a few more breaths.
Just relaxing and releasing.
If you feel you're having any sense of holding or tension in certain areas of your body,
Breathe into those areas,
Encouraging those areas to start to relax and release.
Two more breaths and then bring your arms in a little closer.
Bend one knee and then the other.
Bring one hand behind your neck and then support your head as you lift your head.
Roll over to one side or the other and slowly press your way back up to a seat and pause.
Notice sensation.
Notice your upper back and shoulders.
Maybe any energy or other sensation that you might notice.
And then we'll set aside that rolled blanket.
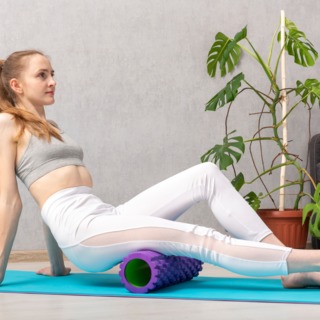
You may still want a blanket under your head and we'll use our tennis ball next.
So you can also have a blanket under your right arm for this one.
It's totally up to you if you want extra cushion under and support under your right arm.
We're going to start with the right upper trapezius.
So the ball is going to be just about in this area to the right of the spine above the shoulder blade and slightly below the top of your shoulder.
We're going to lay down first and then position the ball in that spot.
So knees bent,
Lay down onto your mat on your back.
Option a blanket under your head.
So keep your knees bent for this with the feet flat on your mat and then with whichever hand feels best to you,
Place that ball right on your upper trapezius on the right side.
So lift the right shoulder up,
Position the ball there and then you might lift your left upper back off the mat as well.
So shoulders aren't on the mat and the ball should feel like it's on soft tissue.
So it's to the right of your spine above your shoulder blade and below the top of your shoulder area.
So now you can find some movement.
You might keep your elbows on the mat.
You might have your right arm on a blanket for a little more support.
You might move that right arm slightly and notice how that feels.
You might move your shoulder a little bit up and down,
Left or right.
So we're moving slowly over the ball or you might just stay in one spot if that feels better and see if you can relax over the ball.
For me I find it's a little easier to find a little movement first.
This can be really sensational.
So we hold a lot of tension and tightness in our upper back and the upper trapezius.
So you might find trigger points,
Tender spots that even radiate sensation out into other parts of your body.
If you feel that happening,
Breathe into it.
If you're feeling too much pressure you can release as much pressure.
You're in control here.
To relieve some of the pressure you can lower your left shoulder back down to the mat and not have as much pressure on the ball.
If you want more you can just sort of push onto the ball.
So if you stay and focus in one area a little bit you're feeling a lot of sensation.
After a while it starts to dissipate.
Breathe into this area.
Send your breath.
Visualize your breath filling that area where you're feeling the most sensation and use those sighs of an exhale to help release.
Sometimes I like to keep my left elbow on the mat for support as I move my right arm and shoulder around.
Find what works for you.
So there's lots of variations here.
You might find a good spot and just try to relax over it.
Breathing into that area.
Encouraging your body to release the tightness,
The tension,
The stress that it's been holding on to.
And then you might explore positioning the ball just slightly.
Maybe a half an inch or a centimeter up or down,
Left or right.
Just coming into a slightly different area.
So less pressure if it feels like it's too much.
Just really honor what your body is telling you.
And again find some movement that feels good to you.
Breathe here.
Sort of like a self-massage here.
You can't get into all of the knots and release all the tension at once.
There's layers that we have to work into.
A little bit more on this side.
Adjust the ball again if you would like.
Find your variation.
Again you might pause and hold.
And then release.
Remove the ball.
Just hold it in one hand and pause.
Relax.
Notice difference between left and right.
Take the tennis ball in your left hand.
Lift your left shoulder up.
Place the tennis ball on your upper trapezius on the left side to the left of your spine above your shoulder blade on soft tissue.
So again a little movement.
Might keep your right elbow on the mat.
Lifting your right shoulder up off the mat.
Maybe moving your left arm a little bit.
Maybe lifting it up or down.
Or if you'd like to have an extra support under your left elbow you might have a blanket there and keep the elbow down as you move your lower arm.
And whatever movement feels good to you.
And notice how that shifts sensation over the ball.
Move slowly here exploring different movements with your left arm.
And again maybe moving your upper back and shoulders a little left to right.
Up or down.
Keep your hips on the mat.
If the tennis ball feels like it's moving out away from you,
You can keep your left fingertips there to sort of keep the ball in place.
And then adjust the ball a little bit if you would like.
Listen to your body.
And again if you find a good spot you might just breathe and relax over the ball.
Encouraging your body to release the tightness and tension that is no longer serving you.
Just let it go.
Find any movement over the ball that feels good to you.
This is your self-massage.
Breathe here.
Find the spots that feel good to you.
You might find areas of tightness and tension you didn't even know you had.
Again adjust the ball slightly.
Up or down.
Left or right.
Still staying on that soft tissue in the upper trapezius.
Just maybe find a little different area.
Different spot.
You might explore and find a new knot and breathe into it.
A little bit more on this side.
If you'd like to adjust the ball or just hold.
Find your variation and then remove the ball and relax.
Notice sensation.
Set the ball aside and thoughtfully roll over to one side and slowly press your way back up to a seat.
Notice sensation.
Notice the upper back and shoulders now.
Notice if there's any energy flow.
More openness.
Notice what you're feeling.
You might be feeling heat,
Tingles,
Greater circulation.
Just notice what you're feeling.
Then make your way back onto hands and knees.
Setting your blanket aside and come back into either your puppy pose or your downward dog.
Notice how your upper back and shoulders feel now.
If you're in down dog we haven't gotten into the legs yet.
We'll address that soon.
Notice upper back and shoulders.
You have a little bit more sense of openness.
Lower your knees if you were in down dog.
Hopefully that pose felt better than your initial pose.
So now we're going to get into the legs a little bit and then we'll work back up into the hips.
Using your rolled blanket and maybe blocks.
For this one if you don't have blocks you'll just use your hands.
They'll just be they're just sort of an extra.
We'll be using our blanket.
You might want to unroll it part way so that it's rolled just about halfway.
Come onto your knees and we're going to place this blanket behind our knee crease.
So the blanket that's unfolded is sort of over towards your feet.
Hold the blanket at the back of one of your knees so it sort of stays there.
Knees are about hip distance apart and then start to sit your hips back towards your heels.
So this compressing of the blanket between your thighs and calves is good for both the calves and the hamstrings.
Some of you might be able to sit up with your hands on your thighs.
That's a little much for me.
So if that's too much you can either just stay on your hands here or if you have blocks you can use the blocks like little arm rests.
So start where you're feeling some compression in the backs of your legs but it's not too much.
And as we hold here we'll work our way up a little bit.
So find where it's doable for you and let your hips be heavy.
So just the weight of your hips is increasing the pressure.
If this is too much on your calves you can unroll the blanket and position it slightly different and come forward with your hands or forearms on your mat or blocks and see if that's better.
Breathe here and after being here about 30 seconds or so you might feel you know it's getting a little bit easier and you might bring yourself up onto your hands if you were on your forearms and explore this position.
If you were already on your hands you might walk your hands closer towards the blanket.
You can stay on fingertips or if you have blocks you can use your blocks under your hands.
So gradually after about 15-20 seconds or so just see if you can inch your way up a little bit more.
If you come up too fast too soon you're like oh no just go back where it feels doable to you.
So with your hands on the blocks you can have a little more weight on your hands so you don't have your full weight of your hips compressing the blanket.
Find what works for you.
If you're able to just have your hands on your thighs with your shoulders over your hips that's great too.
We'll just listen to your body.
Breathe here and again if you want to go a little more maybe position your blocks behind the blanket so that you can bring your shoulders more up in line with your hips.
Again using your hands to still support you or you can just relax and have your whole weight onto the blanket.
It's a little much for me today so I'm just going to keep using my hands for support.
Encouraging those calves to begin to soften and release.
Breathe here.
Take a nice full inhale and a soft sigh of an exhale.
Let it go and then lift your hips up off the blanket.
Set your blocks aside.
Set that rolled blanket aside and come back into either your downward dog or your forward fold if you're not using a down dog.
Notice your legs and notice if your heels are closer to your mat.
If you're not doing down dog keep your spine long.
Hands either on blocks or the mat.
Weight over the balls of your feet and notice your hamstrings and your forward fold.
So choose whichever pose feels best to you and notice those hamstrings.
Notice if the calves feel a little bit better.
If you've gone a little further into the forward fold or if your down dog feels more comfortable maybe like a resting pose.
Maybe the heels are a little closer to the mat and then exhale lower your knees.
If you're in the forward fold thoughtfully make your way back onto your mat and then come onto your back and constructive rest again.
Option for a blanket under your head.
Bring your tennis ball.
Just pause here in constructive rest.
Invite your low back to relax and release.
Notice your hips.
So we're going to get into the hips and the glutes next.
So take the tennis ball and just sort of rock over slightly so that you can place the tennis ball under your right glute and straighten your right leg out on your mat.
Keep your left knee bent and make sure the tennis ball feels like it's right under the biggest part of your glute.
It should always feel like it's on soft tissue not bone.
You might bend your arm so that you can sort of use your elbows.
We're maneuvering a little bit or stability.
Option to lift that left hip up off the mat and take your left knee across your right thigh.
You might need to maneuver a little bit more over towards your right hip.
Lifting your left hip up a little more and then relax over the ball.
So again this might feel quite sensational.
If it's too much adjust back up.
Maybe not go as far with that left knee over the thigh.
So find what feels good to you and just keeping the ball in that one spot not trying to move over it here.
Just see if you can relax over the ball.
Breathe into the area you're feeling the most sensation in the right glute.
Soft open mouth size of an exhale.
Let it go.
See if you can relax and release over the ball.
One more breath here and then rock back off the ball.
Remove the ball.
Straighten both legs out on your mat and notice difference between left and right.
Does one hip feel higher or lower?
Does one leg seem higher or lower?
And then bend both knees again.
Sort of rock over to your right to lift the left hip up.
Place the tennis ball right under your left glute and then straighten your left leg out.
Again might need to adjust the ball slightly.
Making sure it feels like it's at the thickest part of your glute and then keeping your right knee bent with your right foot on the mat.
Start to take that right knee slightly over your left thigh and you might sort of lift up a little bit and move the ball slightly out towards the outer left hip or roll more towards that left hip.
Whatever feels best to you.
You're getting a little more intensity over the ball.
The ball should feel like it's sort of at the thickest part of your left glute slightly over to the left.
It should feel like it's getting into maybe some sensitive areas but it shouldn't be like a sharp sensation.
Breathe here.
Relax the arms if you'd like or you can keep them bent.
Whatever feels best to you.
Inhale through the nose.
Exhale through the mouth.
Inviting your hips to be heavy.
Releasing and relaxing as much as you can over the ball and then rock back off the ball.
Remove the ball and straighten both legs out on your mat.
Hopefully they both feel about the same now and it's time to come into Shavasana.
So make sure you feel comfortable,
Warm enough,
Cool enough,
Whatever you need here.
Maybe placing a blanket under your head.
Maybe a blanket over your hips or covering up with a blanket to stay warm.
Invite your whole body to be relaxed and soft.
Letting your legs be heavy and soft.
Notice your hips and let your hips relax and release.
Envision space between each vertebrae and invite your whole back to relax and release.
Soften your shoulders and arms.
Soften your belly.
Soften the area around your heart and let your head be heavy.
Relax and release your jaw and soften all the muscles in your face especially around your eyes and let go.
Thank you.
Namaste.