Hi everyone,
Caitlin Rose-Kenny here.
I have a very short sesh for you today that is a great thing to put into your daily mix.
So I highly recommend that everybody,
Including myself,
Do this every single morning.
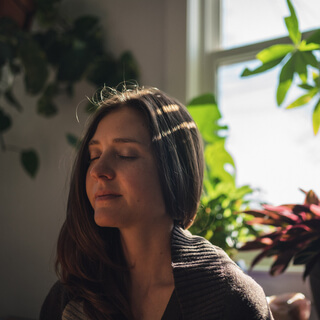
This could be a preparation before you sit and do seated meditation,
Or it could be a routine that you do before your morning yoga or your morning fitness,
Or it could be something that you do every morning,
Even if you're just going to work.
This is going to help you feel a lot better in your body throughout the day.
So this is called a joint release series,
And the one we're doing today is going to sequentially work up from your feet all the way up to your head.
And the idea with a joint release sequence is that you are moving your joints in all of the ranges of natural motion that they can go in.
So we'll begin,
And you'll see how it goes.
And then eventually,
After doing this a few times,
You might be able to do it without the recording and implement it into your daily practice.
We're going to start off standing.
Go ahead and bring your feet about hip width.
We'll start by rolling out the right ankle and maybe getting some cracks in the toes and things like that.
So you'll roll the ball of your foot over the floor and move your ankle in as many directions as you can,
Lifting your heel up and down a few times,
Rolling to the inside of your foot to the outside of your foot.
And then to make sure that we stretch the top of the ankle,
Bend both knees and flip your right foot back behind you.
So the top of your foot is behind you,
And press the top of your foot into the earth.
You can play with bending your knees more versus straightening your leg more.
And then release that foot,
And we'll switch sides.
Start to roll out your left ankle.
Lift the heel up and down.
Maybe you get a crack in a toe knuckle,
Which is totally okay.
And the beauty of a joint release series is that it helps us lose or get rid of the stiffness that builds in us when we go to sleep at night.
There's a really great anatomist resource named Gil Hedley,
And he has something called the fuzz speech.
And in the fuzz speech,
He explains how every night that we go to bed,
We build a layer of this so-called fuzz between the structures of our tissues.
I'll continue with that thought,
But make sure you come to the top of your left foot,
Point your toes back,
See what it's like to bend your knees versus straighten your knees here.
So back to Gil Hedley and his fuzz speech.
He'll say in a much more funny and eloquent way why it's important to move your body and move your body in its natural ranges of motion every single day.
If you don't mind a little bit of graphic imagery with cadavers,
Then Google search Gil Hedley's fuzz speech,
And this joint release series will make even more sense.
Come to standing on your feet and shift the weight into your left foot.
Lift your right knee up to your chest.
You'll start with your knee at a 90 degree angle and then kick your right foot forward and swing it back.
So kicking forward and backward,
Moving your knee in its natural range of motion,
Which is a hinge motion.
Knees and elbows are pretty simple.
They just go in this hinge direction.
They don't roll around in as many directions as say your ankle or your hip would.
Try to relax your foot as you swing your foot forwards and backwards.
Standing the natural range of motion of your knee joint.
And we'll switch sides.
Stand on your right leg now.
Lift your left knee to your chest and kick your left foot forward.
Remain as relaxed as you can through your left leg as you swing your heel forwards and backwards.
A bonus to a lot of this standing joint release series is that the standing leg gets awakened with a little bit of muscular engagement to keep you steady and balanced on your foot.
Release that side.
And from here I'm going to suggest that if you have a block,
You use it.
But if you don't have a block,
No worries.
If you've got a block,
You're going to stand up on your block.
So let's stand on the left foot first and let your right leg hang down.
If you don't have a block,
You're standing on your left leg.
Then you're going to swing your right foot forwards and backwards like a pendulum.
And your hip can go in more than just these two directions,
Forwards and backwards.
You can also bring your knee open to the side.
So let's try swinging the right leg forward,
Out to the side to the back and do that again.
If you're familiar with ballet,
This is like a really sloppy rond de jambe.
Just swinging your leg forward and backward.
Remember to be loose in the joints of your right leg,
Loose in the muscles.
And then you might start to bring your right knee up.
So moves out to the side and up.
It can go backside front in that rond de jambe fashion.
Start to move more spontaneously so that you're exploring your full range of motion in the hip.
Everything that's possible between the socket of your right hip and the ball of your right femur bone.
Now we'll switch sides.
You'll either stand on your right foot on the earth or you'll stand on your right foot on the block.
If you're on the block,
Drop your left leg down from the hip socket.
That feels kind of nice as the femur bone gets some space that isn't usually there when you're standing and compressing that joint.
Start to swing your left leg forwards and backwards.
After a few swings forward and backwards,
Go front,
Side,
Back.
Front,
Side,
Back.
And it's okay if your arms are swinging or if you're wobbling a little bit on your standing leg.
This really isn't about finding control.
It's more about just exploring range of natural motion.
Go backside front.
Do a couple of knee lifts where you pull your left knee up towards your rib cage and towards your armpit out to the side.
Keep swinging and doing your best to relax the joint.
You can slow down your movement.
If you're on your block,
Step off the block.
Set it out of your way.
Sit on your feet with your feet a little bit wider than your hips.
Put your hands on your hips for um-mies,
Which are big hip circles.
You'll move your hips forward in space and then to the right and to the back and to the left.
And your torso and your head just go along for the ride.
So you can keep moving your hips in big circles.
If there's a spot where it feels particularly good to stay,
Why not take a couple of breaths there.
You can also reverse through a spot that feels like it needs just a little bit more attention to unwind.
And now go in the opposite direction.
So it would be front,
Left,
Back,
Right.
You might notice with your hands on your hips how your frontal hip bones can tilt forward.
Like if your hips were a bowl of water,
You'd spill the water forward.
That's an anterior tilt.
And how the frontal hip bones can also lift up and turn a little bit back,
Tucking your tail under.
And that's a posterior tilt.
So as you take these um-mies,
Make sure that you feel both of those tilts at some point.
We'll slow down the um-mies or the nice hula moves and move upwards towards the spine.
So to start with the spine,
We will have seven directions of the spine complete after this joint release series.
And we're going to start with the front to back motions.
Go ahead and bring your arms into goalposts or cactus arms as some teachers call it.
And on your inhale breath,
You're going to open your elbows wide,
Stretch your pecs,
And arch your back like a standing cow pose.
You can stick your butt out here and soften your knees a little bit.
Then on your exhale,
Standing cat pose,
Tuck your tail under,
Draw your chin to your chest,
Sweep your arms forward in front of you,
And imagine that you're wrapping your arms around a tree trunk.
On your inhale,
Open back up,
Bend your elbows,
Pull your elbows back,
Arch your spine.
And on your exhale,
Tuck your tail,
Tuck your chin,
Wrap your hands around the imaginary tree.
Again,
Move your rib cage forward in space to stretch your chest and your belly.
And then exhale,
Pull your lowest ribs back,
Round your upper back.
Two more times,
Inhale,
Lift your heart a little bit here,
Squeeze shoulder blades.
Exhale round,
Spread your shoulder blades.
Inhale,
Open up,
Exhale,
Round your back.
Inhale to release.
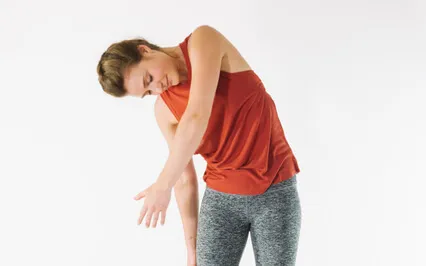
So now we'll move on to side bending in the spine.
And this helps us get into the shoulders too,
Which is great.
Side bending,
You'll sweep your right hand up and over your head,
And then reach over to your left,
Push your hips to the right.
From here,
Look down at the earth,
Roll your chin onto your chest,
And roll your right arm down in front of you until it releases by your side.
Then lift your head back up.
Inhale,
Sweep your left arm up overhead,
Spread your fingers,
Reach over to the right,
Push your hips to the left.
Turn your gaze down,
Roll your chin towards your chest,
And roll your arm down by your side.
Again,
Inhale,
Right hand reaches up,
Spread your fingers,
Get taller.
Exhale,
Side bend,
Roll your chin down,
And release.
Inhale,
Left hand reaches up.
Exhale,
Side bend,
Chin to chest,
Arm releases.
Once more each side,
Inhale,
Sweep your right hand up and over,
Side bend as you exhale.
Inhale,
Left hand sweeps,
Push your hips to the left,
And roll out of it.
Lift your chin back up so you're more in a neutral spine,
And we'll continue with the movements of the spine.
We're going to go into twist right and twist left.
This one has a little bit of breath work with it.
It's not technically a pranayama,
Although it does resemble the Kapalabhati breath that you see in a lot of hot yoga classes where they're exhaling through the mouth.
So I'm going to describe it for you,
And then I'll do a little demo of what it sounds like for you.
To get prepped,
You're going to have your feet hip width.
Take your hands up in front of your shoulders,
Make light fists.
Your elbows will be pointing out to the side,
So you kind of look like you've got chicken wings that are lifting up here.
And then from here,
You'll twist pretty quickly to the right and then to the left,
Spinning around the central axis of your spine.
And the breath sounds like this.
It's exhale,
Focus.
So I'm going to go,
Shoo,
Shoo,
Shoo,
Shoo.
And what I'm thinking about is exhale right,
Exhale left,
Exhale right,
Exhale left.
The inhale happens naturally at center.
You don't need to think about it.
And I do recommend that your breath is audible,
Making that shoo sound.
It just kind of motivates you and makes it a little bit more fun.
So I'll be doing it with you.
Bring the hands up,
Hovering in front of the shoulders,
Elbows wide to the sides,
And begin.
Three more each side.
And release.
You can kind of feel a wave moving through your body as you slow down.
A little bit of wooziness and a little bit of tingling would be normal.
That one wakes up a lot of the prana inside of you or the chi,
The energy that animates you,
Which is why you might feel a little invigorated after that one.
Now the seventh and final direction of your spine is called axial extension.
And all that means is that you're lengthening your spine from the top to the bottom.
And here's how we do it.
Go ahead and stand with your feet hip width,
Bend your knees,
Push your feet into the earth and start to straighten through your legs.
Draw your tailbone down by lifting your low belly up and reach up through the crown of your head.
Try closing your eyes.
Visualize your spine lengthening so that one vertebra lifts off of the other,
Defying gravity.
And this lifting of your spinal column allows for the discs between each vertebra to expand,
To become a little bit more spongy,
Cushiony,
So that you have spinal health and spinal comfort.
Take another breath.
Reach up through your crown,
Soften down through your shoulders.
And then on an exhale,
You can release your effort and stand more normally.
Moving into the elbows and the hands more,
Reach your hands out in front of you,
Palms face up,
Spread your fingers.
And then on an exhale,
Bend your elbows,
Turn your hands into fists as you pull your fingers towards your shoulders.
Inhale,
Re-extend your elbows,
Spread your fingers,
Palms face the sky.
Inhale imaginary bicep curl,
Bend your elbows,
Turn your hands into fists.
Repeat a few times.
Open your hands,
Extend your elbows,
And bend your elbows,
Squeeze your hands into a fist.
Your elbows are similar to your knees in that they only hinge in these two directions.
Now we'll get into the wrists and the fingers a bit more.
Interlace your fingers and start to roll out your wrists,
Side to side,
Front to back.
And then stop rolling out your wrists and push your palms forward,
So you're spreading the base of your palms.
Push your hands out in front of you,
Straighten through your elbows.
And then on an inhale,
Reach your hands up to the sky,
Bring your biceps by your ears.
And on your exhale,
Relax your arms down by your sides.
Interlace your hands again and this time put your awkward index finger on top.
Push your palms forward,
Straighten through your elbows.
Keep your shoulders softening down from your ears as you push out through your hands.
On an inhale,
Sweep your hands overhead,
Biceps by ears.
And exhale,
Arms down by your sides.
Take a shoulder shrug,
Draw your shoulders up,
Back,
And down.
Moving more into the shoulders,
We already did a little bit of shoulder movement with those side bends.
We'll get more into the shoulders,
Which are very similar to your hips in that they're a ball and socket joint and have a lot of range of motion.
So let's start with a mock swimming stroke,
The freestyle stroke.
You'll sweep your right hand back,
Up,
And forward,
And then go over to the left side.
Left hand goes back,
Up,
And forward.
And you'll keep going,
Letting your arms move fluidly but slowly.
So that is important,
Moving a little bit more slowly,
Even in joint release,
So that you can feel more and discover more.
And then we'll do the backward stroke.
So sweep one hand up,
Back,
And around.
And alternate sides.
Make sure that you spend time reaching backwards so that you feel a stretch in your chest,
Your pecs.
Every time you sweep a hand around,
Imagine that you're drawing a circumference of a circle,
And you want to draw the biggest circle possible.
So really reach out through your fingers.
And then you'll slow it down to release this movement.
The last part of this joint release series will focus on the neck.
Start by dropping your chin down onto your chest.
Release through the back of your neck.
And then slowly lift your head up and start to lean it backwards.
Look at the sky.
And you might want to put a hand underneath the base of your skull to support your head as you drop your head backwards.
Inhale,
You'll lift your head back up to neutral,
And exhale,
You'll drop your chin to your chest.
Going through this nice and slow and smooth,
So there's no sticky or staccato type movement.
Bring your head back to neutral.
We'll do a couple more ranges of motion in your neck.
Turn your head to the right.
Bring your chin through center and turn your head to the left.
And that's all.
Just slowly moving back and forth.
See if you can turn your head a little bit farther each time you visit a direction.
You might notice that your head turns more easily in one direction than another.
Bring your head back to neutral after you've evened out your side.
Last bit called a tick-tock,
You're going to drop left ear towards left shoulder so the right side of your neck gently stretches.
And then bring your head up through center and drop right ear towards right shoulder.
Just moving gently back and forth from side to side.
The good news about this neck release series is that it helps you stretch some muscles that might have a lot of chronic tension.
It also can awaken smaller muscles that have become less active because you have big muscles that like to do all the work.
So this is hopefully going to help your neck even out its functionality and disperse its energy across several muscles rather than letting the same ones always activate and overcompensate.
You can stop your tick-tocks once you've evened out each side.
To bring this practice to a close,
We'll take a few deep full body breaths.
Stand with your feet hip width.
Place your hands on your low belly so that your thumbs are touching right around your navel and your fingers are pointing down towards your pubic bone.
Ground your feet and extend up through the crown of your head.
Close your eyes down and start to deepen your breathing so that your inhale expands your lower belly underneath your hands.
On your exhale,
Soften your shoulders,
Your neck,
The features of your face.
Inhale,
Feel every cell in your body expanding,
Your skin reaching out into the air around you.
And exhale,
Find more softness.
One more deep full body breath.
And slip your hands to heart center,
Palms together.
Bow your head slightly.
The light in me honors the light in you.
Namaste.