Welcome to Yin Yoga with Planet and Peace of Mind by the Athenaeum Collection.
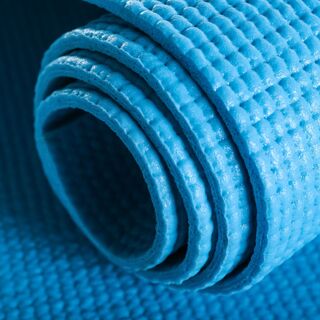
For today's class you will need a bolster or pillows that you can use for support.
We will begin today's class in a seated position.
So let's take a moment to come to an easy seat.
We can sit in cross-leg position.
The hands can be resting in the lap,
Palms facing up or palms facing down.
Find a tall straight spine and slowly begin to inhale deeply,
Exhaling slowly.
Inhaling deeply and exhaling slowly.
We will remain in this pose for a few moments as we center our attention on today's practice.
Take a moment to set an intention.
Once you've set your intention,
Gently allow your breath to return to its natural rhythm.
Take a moment to ensure that the spine is straight,
The shoulders are back,
Drawn away from the ears.
Allowing every inhale to create length and space and every exhale to release tension.
You can switch the cross of the feet if necessary,
If that's more comfortable.
Then realign the spine,
Reconnect to a natural breath.
Slowly begin to mentally prepare to move into our next pose,
Which will be a supported fish pose.
For this pose you will want your bolster or your pillow or even a folded up blanket.
You will place this pillow lengthwise beneath your shoulders so that your head can rest onto the floor gently and the pillow or bolster will support your shoulders directly.
The legs are extended out straight.
The arms can be relaxed on either side of the torso and as you inhale,
Create space through the opening of the chest and as you exhale,
Settle into your bolster a little deeper.
Allow this bolster or pillow to support the full weight of your shoulders and back.
The head is just barely gently resting on the mat.
You will hold this pose for a few moments.
Continue breathing in a natural relaxed rhythm,
Continuing to breathe naturally,
Allowing every inhale to create space and expansion through the chest.
In every exhale,
Letting go,
Releasing deeper into the bolster or the pillow,
Finding relaxation and tension release.
Mentally preparing to move into our next pose,
Go ahead and open the eyes if they were closed.
You can place weight into the elbows,
So lifting off your bolster,
Holding yourself now with your elbows,
Lift your head gently from the mat and come to a seated position.
You can either roll on your side as fetal pose to come to seated upright or if you're able to lift yourself through your elbows to come to a seated pose,
You may do that.
Remove the bolster from behind your back and then when you're ready,
Lie back down on the mat.
We will be coming into half stirrup or half happy baby.
You can have the right leg extended out straight or you can connect the sole of the foot and bend the right knee,
Placing your pillow or bolster under the right knee for extra support.
Your left foot will be raised towards the ceiling and then bend through the knee as you reach with your left fingers to hold the left big toe.
So take a moment to find your comfortable half stirrup or half happy baby,
Whether you're using a bolster or not.
And then once you have found your comfortable place,
Take a deep inhale and exhale.
We will hold this pose for a few moments and slowly mentally preparing to switch sides.
You can release the hold of the toe,
Gently lower the left leg down to meet the right,
Taking a moment to adjust your bolster or pillow if you're using one so that it can now support the left knee.
And then when you're ready,
Inhale the right leg up and bend through the knee as you exhale,
Reaching with the right fingers to wrap around the right big toe,
Coming into half stirrup or happy baby on the right side.
We will hold this pose for a few moments,
So take a minute here and get yourself into a comfortable modification of this pose and then begin to breathe naturally,
Settling into relaxation.
And mentally preparing to come into our next pose,
We'll be transitioning into a one knee twist.
So as you open your eyes,
You can begin to release the right foot from the right hand,
Allow it to come down and meet the left leg.
You can remove the bolster or pillow,
But keep it nearby and allow the legs to stretch out in front of you.
You can even reach the hands overhead,
Taking a full body stretch.
Inhaling and exhaling deeply.
Returning back to a neutral position,
You can draw the right knee in towards the chest and gently twist it or cross it over the body,
Over the left leg.
The shoulders will remain firmly planted into the mat,
So if one of your shoulders,
Your right shoulder,
Begins to lift off the mat in the twist,
Simply back off of the twist.
I invite you to take your bolster and place it under your right knee that is across your body.
This will decrease the space between your knee and the floor,
Allowing for you to still gain access to this nice releasing twist,
But it will reduce the intensity that you may feel in the stretch.
The arms are outstretched into a T-shape and the gaze can be extended over the right fingertips or you may close your eyes.
We will hold this pose for four minutes.
So gently breathe into this gentle twist,
Finding full support if you are using the bolster or pillow under the right knee.
Gently preparing to transition to the opposite side for this twist,
You can slowly flutter the eyes open.
Begin to draw the right knee back across the body.
You can use the hands to guide you if you need to and extend the right leg out straight.
Be sure to switch sides of the bolsters resting on,
So we will bring the bolster now to the right side of the body.
Now preparing to come back into our twist on the opposite side.
As you inhale,
You can draw the left knee close to the chest and then cross it gently over the body towards the right,
Where you can come to rest it on your bolster or pillow.
The arms are outstretched in a T-position and the gaze is gentle over the left fingertips.
The eyes can be closed or opened.
We will hold this pose for four minutes.
Maintain a natural rhythm of the breath,
Settling deeper into the bolster with each exhale.
Slowly beginning to prepare to transition to our next pose,
You can blink the eyes open,
Return the head to a neutral position.
Gently untwist or unbind the knee,
So drawing the left leg back across the body.
You can use the hands to help support the left leg.
Extend the left leg out straight.
You can take both knees and draw them into the chest for a moment.
Give yourself a big hug.
Exhaling,
You can release the legs.
Coming into a fetal pose,
You can walk yourself up to a seated position.
Our next pose will be a neck stretch from a kneeling position.
So come on to a kneeling position.
You may want to put a small blanket under the knees or something soft to cushion the knees in this pose.
Then we'll come to an upright kneeling position.
For the next stretch,
We will reach the right arm behind the back.
The right fingers will reach for the inside of the left bicep behind the back.
Then as you inhale,
Create a tall straight spine,
And as you exhale,
Slowly tilt the head towards the right.
The right fingers are aiming to hold the left bicep behind the back.
If they do not reach comfortably,
That is okay.
Simply keep the right hand on the small of the back.
We'll hold this pose for just a few moments.
On your next inhale,
Gently bring the head and the neck back into a neutral centered position.
You can gently release the right hand from the small of the back,
Rising the arm up overhead.
As you exhale,
Release the arms back down.
Preparing to shift sides,
You can inhale,
Sweep both hands up overhead,
And exhale.
Allow the arms to come back,
The left arm this time reaching across the small of the back.
If the left fingertips can reach the inside of the right bicep,
Place them there,
Holding the right arm in place.
If not,
You can just gently rest the left arm on the small of the back.
And when you're ready,
Inhale,
Creating a tall straight spine,
And then slowly exhale.
As you inhale again,
Find a tall straight spine.
This time,
As you exhale,
Gently tilt the head towards the right,
Finding a stretch in the neck on the left.
We'll hold this pose for just a few moments.
Remaining in this next stretch,
Continuing to breathe naturally.
Continue breathing in a natural pace,
Finding release and stretch through the neck.
Mentally preparing to transition to our next pose,
You can inhale and bring the head upright to a centered position.
Release the left arm from the lower back,
Bringing the left arm out to a T-shape and up overhead.
As you exhale,
Release the left arm back down to the side of the body.
Inhale,
Both hands up overhead.
Exhale and release.
Come down to a seat on the mat.
We will be coming into supported butterfly pose.
You have two options for supported butterfly.
If you have two bolsters or two pillows,
You could even use two rolled up blankets.
You can put them underneath either knee for supported butterfly.
You can also place the bolsters or pillows on top of your feet for a supported forward fold in your butterfly pose.
So play around for a few moments here,
Figuring out which form of supported butterfly feels best.
Support under the knees or support under your forward fold.
And once you have decided on which modification of this pose works best for your body,
Go ahead and settle into the pose.
So the soles of the feet should be drawn together,
The knees bent,
Either resting on the bolsters or drawing down towards the floor.
Find a tall,
Straight spine.
If your knees are supported by bolsters,
The hands can be wrapped around the big toes or around the feet or simply lying in the lap.
Inhale and forward fold.
If you are supporting your forward fold with the bolsters,
Again the soles of the feet should be connected,
The knees bending,
The heels drawn in towards the core.
The bolsters or pillows will be seated on top of the feet or just in front of the feet.
And when you're ready,
You can inhale,
Creating a tall,
Straight spine.
Exhale,
Hinging at the hips until it is a comfortable tension.
And then gently exhaling and forward folding,
Eventually rounding out through the shoulders so that your full weight is supported by the bolster or pillow in front of you.
So coming into either version of our supported butterfly pose.
Settle in,
Getting comfortable,
Allowing the breath to return to its natural rhythm.
We will hold this pose for about five minutes,
Allowing every inhale to create length and space through the spine,
Opening through the back,
Release through the hips as you exhale,
Melting deeper into your support.
Slowly fluttering the eyes open if they were closed,
Preparing to transition into our next pose,
Which will be supported half frog.
So using the hands,
Gently bring yourself to an upright position.
You can move the bolster or pillow off to the side.
Gently draw the knees close together,
Plant the soles of the feet into the mat,
And give yourself a hug.
Keeping your bolster or pillow nearby,
We will begin to transition for half frog.
Come to a prone position,
Lying on the belly on the mat.
Extend the right knee up and to the side,
Coming into half frog.
The arms can be outstretched in front of the body.
The head can be resting on the thumbs of the fingers for support.
So placing the forehead against the thumbs,
The arms pressing into the mat,
And the right knee drawn up and to the side.
You can place a bolster under your bent right knee so that it has support.
This can make the pose a little more comfortable and decrease the intensity of the stretch.
The hips should remain facing forward,
Connected to the mat.
The torso,
The hip and the knee creating a right angle,
A 90-degree bend in the hip.
Placing the bolster or the mat under for support.
We'll remain here for four minutes.
Allow the breath to be natural.
Allow each inhale to create length and space through the body.
And as you exhale,
Relax and press deeper into your bolster or pillow.
Experience the tension release of each breath.
Slowly preparing to switch sides,
You can remove the bolster from under the leg.
Stretch both legs out straight.
Stretch the arms out overhead.
Just take a moment to give a full body stretch.
Then we will transition to the opposite side.
So put the bolster on the opposite side,
Coming under the left leg.
As you inhale,
Draw the left knee towards the left elbow,
Creating your half frog pose.
Put the bolster in place if you would like to use a bolster.
And then again,
The forehead can come to rest on the thumbs as the arms are connecting into the mat.
Take a moment to get comfortable in this half frog pose.
We'll remain here for a few moments.
Connect into your natural rhythm of breathing,
Finding space and expansion with each inhale and finding tension release,
Relaxation and grounding through each exhale.
Connect into the bolster,
Connect into the mat.
Feel the support of the earth.
Slowly preparing to come into our next pose.
You can gently straighten the legs,
Remove the bolster or pillow from under the left knee.
Allow the arms to out overhead.
Take a moment to take a full body stretch and then come into fetal pose,
Keeping the bolster nearby.
When you're ready,
Move from fetal pose into lying on your back,
Coming into a supine position.
We will do supported legs up the wall.
If you have a wall nearby that you can rest your legs on,
You can move to that location or you can simply place a bolster under your hips and extend your legs towards the sky,
Soles facing up towards the ceiling.
Once you are situated with the bolster under your hips,
Legs in the air,
Soles of the feet pointed towards the ceiling,
We will hold this pose for a few moments.
Breathe deeply and allow the bolster to support your hips,
Feeling your spine grounding and connecting into the mat.
The hands can be out to the sides,
Palms facing up or palms facing down for grounding and security.
Allow the breath to remain natural.
You may close the eyes if that feels comfortable.
Gently,
Slowly releasing the legs,
Allowing the soles of the feet to come down,
Connecting to the mat.
You can remove the bolster from under the hips if you'd like and place it under the knees,
Preparing to come into a savasana pose.
So extend the legs out straight from the body,
And then come into a bolster under the knees,
Resting for support,
The spine connecting to the mat,
Grounding you to the earth.
The arms can be extended out to the sides.
The palms may be facing up or pressing the palms down into the mat for grounding.
Take a moment to close the eyes.
Allow the breath to be natural,
Finding relaxation,
Grounding and support through savasana.
Slowly begin to wiggle through the fingers and toes,
Flutter the eyes open,
And remove the pillow from beneath the knees when you're ready.
Gently coming into a fetal pose on the right side of your body,
And slowly using the hands to work your way up to a tall seated position.
Finding a tall straight spine in your seat,
Sitting up straight,
Legs crossed,
Inhaling deeply,
Sweeping the arms up overhead,
Exhaling,
Lowering the hands,
Connecting them down to the mat.
Inhale,
Sweeping the hands up overhead.
Exhale,
Slowly lowering the arms,
Hands down to connect to the mat.
Hands pressing into the mat.
Inhale,
Rising the shoulders towards the ears once.
Hold the breath for a moment.
Exhale,
Lower the shoulders down.
One more time,
Inhaling the shoulders up towards the ears.
Pause,
Hold the breath.
Exhale,
Release the shoulders.
Inhale,
Sweep the arms overhead one more time.
As you exhale,
Slowly put the palms together for prayer,
Drawing the hands down towards the heart center.
Inhaling once more,
Pausing and holding the breath,
And exhale.
The eyes are closed,
Flutter the eyes open.
Inhaling and exhaling.
Thank you for joining me for this yin yoga practice.
This practice is now complete.